 |
| 'The Drama Unfolds' 9x12 pastel ©Karen Margulis available on etsy $160 |
I don't think I will be making pastels from scratch though. There are too many wonderful pastels available to purchase. But I will no longer be reluctant to reconstitute broken pastels or to make new pastels of the bits and pieces that I have saved over the years. Read on for easy instructions.
 |
| my not so pretty pastels |
Don't throw away your bits and pieces!
When your favorite pastels get down to tiny nibs or if you drop and shatter a pastel don't be so quick to throw the pieces away. I have several jars devoted to color families. When I have a tiny piece of pastel I put it into the appropriate jar. This way I can reconstitute pastels that are a recognizable color rather than combining too many colors which will make gray.
Making pastels from broken or bits of small pastels in three easy steps
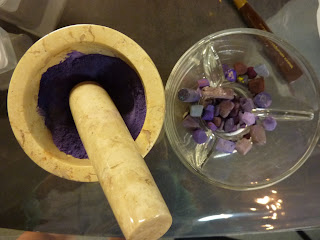
STEP ONE: Gather your supplies. You need distilled water and a bowl and tool to crush the pastels. A mortar and pestle work well. I got mine at TJ Maxx. You also need a palette knife and a covered surface. I used a piece of plastic to cover my table. Choose the pastels you want to reconstitute.
STEP TWO: Crush the pastel bits into a fine powder. For my violet pastel you can see I have a variety of values and temperatures in my bits. I like the idea of creating a mystery pastel! I didn't get my powder completely fine...I wanted to see what the tiny bits would do when I used the pastel. My resulting pastel wasn't pretty but it was fun to use.
STEP THREE: Put the pastel dust into a container. Gradually add the distilled water and stir until you have a thick paste. I tried to get the paste to be like a slightly thick toothpaste. Add the water slowly a few drops at a time. There is no need to add a binder to the mix since the pastel pieces already have binder added when they were originally made. You are just rewetting the pigment and binder. I have read that distilled water is best since it doesn't have chemicals to interact with the pigment.
Once the pastel is ready use the palette knife to form the paste into whatever shape/size you desire. I tired for a square shape but I admit my pastels are not at all pretty. I need practice! Leave the pastels out to dry. Mine took a couple of days in very humid Georgia to finally dry.
AUCTION NOTE:
If you have tried to bid on one of my Iceland paintings and had trouble note that there was a glitch in the system which has now been fixed. Please check out the paintings and bid! Auction ends on Monday. Here is the link: http://www.dailypaintworks.com/buy/auction/564246


1 comment:
Thank you! I've read about this before and have a bunch of pill bottles that I'm saving bits and dust by hue. When I have enough for a stick I'll definitely try this! Love the color of your homemade purple!
Note for anyone trying it - don't use the mortar and pestle for anything else afterward, especially cooking. Fine dust can get into it and some pigments would be toxic to eat. Keep the kitchen tools separate from art tools. My daughter pointed this out to me decades ago about making herbal medicines, again, don't mix with food unless the herbs are all edible ones. Lots of uses for mortar and pestle. Pigment grinding one can be used for any other pigments stuff though like making paint or ink.
Post a Comment