Visit my Patreon Page for more painting instruction and Paint Along Videos!

Tuesday, June 28, 2016

Thoughts on Painting Small


Kiawah Magic     2.5 x 3.5 pastel   ©Karen Margulis      sold
I love painting small. I love painting large too. Who am I kidding....I love painting any size as long as I am painting. But I do have a soft spot for painting mini pastels. I consider a mini 2.5 x 3.5 inches which is the standard artist trading card size. I started doing these small ones as color studies and I soon realized that it was the perfect portable size to do while traveling. You only need a small kit that can be easily thrown into a backpack or bag.  When I travel for pleasure (not a dedicated painting trip) this is the typical size that I paint.

I am often asked how on earth I paint so small....how do the fat sticks make the marks I want? I don't use pastel pencils or even hard pastels. I use the small bits and chunks of my favorite soft pastels...mostly Terry Ludwig pastels. I can make any size and type mark I want with these chunks. 

It is all about PRACTICE. The more you try to manipulate the little pieces the more dexterous you will be come. It is fine motor control and practice will help you get the feel for making small marks. Try it. There are so many benefits to working on these small studies that it is worth the effort to get through the learning curve!

The paintings in today's post are all minis of Kiawah Island South Carolina. They are a series commission I just finished. Enjoy!


I share more tips for painting mini pastels in my pdf digital download available in my etsy shop. This week only all of my digital lessons are available are on sale. Take 20% off at checkout with coupon code DEMO20. Here is the link: http://etsy.me/1kl3JTn 


NOTE: I am headed to Venice Italy today and then on to Croatia to teach a workshop. I can't wait to share my trip and paintings with you. I will post as often as wifi and time allows!


Monday, June 27, 2016

A Tip for Painting Clouds

'Land of Magic'         18x24         pastel        ©Karen Margulis
available $400
I am drawn to dramatic and exciting skies. When I travel I actually welcome the cloudy days. Cloudy skies give me inspiration for future paintings. Cloudy skies are more fun and more challenging topping than a gentle blue sky.

When I was in Iceland earlier in the month I had a bumper crop of exciting skies. We only had 3 clear days but even they were filled with changeable and beautiful skies. I was happy for the studio time in Iceland on our overcast and rainy days. It allowed me to work on studies while the colors and feelings were fresh and available. Below are a few of the studies I painted while in Iceland. Working from life is always a great idea but I have another tip for painting clouds....read on!


I have learned much about painting clouds and skies and I have distilled it into 10 tips and techniques for painting more effective skies and clouds. I am working on a way to share all of my tips but for now I will share a tip that has really helped me whenever I am putting clouds in a landscape painting.

PAINT CLOUDS THAT WORK IN YOUR COMPOSITION EVEN IF THEY AREN'T EXACTLY HOW YOU SEE THEM. YOU ARE AN ARTIST....NOT A CAMERA. DESIGN YOUR SKY!

If you are working from photos the clouds will rarely be perfectly arranged. It is a moment in time and clouds move! If you are working from life you will be at the mercy of a changing sky. It is important that we make a mental image of the clouds....colors,values, shapes and then use this information to paint an impression of the sky. 

Place the clouds so that they help support the design of your painting.  Can they be placed to lead the viewer's eye into the painting? Avoid unusual shapes that have to be explained. Good skies are not random...they are designed!


If you are in the Atlanta area I will be offering a one day workshop devoted to painting more effective skies and clouds. I have a few openings. Email me karenmargulis@gmail.com to register.


Sunday, June 26, 2016

They are Just Shapes!

'Along the Coast'           5x7        pastel        ©Karen Margulis
available $75
Sometimes I hesitate when it comes to adding structures to a landscape painting. It is the same thing for figures and animals. I know that when there is a manmade structure or a living thing in a painting the viewer will naturally gravitate to them and they become a focal area. So that means they need to look right!  But 'right' doesn't have to mean perfect. I hesitate when I forget this and try to make perfect little buildings and horses.

I like to give myself permission to HINT at structures, figures and animals. They don't have to be perfect but they have to look like they belong. I ask myself is they are the correct size for their location. And I remember the very sage advice given to me years ago by Terry Ludwig. 

5x7 pastel available by DailyPaintworks auction. click here to bid

I had only been painting for about a year when I attended a workshop with Terry in the Georgia mountains.  Somehow the subject of adding buildings to a painting came up. I mentioned that I was afraid of adding them because I never painted structures and was worried that they wouldn't look right. His response was perfect... "THEY ARE JUST SHAPES!"  Don't worry about the label. Look at everything as a simple shape, color and value. See the difference when we say....a square of white with a slash of red instead of a white house with a red roof. Describing the object as a shape simplifies the process of painting complicated things.It takes away the fear of getting it wrong. After all we can all paint shapes!


The auctions for these Iceland inspired paintings end on Monday at 6PM. Please consider adding one to your collection! Click here to have a closer look: http://www.dailypaintworks.com/buy/auction/564241

Saturday, June 25, 2016

Don't Throw Out Your Bits and Pieces!


'The Drama Unfolds'         9x12       pastel        ©Karen Margulis
available on etsy $160
I had the perfect violet pastel for the painting. It was a purple pastel that I made myself a few months ago but had set it aside for just the right subject. The dramatic skies and lava fields in this Iceland scene needed that purple pastel!  I used it first to block in the dark shapes and then washed it with turpenoid. It went on smooth and creamy and felt so nice. There was also a tiny explosion of violets from the tiny bits that were not completely crushed. I loved using it and I don't know why I waited 11 years to make my own pastel!

I don't think I will be making pastels from scratch though. There are too many wonderful pastels available to purchase. But I will no longer be reluctant to reconstitute broken pastels or to make new pastels of the bits and pieces that I have saved over the years. Read on for easy instructions.


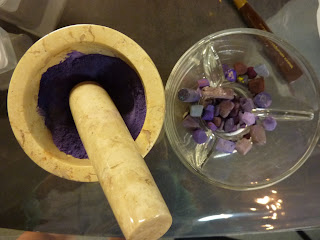
my not so pretty pastels


Don't throw away your bits and pieces! 
When your favorite pastels get down to tiny nibs or if you drop and shatter a pastel don't be so quick to throw the pieces away. I have several jars devoted to  color families. When I have a tiny piece of pastel I put it into the appropriate jar. This way I can reconstitute pastels that are a recognizable color rather than combining too many colors which will make gray.

Making pastels from broken or bits of small pastels in three easy steps


STEP ONE:  Gather your supplies. You need distilled water and a bowl and tool to crush the pastels. A mortar and pestle work well. I got mine at TJ Maxx. You also need a palette knife and a covered surface. I used a piece of plastic to cover my table. Choose the pastels you want to reconstitute.


STEP TWO: Crush the pastel bits into a fine powder. For my violet pastel you can see I have a variety of values and temperatures in my bits. I like the idea of creating a mystery pastel! I didn't get my powder completely fine...I wanted to see what the tiny bits would do when I used the pastel. My resulting pastel wasn't pretty but it was fun to use.


STEP THREE: Put the pastel dust into a container. Gradually add the distilled water and stir until you have a thick paste. I tried to get the paste to be like a slightly thick toothpaste. Add the water slowly a few drops at a time. There is no need to add a binder to the mix since the pastel pieces already have binder added when they were originally made. You are just rewetting the pigment and binder. I have read that distilled water is best since it doesn't have chemicals to interact with the pigment.

Once the pastel is ready use the palette knife to form the paste into whatever shape/size you desire. I tired for a square shape but I admit my pastels are not at all pretty. I need practice! Leave the pastels out to dry. Mine took a couple of days in very humid Georgia to finally dry.


AUCTION NOTE:
If you have tried to bid on one of my Iceland paintings and had trouble note that there was a glitch in the system which has now been fixed. Please check out the paintings and bid! Auction ends on Monday. Here is the link: http://www.dailypaintworks.com/buy/auction/564246

Friday, June 24, 2016

Tips for Painting Lupines

'Lupines in Iceland'         5x7      pastel      ©Karen Margulis
available on DailyPaintworks auction here

I was enchanted by the lupines in Iceland. Maybe because they are my favorite color. I am drawn to violet like a bear to honey. So to see miles and miles of purple flowers carpeting the hills was exciting. The lupines in Iceland seem to be everywhere. I've heard differing opinions from Icelanders about the lupines. Some don't like them. They are invasive weeds. But others told me they don't mind because they at least they are pretty weeds...better than ugly weeds. Some say they are beneficial for controlling erosion. I know that I fell in love with them and they quickly became my most favorite thing to paint.

a lupine meadow by the sea on the Reykjanes peninsula
I made it my mission to conquer the lupines and to find the best way to paint them so they looked authentic yet painterly. I am still discovering the many subtleties of this wonderful blue-violet flower but I have come up with some ways to help me capture the feeling of the lupines. Here are three tips:

5x7 lupines available by auction here
  1.  Know the Lupine. Study them intently. Look at them and describe them using descriptive art words.....colors, shape, value. How do they grow? How big are they? What else about their habits?Sketch them. If they are plentiful then cut a few and bring them inside for study and sketching. Paint them from life. Mother Nature is the best teacher and you will become intimate with them if you can paint them from life. The painting above was painted from life looking out the studio window at a patch of lupines.

5x7 pastel sold
2. Effective Massing of Lupines: I enjoy painting close-ups of individual blooms but I am more interested in painting the masses of flowers as they cover the landscape. It is nice to know that you don't need to paint every single bloom in the patch to have the painting work. In fact, it is better to suggest a big mass of color and pull out a few individual flowers in more detail. The viewer's eye will fill in the rest of the detail. Choose a few blooms to develop more completely. These flowers should be where you want the viewer's eye to rest and not random.


selfie in the lupines!

3 Get the right pastels. Make a 'Lupine Box' of as many violet pastels as you have. Lupines come in a variety of colors from dark blue violet to a pale almost white violet. They often have touches of red violet, blues and even greens in the blooms. I like to use some grayed down violets along with my bright intense violets. Having a few lupine colors all together makes it easier to do many studies. 

Two of my lupine paintings are available by auction this week. Click on the links under each painting for details.

Thursday, June 23, 2016

The Benefit of Real Life Observation

'Down by the Sea'         9x12       pastel        ©Karen Margulis
sold
I had to go down to the sea. I spent over a week perched on the bluff overlooking a mesmerizing view of the sea. I took many photos. I painted the many moods of the view. I spent hours just staring out the window and painting what I saw in my mind. But the ribbons of blue beckoned. I saw the waving grasses and dots of yellow flowers. I needed to get closer.

So one day I set out with my camera and took a walk down to the sea. It was actually an easy stroll on a paved path. And while the view from above was amazing it was heaven to be down next to the sea. The smell of the tidal flats and the calls of the sea birds added flavor to the picture perfect scenery. It was a crisp clear day and the water was an unbelievable shade of blue. The wind whistled through the grasses and the tiny yellow flowers danced on skinny stems. I took a deep breath and tried to soak it in. I let it fill every pore. I wanted to remember this moment. It would pay off later.


a few photos from my walk down to the sea


Back home from Iceland I am now spending my studio time painting these images that are in my mind. I am using my photos to jog my memory but I am drawing on the mental notes I took while there. The many hours spent staring out a window or walking in the wind are helping me when I paint. The paintings I did of the view while in Iceland are now helping me when I look at my photos.  I am able to recall those sensations and memories. It is all still so fresh. I hope that my paintings are able to show exactly how I felt at the time I was there in Iceland.

Real life observation is the best teacher. Spend time this summer just looking and feeling. Let the images, sounds and smells fill you up. Then paint them.


I now have made 10 of my Iceland studies available by Daily Paintworks auction. Opening bids start at $50 for the 5x7 pastels. Here is the link to view the paintings: http://www.dailypaintworks.com/buy/auction/564246

Wednesday, June 22, 2016

An Easy Way to Reuse Pastel Paper...and Iceland Travelog part 2

'Making Friends'         12x12       pastel        ©Karen Margulis
available $165

I wanted some paper with texture. My subject was a wild and wooly Icelandic sheep. A textured surface would be perfect to help me capture the feeling of his shaggy coat. I didn't have any textured surfaces ready so I decided I would make my own. I decided to repurpose an old unfinished painting from my pile of discards. It was a piece of sanded paper mounted on foam board. It was the perfect candidate for recycling.


I brushed off the old painting with a stiff brush getting off as much pastel as I could. It was such a dark painting that I wasn't able to remove much but the dark value orange would work well with my white sheep.

Next I slapped on some clear gesso with a cheap brush using random brushstrokes. The clear gesso mixed with the pastel to create the dark tone. The slight grittiness in the gesso would give more tooth to the surface. It took about an hour to dry and then I was ready to paint my friend the sheep!


 I am planning to continue my Iceland travelog in my blog www.paintingiceland.blogspot.com You can read about both my 2014 and 2016 trips to Iceland in the blog. Here is part 2:

I've been to Iceland before. It was the summer of 2014 and I joined Stan Sperlak and his Painter's Passport group for a pastel workshop/expedition. It was a wonderful adventure filled with many amazing experiences.  I fell in love with Iceland and hoped that someday I would return. But it was a distant thought that was soon buried by my busy everyday life....Until the summer of 2015.
Once again I joined Stan and the Painter's Passport group this time as a co-teacher. Stan chose my roommate for me and that changed everything.


She was from Iceland and we connected immediately. She was a kindred soul across the sea. Sisters. Artists and forever friends. We bonded on the very first day. We shared an adventure in France and knew that our friendship would not just end at the airport in Paris. When she said "come visit me in Iceland", I knew that I would and this time it would be different. Very different.

The Heart stone that Elinros found on the beach in Normandy. If you'd like to read the story behind the stone visit my France travelog here: http://paintingfrance.blogspot.com
Below are two of the paintings done from the first trip to Iceland. 
'Summer lll'      19x14      pastel      $195

'Summer in Iceland l'       11x14     pastel    $150
The adventure begins.....to be continued.

Tuesday, June 21, 2016

A Lesson in Simultaneous Contrast

'Epic Wishes'         12 x 12        pastel        ©Karen Margulis
available $165
 I love it when I can put a lesson to good use. When we are learning how to paint we amass so much information. Our heads start to swim with all of the dos and don'ts, rules and guidelines. The more we learn the harder it is to keep track of the things needed for a good painting. And sometimes the concepts we learn or read about don't quite make sense. Value is one of the concepts that confused me for a long time. Simultaneous Contrast is another big one.  I understood what it was but wasn't sure how to use it. It seemed 'above my head'.

But one day it finally clicked. It made sense. The idea that everything is affected by it's opposite made perfect sense. Understanding this idea allows us to make better choices when painting. (you can read more about simultaneous contrast in this post by Richard McKinley. click here.)

I was struggling with my dandelion painting today. I could not seem to get the fluffy white seed heads to look bright enough. I didn't want to use white pastels but the lightest value I had was not allowing the seed heads to 'pop'. And then I remembered......Simultaneous Contrast! Everything is affected by it's opposite.

I could keep trying to get the dandelion puffs lighter and lighter but it would be better to darken the area around the light seed heads. Having the sky darker would make the lights appear brighter! That was the simple solution and it is something that is so helpful in so many painting situations.  I'm glad I remembered the lesson today!

the initial drawing on 12x12 Uart

underpainting with Inktense sticks and Nupastels with a water wash
The subject of today's painting were some epic seedheads from the giant dandelions in Iceland. They are huge...maybe three feet tall! They make great dandelion puffs good for epic wishes!  My Iceland travelog will continue tomorrow. I was tied up with packing for Croatia today!

Monday, June 20, 2016

Seeing Iceland ...Through an Artist's Eyes part one

'Undiscovered Beauty'       16.5 x 9.5         pastel        ©Karen Margulis
available $175
Enjoy my Iceland travelog. This is part one. I will be sharing my writings and paintings inspired by my recent trip to Iceland over the next few days. Today's painting is from a photo I took while exploring the beautiful Rekyjanes penninsula.

I am on the plane headed home after 10 amazing days in Iceland. I close my eyes and something strange is happening. From the darkness a picture is materializing. It appears as if through a fog and gradually comes into focus. It begins with the deep blue violets of the distant shore. It slips into the hazy blues of the far headlands. They transition to the cool greens and lavenders of the cliffs as they get flatten and become studded with bits and pieces of color that form the houses of Njardivik.  All of this is punctuated by the shining silver fingers of the sea.  

Finally it is all in focus. It is the view from the little house on a bluff above the sea. My view for the last 10 days came into focus and I awoke from my reverie with a start. I SAW Iceland. I mean I really saw it. It was now a part of me and I don't know how it will ultimately effect me. But at the moment I feel exhilarated and fulfilled. It was an amazing 10 days. And while the plane continues on it's journey home I begin to write. 


'Silver Seas'     5x7    plein air pastel     $75

The lupines cover the hillside

The ever changing view

'Brighter Day Ahead'       5x7    plein air pastel    $75


home

view from the patio
Tomorrow the story continues with how it all began. Stay tuned!