Visit my Patreon Page for more painting instruction and Paint Along Videos!

Saturday, March 31, 2012

If You Need Inspiration...Look No Further than Robert Henri

'Dancing Into the Sunset' 11x14 pastel ©Karen Margulis sold
"Pretend you are dancing or singing a picture. A worker or painter should enjoy his work,else the observer will not enjoy it. It is not good to wear lace that was a drudgery to someone to make. The lace, as well as the picture, should be made in joy." Robert Henri

Robert Henri's The Art Spirit is a book that every artist and art lover should have this book on the shelf. It is a book filled with the wisdom and advice of Henri who was a revered teacher and artist. The book is a collection of his teachings, notes and critiques. Read more about Robert Henri here http://roberthenrimuseum.org/
Not only does the book give Henri's technical advice to painters, it is full of inspiring words of wisdom about life and art. It is the kind of book that can be picked up and opened to any page. Every page has a pearl of wisdom and gives food for thought. It is a book that can be read over and over. I keep my copy on my night stand and pick it up whenever I need a bit of inspiration. The quote about singing a picture is typical of the little gems on every page of the book.
My dog-eared copy of Robert Henri's The Art Spirit.

If you already have this book I encourage you to take it out and give it another read. I'm sure you will find something that speaks to you that didn't strike you the same way the first time you read it. Do you have a favorite quote from The Art Spirit that has inspired you?

If you are looking for more books for your art library you may be interested in the other books I have shared HERE


Friday, March 30, 2012

Capturing the Colors of the Southwest ...Pastel Demo

'John Wayne Country' 8x10 pastel ©Karen Margulis
purchase painting with paypal or check HERE $125

The landscape of the Southwest is calling to me! I am so glad that I decided to attend the 1st Annual Plein Air Convention in Las Vegas. In two weeks I will have an opportunity to paint in Red Rock Canyon and I can't wait. Not to mention all of the wonderful artists who will be there...both the instructors and the attendees.

I am working this week on desert landscapes so I can test my pastel box of colors that I plan to bring. Yesterday I did a painting that depicts the red rocks with intense late afternoon light. I was going for the glow on the rocks. You can see the painting HERE. For today's painting I wanted to capture the more subtle colors of the desert. I did need to add a couple of new colors to my box so I am glad I am testing this week!

Mini Demo of 'John Wayne Country'
I chose a photo from a trip I took to Moab, Utah. We went on a horseback ride in an area that many old Westerns were filmed. I had my camera on the ride and just kept shooting the wonderful desert landscape. Read on to see my thoughts on developing this pastel.
  1. (from left) I worked from a reference photo on my new ipad.(love this way of working) I first did a small thumbnail/value study. I am working on Uart paper.
  2. I am also bringing a small box of Nupastels so from this box I chose some colors to block in my big shapes. I am planning on doing an alcohol wash underpainting. See more about alcohol washes in this post. I chose colors that are bolder and darker than I want my painting to be. I can always tone things down but it is harder to bring back boldness.
  3. The alcohol has been brushed into the pastel with a stiff bristle brush. Notice the cool drips!
  4. Once the alcohol wash has dried I am now ready to work with my softer pastels. I start by reinforcing the dark areas but applying 2-3 layers of dark values.
  5. Once the darks are established I work on the light areas....in this painting it was the sky. I applied a few layers of blues all of similar values so I could have an interesting sky.
  6. Now that the darks and lights are established I choose to work from top to bottom so I work on the distant cliffs and work my way down to the bushes in the foreground. I really wanted to make sure my pastel set had the right greens for the Southwestern plants and I was happy with my selection.
  7. The next step is to refine the painting and add details where needed. I decided that the colors of the sand and the distant cliffs were still more intense than I wanted so I scumbled some blues and cooler sand colors over the cliffs and sand to tone them down. The result is a different feeling to a similar landscape from yesterday's red rock painting. It was a good test of my pastel box.

Thursday, March 29, 2012

Why an Ipad is a Great Tool for Artists

'Red Rocks are Calling' 8x10 pastel ©Karen Margulis
purchase painting HERE paypal or check $125
I did it. I got the new Ipad. Of course I justified it by thinking up a list of ways the ipad can help me with art. Today I put it to the test by using the ipad and it's beautiful display screen to show my reference photo as I painted. I was very happy with how well it worked. The photo was bright and clear and the image was full of light....so much nicer than a photo printed on paper. I placed the ipad on a stand in front of my easel so it was if I was painting plein air and looking at the scene in front of me.

My reference photo shown on my new ipad

There are many ways to get reference photos on the ipad. You can save images you find online from copyright-free sources such as the Wet Canvas Image Library. You can add your own photos to the photo app. And if you have an ipad 2 or the newest ipad you can take a photo with the built in camera. A friend who just returned from a plein air pastel workshop told me that on a rainy afternoon everyone worked inside painting from their ipads. Many had snapped photos on their ipads before the rain started.

My Southwest Plein air Pastel Box

Today's painting is a scene from the Red Rock Canyon National Conservation Area. In two weeks I will be heading to Las Vegas for the 1st Annual Plein Air Convention. Here is a excerpt from their website:
"The Plein Air Convention & Expo in the Red Rock's of Nevada promises to be a historical part of today's plein air movement as hundreds of painters gather to learn, paint, visit with friends, fine tune their skills, and mingle with the top painters in the world."
Even though this is a plein air convention I wanted to travel light and I have pared down my supplies. Instead of bringing my Heilman box of pastels I put together my own set. It consists of my favorite Terry Ludwig Arid Landscape set along with some other colors that I think I might use such as more blues and oranges. I did today's painting with just this set and it seemed right. I will do a few more desert scenes before I go and tweak the set if necessary.

Using the ipad as a reference photo viewer is just one way an artist can benefit from an ipad. I am compiling a list for a future post so if you have an ipad use for artists you'd like to share just comment below!

Wednesday, March 28, 2012

The Importance of Venturing Outside Your Comfort Zone

'Summer Freedom' 8x10 pastel ©Karen Margulis
purchase painting here $95

Ah the freedom of painting the landscape. It is like a breath of fresh air. I love to paint the landscape. It is my muse and my comfort zone. I could probably paint a marsh with my eyes closed (hmmm an interesting idea) But sometimes we get too comfortable and we have to challenge ourselves and try something that pushes us beyond that place where it is nice and easy. This is the only way we will grow as artists. So when I saw that Margaret Dyer was teaching an 8 week pastel figure painting class here in Atlanta I knew it would be just what I needed.

Margaret is one of my 'pastel heros'. I love her work and I credit her with a major breakthrough I had in understanding value during a 3 day figure workshop in 2007. I had never painted the figure before or since so I went to class today filled with excitement and very unsure of myself.
1 minute poses from today's figure class....warming up!

I am so glad for the support of my two friends Jayne and Holly who decided to take the class as well. I didn't get very far in my painting today but I had fun and I know that with practice I will do better. I do know that I definitely felt stretched which was the idea. An added benefit that I didn't anticipate is that I am getting a better understanding of what it feels like to be struggling and to be unsure as a student learning how to paint. Landscapes may be less challenging for me now, but as a teacher, I need to remember what it feels like to be outside my comfort zone.

After this 8 week class I may not be a better figure painter though I plan on working very hard....but I do know that I will be a better teacher as a result of being a student once again.

Today's painting was done as a demo last weekend for a private student fairly new to pastels. I hope I was able to do a good job breaking down my process and helping her understand some basic landscape concepts.

Tuesday, March 27, 2012

Tips for Painting the Spring Landscape

'Azalea Path' 11x14 pastel ©Karen Margulis
Purchase this painting here $150

Every Spring I am faced with the same challenge.... How to capture the beauty of the Spring landscape successfully in my paintings. In an earlier post I discussed the challenges we have in trying to paint the Spring landscape. Read more here. Today I'd like to share some things that have helped me meet the challenge.
  1. Do some advance planning. Do thumbnails to help you SIMPLIFY the busy Spring landscape.
  2. Decide on a FOCAL AREA and develop it while leaving other areas with less detail. This is especially important when trying to paint flowering trees and shrubs....simplify the background by using colors in the same value so that they are soft and out of focus.
  3. Try to focus in on one area of the landscape rather than trying to fit in all of the excitement into one painting. Plan on doing several paintings instead.
  4. Try to zero in on one bush, flower or branch for a more intimate view of Spring.

'Golden Delight' 5x7 pastel
Here the focus is on the forsythia bush so I downplayed the pink blooming trees in the background by making them into soft pink shapes with no hard edges.

'Cherry Grove' 5x7 pastel
In this painting there is a grouping of cherry trees in bloom. They were all fighting for attention so I chose to emphasize just one tree. I put the most details in the center tree and downplayed the others. I also made the background trees which were very busy...into soft-edged shapes. I also used duller cooler colors to push the background into the distance.

Next I will talk about the wonderful colors of Spring. Be sure to come back for the next installment. If you haven't already, I invite you to sign up on the sidebar to receive blog updates.
Thanks for visiting!

Monday, March 26, 2012

A Great Studio Tool for Better Color

'As Far as I Can See' 8x10 pastel ©Karen Margulis
purchase this painting HERE $95

Having a big pastel collection is a mixed blessing. It is wonderful to be able to have a big box of colors. There are so many choices and so many possibilities. But the more pastels you have the harder it gets to make good color choices. It can be overwhelming when faced with boxes of pastels. Even if you have taken the step to put them all in one box and organize them by value and color....it is still too easy to get into color trouble. That is, it is so tempting to use more colors than you need in a painting. Before you know it you have lost your color harmony and everything screams for attention.
Many pastel artists help prevent this by keeping the pastels they use for a painting ou while they paint...in a tray or on a paper towel or some other system. This does help by giving you some control and idea of how many colors you have going in a painting. It is easy to see when you have too many colors in use by the size of your pile. It is also easier to reuse a pastel which creates better color harmony. No need to hunt and peck for a certain color you just put away!

I take this idea a step further.... I preselect my pastel palette before I start the painting and lay the pastels out in a butcher tray!

Pastel Palette for my Marsh Painting

I have several of these butcher trays that I bought at Blicks. I line them with a washcloth to keep the pastels cushioned and in place. I keep several palettes going at once. It is great if I am working on more than one painting. I don't have to put my pastels away until I am done. I will often use the palette for more than one painting as well.
  • Taking the time to plan my painting and to think about the colors I will use makes the actual painting time more efficient. Since I have worked out my colors I am free to get 'in the zone' and respond more intuitively to my painting.
  • For a landscape I will select my pastels by choosing my dark values first, then light values which are usually sky colors or cloud colors, then I choose colors for any distant elements such as mountains,trees,land masses. If there are any greens in the scene I pick my greens and line them up from cool to warm. I also need some 'dirt' colors to go under the greens. For today's painting I had golden grasses so I chose my golds and yellows and some mauves for the 'dirt'.
  • I may use all of these colors or I may need to supplement but at least I am starting out with a plan in place and hopefully will achieve color harmony in my painting.
I know this doesn't seem like a very spontaneous approach to painting but I find I enjoy the actual painting process more when I have a plan. I will say that I never force myself to stick with the plan or my preselected colors.....I am always open to change when the painting starts to talk to me. (that's for another post!)

Sunday, March 25, 2012

What I Like About Fixative on Pastels

'The Magic of Spring' 8x10 pastel ©Karen Margulis
sold

To Fix or not to Fix.....that is the question I am often asked. The answer is that I never use fixative on a finished painting. When I am finished with a painting I give it a good whack on the backside which does a great job of removing any pastel dust or loose pastel. I tend not to be too heavy handed with my pastel application and the sanded papers I work on do an excellent job of grabbing onto the pastel. I have not experienced any problems with pastel dust so I just prefer not to spay fixative on my work. I have found that fixative tends to darken and dull my colors.

I have heard that the relatively new SpectraFix fixative doesn't alter the colors but I haven't used it myself so I can't really say. I welcome your comments if you have tried SpectraFix or any other fixative that doesn't darken colors. So you can probably tell that I am not a big fan of fixative. But I actually do LOVE fixative just not on a finished painting.

My Fixative Choices...Blair Workable Fixative and SpectraFix

I do like to use workable fixative during the painting process. I don't use it for every painting but it does come in handy sometimes. My preference is Blair Very Low Odor Workable Spray Fix (it still has a pretty strong odor so if I am working around others I take it outside)
  • It is very useful to restore some tooth to an area of a painting that has been overworked. I brush out the area I am not happy with using a stiff brush then spray a little fixative.
  • I love using fixative to create texture in an area of a painting. I will often build up some layers, spray it and let it dry and add more layers. The pastel over the fixative will have a grainy, textured look. I will repeat this process building more layers until I get the effect I want. See the close-up of today's painting below. The greens are applied over a fixed area and notice how the green pastel skips over the darker pinks creating texture.
  • Fixative can be used like a glue to fix dusted areas of pastel in place. For today's painting, I sprayed the trees with workable fixative then shaved some pale value pastels on top. This pastel dust was rolled in place with a rolling pin and glassine paper.

close-up detail of azaleas

I'd love to hear your experience with fixatives. Do you fix or not? What other uses have you found for fixative?

Saturday, March 24, 2012

The Challenges of Painting the Spring Landscape

'A Walk in the Woods' 8x10 pastel ©Karen Margulis
sold
Spring has arrived in the Southeast and it is a great time of year to be an artist! I love to paint the Spring landscape but it does have it's challenges. I have put together some thoughts about painting Spring and would like to share them in the next few posts. Let me begin with some of the characteristics of the Spring landscape.
  • Color is everywhere but there is less contrast than in other seasons.
  • Colors tend to be pale and warm: creams, pinks and yellow greens with bursts on intense colors in some flowers such as hot pinks,reds,corals and purples.
  • New Spring growth can often resemble a paler softer version of Autumn colors.
  • There are also some bright 'acid' intense greens that appear in the landscape.
  • Soft edges of new growth can create an overall fuzziness and softness to the landscape.
Keeping these characteristics in mind the first thing I do when I want to paint the colors of Spring is select my pastels. I set aside a group of pastels that I will use for my Spring landscapes.
My Spring Landscape Pastel Palette

This is my Spring pastel palette. It is an assortment of Terry Ludwig, Great American and Diane Townsend pastels. If you want to paint bright intense blossoms it is important that you have these colors. You can't make them from other colors so you need to have those bright corals, fuchsias and hot pinks. (a good excuse for the Terry Ludwig Vibrant color set!) I balance these bright colors with the softer, paler, grayer colors such as peaches, mauves, yellow-greens. Finally I choose an assortment of greens from cooler to warm and I make sure to include some bright, acidy greens. These artificial looking greens actually make wonderful accents in a Spring landscape. I used this palette to paint today's painting of the dogwoods on bloom.

Since there is an overall lack of contrast in the Spring landscape it is easy to get paintings that appear washed out or wishy washy or dare I say too sweet! Tomorrow I will share some ideas for handling the challenges of painting the Spring Landscape.

Friday, March 23, 2012

Animal Fur Color Made Simple

'Goldendoodle' 11x14 pastel ©Karen Margulis
Painting available $150 HERE Commissions Welcome
Brown, Black, Tan, Yellow, White ....are all words we use to describe the color of animal fur. When I paint animals I rarely use these colors. I like for my fur to have more life and exciting colors than what we consider the local color. A black cat painted with a black pastel isn't as interesting as a black cat painted with purples and blues. The same thing is true for any of the 'local' colors. Animal fur will reflect the colors in the environment and by incorporating some of these colors you can make the fur more lively and interesting to the eye. Sometimes it is easy to see interesting colors in the coat and of course everyone sees color differently but I have a technique I use for painting animal fur that allows me to introduce unexpected colors into the fur and still have it make sense.

The photo above shows a fur color chart I made. I illustrate how local fur color is actually made up of layers of local color along with some unexpected colors. The key to making it work is VALUE. If you have the value right then layering several colors will make it read correctly.

Let's take the creamy white fur of the Goldendoodle. I'd be tempted to take out my white pastels with some gray for the shadows. Instead, I simply chose 3-4 middle dark colors...peach, green, lavender and layered them in the shadows. I also chose 3-4 light colors that were lighter versions of these middle darks and layered them in the lighter fur. I always make sure to choose one of the colors to be close to the local color of the fur but by layering several colors of the same value, this local color is now much richer and more interesting.

The photo above shows a collection of my small cat pastels. I used the same technique to get the fur color as I did for the dog painting. Just remember the Value does all the work but Color gets the glory. So get the value correct and you can get away with interesting and unexpected color in animal fur.
For a refresher on value you may be interested in my post on value HERE

The mini aceo cat paintings are available on Daily Paintworks auction this week. Click here to see them larger.

Thursday, March 22, 2012

How to Make Your Images Larger on Blogger

'Sing a Happy Song' 5x7 pastel ©Karen Margulis sold


Art blogs need great photos of art. When I started this blog in 2005 I chose Blogger because it was the most user friendly of the blogging platforms at the time. I have been pleased with how easy it is to quickly post a photo and write and edit posts. I like how my art looked too.
Last year I changed my main website to Wordpress. The difference in how my art displayed on the Wordpress site was obvious. My images appeared much larger and I loved how clean and simple the background was. See my website here. I was tempted to change this blog over to Wordpress but I am such a creature of habit that I didn't want to learn a new interface for posting. But I was now very disappointed in the way my paintings appeared here on Blogger. They were so tiny, even on the largest setting. It didn't matter how large my file was, the large size didn't get any bigger. (The painting of the Chickadee in the snow is the standard Large Image size on Blogger...the Chickadee at the top of the post is a resized Large) But the internet is a wonderful thing. A Google search turned up several tutorials on how to resize the standard images on Blogger.

'Chickadee in the Snow' 5x7 pastel
I chose the easiest, least technical method and I want to share it with you in case you would like larger than standard images on your Blogger blog. You do need to edit the Html but I promise it isn't hard to do.
  1. Upload your image as you normally do. Choose the largest image size.
  2. You will now see your image in the editing/posting box. Look at the top of this box and you will see two tabs 'Compose' and 'Edit Html'. Click on the 'Edit Html' tab.
  3. Now you see the Html code for your image. All you need to worry about it the size so look for the number for the Height. It will look like this : Height: 320px; " You want to delete this number and the semi colon but leave the Quotation mark in place.
  4. Now, just before the height information you will see a number for the width. Change this number to 500px.
  5. Finally look for something that says s400. Change the 4 to 8 . It should now read s800.
  6. You are done! Click on the 'Compose' tab at the top of the box and you will see your image larger. Continue working on your post as usual.
Now you can have a larger than standard image on your Blogger blog and visitors can have a better look at your images. Of course it helps if you have a good system for photographing your work but that is for another post!
I invite you to sign up for updates to my blog on the sidebar. Thanks for visiting today!

Wednesday, March 21, 2012

How the Right Pastel Box Can Make You a Better Painter

'The Road to Her Farm' 8x10 pastel ©Karen Margulis sold


Once you start collecting pastels it is time to decide how to store them all. It's a very important decision and the choice you make can have a big impact on your paintings. When I was starting out with pastels I tried every pastel box available. Many systems are great for storage but don't really help make painting easier. I spent a lot of effort and money until I settled on my current system. It has made all the difference in the world to my growth with pastels. It is my mission to help those new to pastels or those without an organized system to see the importance of the right pastel box.

My Current Pastel Boxes .. homemade studio box,Heilman Box, small homemade cigar box

I have found that many artists new to pastels keep their pastels in the original manufacturer's boxes. They paint right from these boxes. There are two challenges with this system.
  • The first is that it is inevitable that you will add to your pastel collection and soon you will be carting around a pile of cardboard boxes that really don't protect your precious cargo very well.
  • The second and critical problem is that you can't paint efficiently when you have to hunt and peck through several unorganized boxes of miscellaneous pastels. The KEY to painting well is to be organized with your supplies and having your pastels arranged so you can easily find the value and color you need. The BEST thing you can do to improve your work (next to painting more often) is to organize all of your pastels by VALUE and COLOR. Maggie Price has written an excellent article on why you should organize pastels by value and color as well as how to do it. When I finally got a box that would allow me to organize pastels by value and color I saw an immediate improvement in my work and painting was just more fun and less exhausting. Believe me, the right box may be costly but it is well worth it!
So what is the right pastel box? Everyone will have a system that works best for them but here is the system that I have found to work for me. I need a box that is sturdy. protects my pastels and that allows me to separate pastels by value. See the photos above for my boxes. I have a wooden studio box made by my Dad that has six padded sections. I have my pastels arranged by color in each section and they go from dark to light. Some artists choose to have each section be a value with colors going from warm to cool. (See Maggie Price's article) This box is not portable so it stays in the studio. I have a Heilman Box for travel and classes. I have the backpack size. This is the gold standard in pastel boxes and is priced accordingly. I love my Heilman Box! The smaller box is a cigar box that I have lined with foam. I make up these boxes for travel. This is my Southwest Plein air box. I can still arrange my pastels by value and color even in this cigar box so it is a great option if you are on a tight budget....and much better than using the cardboard manufacturer's boxes. There is anther option to consider if you want something similar to the Heilman. Many of my students have purchased the new Dakota Traveler boxes by Dakota pastels. (see below) In my opinion the Heilman Box is still the best but this new box is a good less expensive option.

A student box Large Dakota Traveler. Student still has plenty of room to grow into this box

A student box...small Dakota Traveler box filled with Mt Vision and Great American pastels

I want to add that I am an avid collector of pastels so I have many more that don't fit into my boxes. I usually break new ones in half, add it to my box and store the other half. I do also like to keep certain sets such as my Terry Ludwig Arid Landscape set separate. But the majority of my pastels are incorporated into my working studio box.
If you don't arrange your pastels by value and color I encourage you to find a system that allows you to do so. I promise you will not regret it!

Tuesday, March 20, 2012

A Simple Way to Start a Pastel Painting

'Mountain Memories' 8x10 pastel ©Karen Margulis


Are you new to pastels or looking for a way to simplify your work? Why not try this simple method for starting a pastel painting. There are so many choices and options available to pastel artists these days...new papers and pastels open up great possibilities. It can be overwhelming. What paper to use? Underpaint or not? Sometimes it just feels good to go back to basics. This is the method that I learned when I first started with pastels. My teacher, Marsha Savage, would start each class with a wonderful demo in which she used this method. I may not have it exactly the way she did it but this is what I remember. Check out Marsha Savage's website here.

A Simple Way to Start a Pastel Painting

First the basics. Most of the time in pastel you will work from Dark to Light, Hard Pastels to Softer Pastels, Big Simple Shapes to more Detail. There are always exceptions but this is what I do in this method. I am using Canson Mi-Teintes paper in Moonstone. My pastels consist of a selection of NuPastels and some softer pastels (Ludwigs, Great Americans and Diane Townsend)

My goal for this way of starting the painting is to establish the big simple shapes and set the boundaries of value and color.
  1. (from top left) I start by blocking in all of my dark shapes. I am using a dark spruce blue Nupastel no. 305 (th only number I know!) I make sure my dark shapes are not isolated and spotty. Connect the dark shapes whenever you can.
  2. Now I block in all of my Light shapes. In a landscape this is usually the sky. In this scene the dirt road is also very light. I use a light pink Nupastel for both.
  3. Next I block in my Most Intense Color. I chose the orange-red roof but I also liked the bright green area in the grass so I blocked both colors in. I don't mind if I use more intense colors and darker darks in this stage. I can always modify them but it is harder to put it in later.
  4. Next step is to see what is not blocked in, Most often this will be an area of medium value so I assign it a medium value color. I want to have a layer of pastel over the entire painting at this stage.
  5. The next step for me is to rub in this layer of pastel. I use my fingers or a piece of pipe foam. It isn't necessary to blend in this layer but I like the soft dreamy look. It helps me to decide where to develop the most clarity.
  6. Finished painting. To get to the finish all I do is decide where my focal area is and start by reinforcing the darks, then the sky, then I gradually add more detail. I work over the entire painting at once putting the most clarity in the focal area.
If you like this post be sure to sign up on the sidebar to receive updates. I will be adding more to this series on getting started with pastels. You may also like to check out past post by looking on the sidebar for the section 'Posts You May Like'.

Monday, March 19, 2012

Getting Started with Pastels...Choosing a Pastel Set

'Wildflower Magic' 8x10 pastel ©Karen Margulis
Painting available by paypal or check $95 click here

I love to share the wonderful medium of pastel with other artists. Today I had the privilege of doing two introductory lessons and I have two new converts to pastel! I have developed a 2 hour introductory lesson during which we review and test the different pastels and papers and other supplies. I also demonstrate a quick and easy way to start a pastel painting. My students then get a chance to work with my assortment of pastels on a variety of papers. My goal is for them to leave with a nice painting, excited about pastels and armed with the knowledge of the available supplies.
I have my own favorite pastel brands but I feel that it is important for those new to pastels to try out a variety of pastels and papers. We all have our preferences and what works for me may not be the best choice for you. Here is what I recommend:

Dakota Pastels sampler pastel set along with my paper samples
I encourage those new to pastels to try a Pastel Sampler set by Dakota Art Pastels. In each set you receive one pastel from each of the 17 lines carried by Dakota. You can choose the color of the set. I have the blue set. The set is not meant to be a comprehensive working set but rather a chance to try a pastel from each of the major manufacturers. This is a great way to test drive a pastel before ordering a larger set.
I made a small paper sample set for students to see and feel the available papers but Dakota also offers a paper sampler. This is an excellent way to try a variety of papers without ordering a large quantity.
Once you have done a test drive and know what pastel brands you like it will be easier to narrow your choices for purchasing a larger set. I actually like a few brands so the majority of my pastels are from small sets and open stock from my favorite brands. Since pastel preferences are so personal it is hard to recommend a set that will work well for everyone. If I were starting out (after trying them all!) I would choose a selection of Terry Ludwig pastels, Great American Artworks and Diane Townsend soft form pastels. My favorite Great American set is the Richard McKinley Landscape set and I would supplement this with some Terry Ludwig darks and vibrants and some Diane Townsend lights. I also like to have a set of harder pastel sticks such as NuPastels or Polychromos.

Today's painting was the demo for my first intro class today.

Sunday, March 18, 2012

A Tip for Painting Green Landscapes

'Signs of Spring' 10x10 pastel ©Karen Margulis
painting available for $95 with paypal or check click here

Everything is turning green! I live in the Land of Green so it is important to know how to deal with the many greens in the landscape. It is a challenge to paint a very green landscape and make the color interesting rather than all green. You can certainly use just variations of green, dark,light,warm & cool to make a green landscape read correctly but it may not be very exciting.
Richard McKinley teaches about the 'Secret of Green' in his writings and workshops. Knowing this 'secret' and how to make greens more interesting has made a big difference in how I paint the landscape. Richard teaches that the secret of green is orange and violet is the friend. I like to say that Green Loves Red & Orange and likes Purple to visit too. So what does this mean for your paintings?
  • Introduce some orange or red in your green masses and add a little purple somewhere instead of only using green by itself.
  • Underpainting with these colors is an easy way to introduce them. (though it's not the only way)
  • See how I have some orange underneath my grasses in today's painting? This was the underpainting. The purples were added as I added pastel.

Sometimes we think we need every imaginable green pastel or tube of paint to paint a green landscape. But as you can see, knowing how to make your greens more interesting with other colors is helpful to keeping your palette simple.

If you wish to read more about Richard McKinley's secret to green and why it works see his post in the Pastel Pointer's blog Here

Saturday, March 17, 2012

Great News! My Painting Accepted into Southeastern Pastel Society's 15th International Exhibition

'Into the Twilight' pastel 18x24 ©Karen Margulis

It is always exciting to get the news that a painting has been juried into an exhibition. I am excited about having my painting be in such wonderful company at this show. The juror is Fred Somers and I wish I had been able to take his workshop. The Opening Reception is May 17th from 6-8 PM at Oglethorpe University in Atlanta. I hope that my local friends will be able to come.
A little bit about this painting. It is done on Uart paper with an oil paint stain underpainting. I was able to leave some of the drips alone and they became tree trunks and marsh grasses. My goal was to simplify the marsh grasses as much as possible. I ended up using several layers of fixative which helps contribute to the feeling of texture in the grasses and the sky. When I was almost finished I felt like I could feel the quiet of the marsh at twilight but thought it was missing something.....then I added the fireflies! These were done with the dusting technique of shaving pastel and pushing it in with a rolling pin.

Friday, March 16, 2012

Extreme Plein Air ...You Can Take Pastels Anywhere!

Miniature Pastels each 2.5 x 3.5 inches ©Karen Margulis
These paintings and 5 more are on ebay auction this week click here

Did you ever regret not having something to paint with when visiting a wonderful place? But you didn't bring any painting supplies because you didn't want to lug them around. I never travel without my pastels anymore because I have an Extreme Pastel Kit.
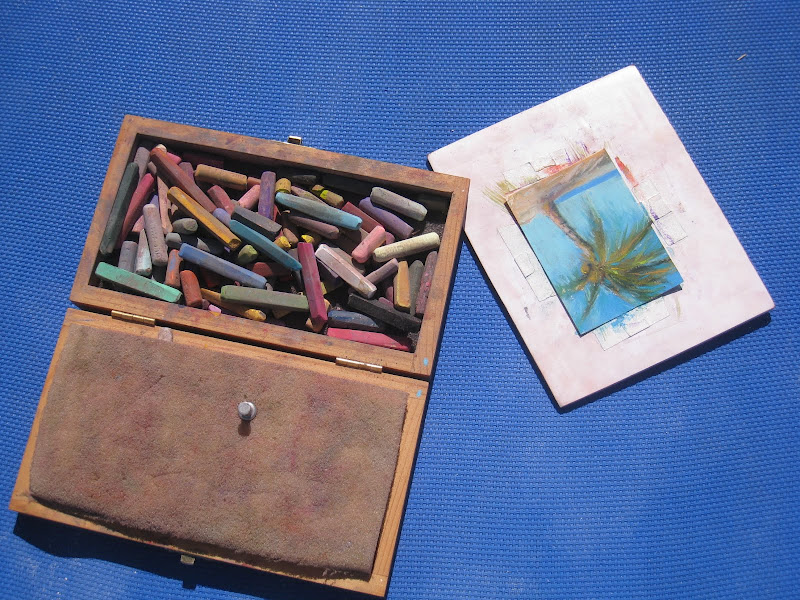
Keep it Simple. That's my goal when traveling with my pastels. I shared my 'Lounge Chair Plein Air' set up in an earlier post. Sometimes I want to pare down my paintings supplies even more. That's when I break out my Extreme Plein air pastel box. It is actually a small box that I include in my lounge chair set-up. I just take this box with me on excursions or trips when I don't want to carry a lot or only have a purse or small bag.
My Extreme Plein Air Pastel Kit

So what exactly is in my Extreme Plein Air Kit? Have a look.
  1. I use a small wood art box. It measures 8 x 4.5 x 1.5. I lined the bottom and lid with upholstery foam and glued it down. I purchased my box at Aaron Brothers but you can use any small sturdy box. I have used cigar boxes but I really love this small size. I put a rubberband around it just in case!
  2. Pastels: I filled my box with an assortment of hard pastel sticks like Nupastels and Polychromos. I break them so I have smaller pieces. I fit more colors this way. I also add some small pieces of Girault pastels. These pastels are firm but surprisingly soft. They hold up well and come in handy when I want the effect of a softer pastel. They are also thin and narrow so don't take up as much space as other soft pastels. How do I choose my colors? As you can see from my photo I have a random selection because I love the challenge of making a painting work with what I have on hand.....but if I were restocking this box I would try to have a light, medium and dark value of each color on the color wheel. I would add a black and white to change the value of any color.
  3. Small piece of foamcore for a drawing board to attach my paper.
  4. Washcloth to wipe pastels clean (they will get dusty in this box)
  5. A small zipper pouch for misc supplies such as tape or clips,pencil,travel baby wipes,maybe a small travel size watercolor kit.
  6. A plastic envelope of precut paper.
  7. A magazine or brochure to store finished paintings.I have made small folders of sheets of glassine for finished work but I like using a small travel guide/magazine just as well.
  8. That's all! These items fit nicely into a purse/bag or mini backpack. Or slip them into a gallon size ziploc and when you are headed out just grab the bag and go!
Close-up of my Extreme Plein Air Pastel Box

'Bahama Breeze' 3.5 x 2.5" pastel

With this small kit packed and always ready to go with me I never have those feelings of regret when I find myself in a paint-able location without my pastels! This is one of the paintings I did while relaxing on the beach in the Bahamas. I will bring this small kit along out to the Plein Air Convention in Las Vegas next month but I am also going to bring a larger cigar box filled with Southwest/Red Rock colors. I'll be posting more on this soon.

Thursday, March 15, 2012

Here's a Quick Way to Simplify Your Paintings

'It's a New Day' 8x10 pastel ©Karen Margulis
available by auction at Daily Paintworks here

I love to paint en plein air but I paint mostly from my photos. So I like to find ways to use the photos to create paintings that don't really look like the photos. I find that if I can simplify the photo it is easier for me to change things around and make more interesting compositions and color choices. In yesterday's post I talked about how squinting at my subject or reference photo helps me to see the big simple shapes and values. This is the most handy way to do it. But if you keep your reference photos on your computer you can manipulate them and simplify them before printing them out to paint. You don't need to be a computer whiz or even have photoshop to do this easy trick either. I like to use the free and simple to use program called PICASA.


Photo on bottom was made blurry with the soft focus feature on Picasa
Top photo shows how I drew lines around my big shapes

Picasa is a free download from Google. I have used it for years to organize, manipulate and print my photos. I use it on my PC but there is now a Picasa version for Mac. Since I haven't tried it I found a review of Picasa for Mac here. I like to download my photos to My Pictures and they automatically go to Picasa as well. It is so easy to open Picasa, find a photo and do some simple adjustments. For the photo above I made it black & white (so I could play with color) and then used the soft focus feature to blur the photo. You can blur it as much as you want. I wanted it blurry enough to remove all of the distracting details. Then all you do is click on the print button and you have options for printing. I also like that it is easy to print out multiple photos on one piece of paper.
This blurred version of my photo is perfect to use for value studies and initial block in of my painting. I can't get bogged down too quickly with details if I can't see them! The black and white version is good when you don't want the distractions of color. I did a 2x3 color study (below) to try a different color palette than my original reference photo.

2.5 x 3.5 mini color study
Of course there are many programs that allow you to manipulate your photos. I have photoshop and use it sometimes but I have found Picasa to be such an easy and fun program that I use it most often. So if you are looking for a way to be less fussy with detail, try to blur your reference photos!

Wednesday, March 14, 2012

How to Simplify Your Paintings for Free

'Time is Golden' 8x10 pastel ©Karen Margulis sold
Are you a Squinter? I am a 'sometimes squinter'. I try to remember to squint when I am painting but it is not as much of a habit as I know it should be. I do know that when I remember to squint I end up with a more successful painting. Why? Because squinting helps me simplify. And squinting is a free tool that goes everywhere with me! I can plan a painting based on strong simple shapes and value patterns because squinting helps me to remove the clutter of details. Take my reference photo for today's painting seen below:

Reference photo (top) with a black & white blurred version (bottom)

My reference photo is quite busy with lots of details and many different values. If I tried to do a value thumbnail or block in my painting with my eyes wide open I might be tempted to but in the details too soon or I might not even come up with a strong design. Now squint at the photo and notice how you can now better see big shapes of darks, lights and middle values? Compare what you see when squinting to my black & white blurry picture which I manipulated with Picasa. It looks the same and squinting doesn't require a computer or printer! So Squinting is an easy and free tool to help you simplify! The picture below shows my initial block in of the painting. It is based on the simple shapes of darks, lights and middle values that I was able to see while squinting.

Block-in of the painting with NuPastels....blended with a piece of pipe foam

There are some excellent tips for squinting in Richard Schmid's book Alla Prima Everything I know About Painting ( a must have book for your art library) Some of the tips include the following:
  • Close your eyes down just until things start to blur. If you squint too far down it isn't as effective.
  • Squinting is good for judging value. Open your eyes if you want to see color.
  • Don't squint at your canvas/paper only squint at your subject.
  • Practice squinting. Do it often so it becomes a habit.
Thanks for visiting my blog today. I'd love for you to sign up for updates. (on sidebar)

Tuesday, March 13, 2012

Gesture Drawing at Sea ... How I Made Sketching Fun

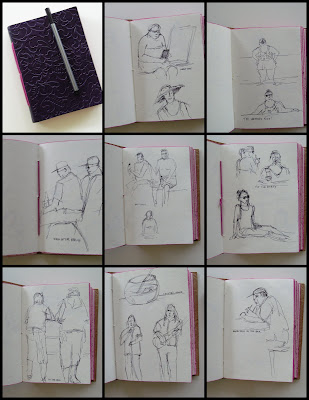
A Page of My Cruise Sketchbook

It's all about the tools! I don't know how many times I have started a sketchbook only to abandon it after a few pages. I know that it is important to my growth as an artist to work on my drawing skills. I know that keeping a sketchbook is a great way to practice drawing but I just haven't been able to stick with it. I think I finally figured out how to make it fun. I found the right tools!
Here is my wonderful little sketchbook and pen. We were inseparable on my cruise last week and I managed to fill the book up with gesture drawings of the people on the ship. So what is so great about these tools? Let me say they worked well for me. Everyone has to experiment and find the right combination of sketchbook and drawing tools.
  • I found that I prefer sketching with a pen on a slightly rough paper. The pen I used is a Staedtler triplus fineliner in black. I liked the fine lines and it was very responsive.
  • My sketchbook was a find at TJ Maxx (need to find more!) It is a purple leather bound book that can open flat if needed. I love the rough paper that has a handmade feel to it.
  • The book is small 5x7 and very flexible making it easy to stick in my purse of beach bag. All I did was clip the pen on the cover and I could carry it everywhere. But 5x7 is big enough to do several quick sketches on one page or use the entire page for something larger. I like this flexibility. I've tried the smaller moleskine books but they were a bit too small and the paper too smooth.

A few more pages from my cruise sketchbook

As you can see I concentrated on doing quick gesture drawings of the people on the ship. I did this for a couple of reasons. First of all the people watching on a cruise ship is second to none! It was fun to try to capture the may moods and body shapes I saw. Second, In a couple of weeks I will be taking an eight week course on painting the figure in pastel with Margaret Dyer. See Margaret's work HERE. I don't usually paint the figure so I wanted to practice so I am not totally lost in the class. I discovered that I loved sketching people! Now I cannot wait for the class to begin. In my sketchbook I concentrated on doing quick studies of the people. I used a pen so no erasing. I mostly looked at the person and not the paper and I didn't do any shading. If you want to read more about how to do gesture drawings check out this WikiHow article.

I am encouraged now to keep at my daily sketching. Now I have to find more of these great little sketchbooks!

Monday, March 12, 2012

What are the Benefits of Painting Small Studies?

'West Across the Ocean' 8x10 pastel ©Karen Margulis
sold

I happen to love painting small. Big is fun too but I get so many benefits from painting in smaller formats that it is very much a part of my way of working. For one thing doing smaller paintings allows me to bring my pastels along when my usual supplies would be too cumbersome like on my recent cruise. (Read about my lounge chair plein air set up here) It was so easy to put my supplies in a small bag and sit in a lounger to paint.
But another great way to make use of smaller formats is to use them for small and quick plein air field studies. I am talking about very small 2.5 x 3.5 inch field studies! Usually when I paint en plein air, 5x7 is the smallest size paper I use. On my cruise I decided to try some field studies on my 2.5 x 3.5 paper. The small size of the paper forced me to simplify the scene. There isn't any room to fiddle so I was able to work quickly and efficiently. I can now use these small studies to develop larger works in the studio. I have all the information I need...colors, values, composition ideas and best of all the study reminds me of what I felt when I painted the scene.

small field study 2.5 x 3.5 pastel
Today's painting was done from this small field study that I completed on my cruise while the ship was out to sea. (see above) I used the same paper for both (Canson Touch) but at home I had all of my pastels at my disposal so I was able to get more complex color. I like the freshness of the study but the 8x10 captures the darkness and turbulence of the sea. We had 18 foot seas and gale force winds for most of the cruise!
I plan on using this small size from now on for my outdoor field studies. I'd love to hear your ideas for the use of small format paintings!