 |
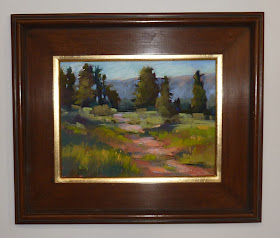
| 'Keep Close to Nature's Heart' 9x12 pastel ©Karen Margulis SOLD |
"Keep close to Nature's heart... and break clear away, once in a while, and climb a mountain or spend a week in the woods. Wash your spirit clean."
- John Muir quoted by Samuel Hall Young in Alaska Days with John Muir (1915) chapter 7
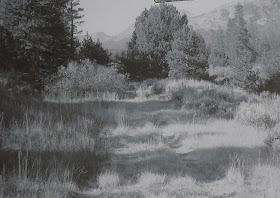
The idea is to rely on the value of the shapes to choose your colors. Remember that if you get the value correct then you can get away with any colors even if they are not what we consider the real color of the thing we are painting. So if you want a purple landscape....go for it. The black and white photo makes it easy to be creative with color. You aren't influenced by the colors you see in the photo. Read on for my mini demo.
 |
| My reference photo....Hope Valley California |
This photo was taken in the Fall. The grasses were dry and turning color....they were very much golden in color. No more greens of summer present. I decided to make the landscape a summer scene with lots of green. Since I only can see the dark and light areas and not color it will be easier to do.
 |
| Dry Underpainting and charcoal drawing |
I start with a rough drawing with compressed charcoal. I like this when I want to be bold and direct. I then choose a warm underpainting in reds and oranges to complement the greens I will be using. This is a dry underpainting using Nupastels rubbed into the paper.
 |
| Adding the darks |
I am using terry Ludwig pastels for this painting. I begin by blocking in all of the dark shapes. I use purple and dark blue and dark greens. I use a cool blue green in the shadowed areas of the grass.
 |
| Putting in the sky, trees and mountain |
The next step is to establish the sky. I chose a combination of blues for a nice summer sky. I block in some warmer greens in the trees keeping the light consistent for the light source. After that I used some distant mountain blues for the mountain shape. I added some air holes of this same blue behind the trees.
 |
| Finishing touches |
The final touches included a few blades of grass and some pebbles in the foreground and some punctuation marks of blue and orange in the trees. These are my little touches of eye candy.
I just might use this same black & white photo and paint it in each of the four seasons. Now that would be a fun challenge!


works really well - I've tried this too. Great painting.
ReplyDeleteHi Karen..This is a terrific little demo Thanks. I am a plein air painter watercolor and oils for many years, and I have never tried pastels en plein air...but I am getting ready to! I live in GA also, Savannah...lot of rainy days this summer! so I have been working primarily in the studio...looking forward to fall and maybe a little change in the weather :-) I am writing because, I see that you post your pastels in what I think of as a standard plein air frame for oils. Do you typically frame your work this way? I have always framed pastels with a mat and spacer, glass cover. Are pastels safely framed without glass? or am I just not seeing glass in your photo? Thanks so much for your inspiration and information! Rebecca Demarco
ReplyDelete