 |
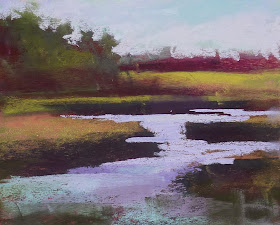
| 'In Comes the Tide' 8x10 pastel ©Karen Margulis sold |
I love it when inspiration happens. I am doing some serious studio cleaning in preparation for The Art Mob Open Studio Tour (Nov 15,15,17) I am finding some unfinished work still taped to foamcore. I never throw anything away but I don't always know what to do with them. I found this painting yesterday and it was immediately clear what it needed. I was inspired!
This painting needed some water. I can visualize a winding creek through this landscape. I found a reference photo to spark some ideas and got to work. Enjoy this mini demo!
Here is the original unfinished demo. It has a lot of empty space. Boring! I need to make this space more interesting. That's where the water will come in.
The first thing I did was to take a stiff bristle brush and remove some of the thicker soft pastel. I 'painted 'in the water by removing the pastel down to the underpainting. Now I have an idea where the water will flow.
Next I use a nice rich dark to define the banks of the creek. I use some workable fixative to spray the banks and foreground area. I wanted to darken it and fix the pastel in place so it will be easier to add more layers. This will also allow me to add a suggestion of grasses over the edge of the banks.
My next step is to put in the water. Before I can do this I have to decide what colors will be in my sky. The water reflects the sky. I decide I want an overcast moody sky. I choose some violets and blues and paint the sky first. Next I paint the water using horizontal strokes. I use my reference photo for a suggestion of how the water might flow through this marsh. I like how the dark bank makes the water settle into the land.
I also work on the distant trees. I used the sky color to break up the distant tree lines.
The next step is to work my way from the distant trees up to the foreground. I start by refining the two banks of trees. I add cooler greens to the far treeline. I create more airholes in the front trees and pull out some more foliage. I start to add some of the greens in the marsh using horizontal strokes. I like the original bright yellow green so I let some of it stay.
At this point I add some more greens using vertical strokes in the foreground. I decide to break up all the green with some blue-purple grasses. I saw these suggested in the reference photo. I make a decision to not put any blades of grass in this painting. I feel like the water provides enough interest and too many 'blades' would be too busy. I leave the foreground in an unfinished state for the same reason.
I think that this is a much more interesting painting! It is fun to take something unfinished and make it work! If you have enjoyed this mini demo and would like to see a more detailed demo, consider my Digital Downloadable Demos available in my Etsy shop. I have both a marsh and a green landscape demo available!


What a great demo. It's exciting to see how you were able to include these changes into a good painting and make it a great one! Thanks!
ReplyDeleteThanks Jane. I'm glad you enjoyed seeing my process!
ReplyDeleteI saw the finished painting on Facebook and now that I see the demo, WOW! I loved this one anyway. The broken color does a wonderful job of implying reeds coming up through the shallow water! Love it!
ReplyDeleteTerrific Demo! Thanks for showing how that's done. I'm just getting used to pastels and exploring the different ways people use them.
ReplyDeletebravo! c'est une belle réussite!
ReplyDelete