 |
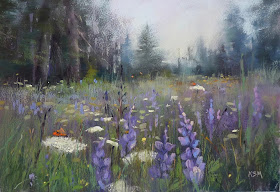
| 'A Little Piece of Heaven' 11x16 pastel ©Karen Margulis available $375 |
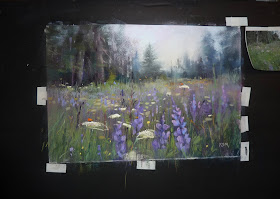
I preach it every month. Step away from your paintings frequently and come back to finish a painting with fresh eyes. Do I always follow my own advice? No. But I should! Take today's painting for an example. It began on a piece of Somerset printmaking paper prepped with Diane Townsend Dry Ground. I am exploring this product and will report on it soon! The paper was a leftover scrap and was an odd size 11x16 but I thought it was an interesting size for my wildflower meadow concept.
Step 1: After preparing the paper I did a dry wash black in with some Nupastels. I rubbed the pastel into the paper with a piece of pipe insulation foam. I used a light touch because I didn't want to remove any of the dry ground.
Step 2: I begin applying softer pastels. I used mostly Terry Ludwig pastels. I first reestablish the dark shapes.....the distant tree masses and the dark foreground 'dirt'. I know that if I get my darks rich, deep and interesting in color I will have a strong foundation. I will build layers of color over this dark base.
Step 3: Next I establish the sky. It sets the tone and the mood for the painting. I want to have a soft overcast almost misty quality so I use pale values of pink, blue and yellow. I layer them together to get an interesting visual mix of sky color.
I also begin building layers in the meadow. I was in the zone here so neglected to take photos but I can tell you that I began with big swaths of pastel before starting on the flower shapes. I start at the back of the field and work my way to the foreground. Once this grass base is established I start adding the flower shapes. You can see that there is no detail in the flowers or grasses at this point.
Step 4: Now for the detail. Of course everyone has their own idea of how much detail is enough. I seem to be headed in the more detail direction which is interesting. I probably would have called the painting finished at the stage 3 level not too long ago. I will probably change and evolve again so I just go with the flow! But lately I enjoy creating the wonderful tangle of flowers and grasses that are found in a meadow.
Here is where it gets interesting. After adding the grasses and refining the flowers I still felt like something was missing. There was so much going on but no clear visual pathway for the viewer. I had the idea of adding some orange butterfly shapes. I liked the way these spots of orange added some life the the painting and gave some contact points....stepping stones around the painting. I felt like I was finished so I took my usual photos and called it a day.
Step 5: I came back into the studio in the evening on the way out to the hot tub! I decided to steal a peek t the painting still up on my easel. That is when it hit me. The proportion of the flowers to butterfly was off. I had created a low point of view by making the foreground purple flowers (lupines) large and in your face. But I didn't follow with the Queen Anne's Lace in the foreground because I had added them in myself. They weren't in the photo. But they were actually too small in relation to the Lupine. That made my butterfly too small for the location in the foreground. It was fine for the size of the flowers head......but the flower was too small for the location in the foreground.
I didn't want to forget my observation so I took out a Nupastel and made the foreground QA Lace larger. I would fix them in the morning!
Here is the finished painting. Once I made the flower heads larger I thneed needed to make the butterfly larger. The flowers and butterflies in the distance were the correct size for their location.


No comments:
Post a Comment
Note: Only a member of this blog may post a comment.