

It's all about getting the shape correct. No matter what our subject, we can tell a lot about it by looking at it's shape or silhouette. This is especially true for trees. If we see a silhouette of a palm tree there is no way we could confuse it for a fir tree. The shape and the outside contours of the tree give us the information we need.
When I paint a tree I begin by looking at the overall shape of the tree. Then I block it in with one value making a flat positive shape. As I develop the tree and add the background, I make sure that the negative shapes (sky holes) that I paint continue to describe the shape of the tree.
It is very easy to make an interesting tree shape into a boring one if we aren't being good observers. This has to do with our thinking brain taking over and giving us the simple symbol for a tree. This is why we sometimes end up with 'lollipop trees' ! We have to practice observing and blocking in our trees carefully. Lots of practice will help!
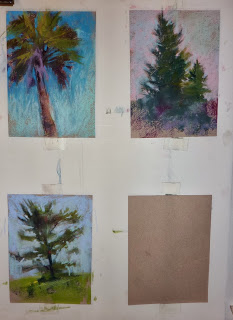
I am always looking for a way to make practice fun so I came up with this exercise: 10 Minute Trees!

- Begin with a piece of paper divide into quarters. Make sure that each section is no smaller than 5x7.
- Have a selection of tree photos available. Try to have several variety of trees. It is best to have photos with strong light and shadows. Don't worry about background.
- Have your pastels ready.
- Set a timer for 10 minutes. The object of this exercise is to observe the tree and block it in using one value to start with. This is the positive shape. You then block in the background (negative shape) carving into the tree and creating skyholes.
- Continue working on developing the tree from this block in stage until the timer goes off. Don't worry if you aren't finished. The goal is simply to get the shape correct. You should be able to tell what kind of tree you are painting by the shape!
- You get bonus points if you do this exercise from life....either plein air or out the window of your studio!
- Start with the big simple shape of the tree. Don't worry about details (or painting leaves)
- Make sure the tree shape is a dark enough value and that it is flat...avoid spottiness.
- Develop the tree by gradually layering color (Save the highlights for last)
- Carve into the tree with the background color to create interesting edges and sky holes.
- If you have time to add details such as leaves....try to avoid putting in too many leaves. A few well placed leaves will allow the viewer to fill in the blanks.
No comments:
Post a Comment