Visit my Patreon Page for more painting instruction and Paint Along Videos!

Tuesday, April 30, 2013

How to Paint Better Clouds

'Clouds, Beautiful Clouds'             13x18       pastel        ©Karen Margulis

Clouds are so commonplace that their beauty is often overlooked. They are for dreamers and their contemplation benefits the soul.
from the Manifesto of the Cloud Appreciation Society


I happen to enjoy painting clouds.  I find that artists either love to paint them or avoid them. Often times students will get frustrated because their clouds look fake. You know, like white cotton balls pasted onto a blue sky.  They give up on putting clouds in their paintings and thus the cycle begins. 

There is a good reason why we often paint child-like clouds.  It happens when we aren't really looking at the clouds. We allow our thinking brains to step in and tell us what a cloud looks like.  And our thinking brain will usually give us the symbol we have for a cloud....the typical white scalloped shape.

But clouds are never that regular looking and they usually aren't pure white. Look carefully.

  • The first step in painting better clouds is to become a better observer of clouds. Go outside or look out the window and watch the clouds. See them change shape and color. See their infinite variety. Look up and see how those white puffy clouds are brighter and whiter directly overhead. See how they tend to get smaller and stacked closer together as they move toward the horizon. Look at the edges of clouds. Are they ragged? Are they darker? Are the clouds thin and wispy or dense and puffy?
  • Paint cloud studies. Don't worry about making a painting. Just paint the clouds you see. Paint them quickly.
  • Paint clouds in your mind. Look at the clouds and if you don't have your pastels then imagine how you would paint them. What colors would you use?
Appreciate the clouds. Don't take them for granted. They are just as beautiful as any feature in the landscape and all you have to do is look up.  

Did you know that there is even a Cloud Appreciation Society?  Have a look at their website and coming soon they will have a CloudSpotter App. 

Monday, April 29, 2013

Demo Monday...Painting a Happy Sky

'Passing Clouds'             11x14            pastel         ©Karen Margulis
available for purchase in my Etsy shop $165
I am fascinated by clouds. I search out opportunities to put clouds into my paintings.  I love all types of clouds....white puffy clouds to dark stormy ones. I am drawn to painting them.  But clouds can be challenging to paint. The struggle is to make them look like they are a part of the sky and not stuck on like cotton balls.   

I have learned some great sky and cloud tips that have helped me.  I am working on a mini booklet on painting skies and clouds filled with the pearls of wisdom I have collected.  In today's demo and this week's blog posts I will be painting clouds and sharing some tips.


I am working on 11x14 Wallis Belgian Mist. I will do not underpainting or block in but get right to the painting with my softest pastels. I am using Diane Townsend pastels. I start by putting in the darkest colors which is the land.


Next I begin with the sky and put down some cool dark blues using the side of my pastel.


I continue to lay in the blues of the sky getting progressively lighter and warmer. Near the horizon I use pale pinks.


After all of the sky colors are put in I add some lavender for the start of the clouds. Then I blend all of these colors together with the side of my palm.


The next step is to build up the clouds. I start with the dark bases of the 'puffy white clouds'. I use lavender, peach and green.  The thinner wispier clouds can be lightly scumbled on top of the blue sky.


 I needed to darken the cloud bases somewhat by adding a gray purple. Next I add the light part of the clouds using pale peach and pale yellow....they are so pale that they are near white. I don't use any pure white.  Finally I work on the ground plane. I just add some reds and ochres and dark greens.  I don't put any detail in the foreground as this painting is all about the sky. (see top photo for the finish)

Sunday, April 28, 2013

Z is for Z Compositions

'New Day Dawning'             8x10              pastel          ©Karen Margulis

The Z wins it for me!   I love using a Z curve Composition in my paintings.  It is especially useful in a landscape as many elements naturally form curves.   The Z composition is just a variation of the S Curve which is simply arranging the elements of a composition to form a series of curves.  These curves lead the eye through the painting.

Edgar Payne in his book on composition prefers to use the term Compound Curves.  I like this term better because it doesn't limit you finding an S or Z in your painting design. You could very well have a sideways M or W. It could be big long lazy curves or tight short curves.  The idea is to use the curves to pull the viewer into and through the painting.

The curves don't have to be a feature such as water or road or path.  Many times the curves can be subtle like the arrangement of the light on the grass that pulls the eye around the painting in a curving manner.  I like to use Compound Curves in my wildflower paintings as well.  This is done in a very subtle way and I will share more about that in tomorrow's post.

My favorite Kiawah Island marsh view has perfect compound curves

Plein air version of the same marsh

a more subtle use of compound curves
This post concludes my month of A-Z blog posts.  I hope you enjoyed them. It was fun to use the a-z format to help me come up with ideas for new posts. For the month of May I will be back to my regular posting format. In June I hope you'll join me as I travel cross country on a wonderful art adventure! I will be blogging and sharing my art and the journey with you.

Saturday, April 27, 2013

Y is for Yardwork and Pastels

'Daisies in My Garden'          8x10           pastel        ©Karen Margulis
click here to purchase $125
Years ago before I got busy with children and work I had beautiful garden beds in my yard.  Neglect had taken it's toll and when I decided last year to revive my gardens I had my work cut out for me.
So the last few weekends I have been out pulling weeds and getting things back in shape.

My goal now that I paint is to create gardens that beg to be painted.  I am planting some of my favorite flowers ....daisies, coneflowers, black-eyed susans and sunflowers!  The plants I put in last summer are all coming back in nicely so I am encouraged. I am seeing many similarities in gardening and pastel painting. For one thing both are very much hands on and you get your hands dirty!

Another similarity, I am finding is that plants are like pastels.....you can't just have a few.  Going to the Nursery is a dangerous thing. I see rows of flowers that remind me of a box of pristine pastels.  I want every color!  But now that I have been painting I have to try to remember that designing the garden is like designing a painting.  I want to be sure to balance the color with neutrals and to strive for color harmony.  But I don't want it too manicured!  Here is my dream garden.....

'Living The Good Life'          18x24         pastel 
I know it will take time to get things the way I want but I am enjoying the journey and having fun being back in the dirt again!

Friday, April 26, 2013

Storing Pastel Paintings Part 2...and Spring Studio Sale!

'Outer Banks on My Mind'          8x10         pastel       ©Karen Margulis
sold

My boxes are full!  It is time to do some Spring Cleaning and go through the finished paintings I have in my storage boxes.  In a recent post I shared the first part of my routine for storing finished pastel paintings. I hang finished paintings on a curtain wire. You can read about it in this post HERE.

At the end of each month it is time to take the month's paintings down from the wire and decide what to do with them.  Some of them will be put aside for possible framing.  Some I put into a clearbag to use for my classes.  The majority of them get put into storage boxes.

I have several acid free document storage boxes that are large enough to hold paintings up to 9x12.  I label the boxes by subject.  These correspond to the subjects I paint the most such as 'Marshes', 'Beaches', Southeast Landscapes' Southwest Landscapes', Plein air Studies'.  I simply lay the painting in the box and place glassine paper in between each painting.  The paintings stay clean and safe and easily accessed if needed. Oversized paintings are stored in a different manner and that I will cover in part 3.


This system works well for me.  If I need to find a painting I simply look in the correct 'Subject' box.  I admit that I am not very good at inventory control.  I have tried to assign each painting an inventory number but I wasn't consistent. You need to be consistent in order for it to work.  The 'Box' method of storage works best for me.


Every once in awhile the boxes need purging. Being a Daily Painter means you accumulate a lot of paintings! I store every painting whether they were demos, studies or listed in one of my online galleries.  I am doing some Spring cleaning of my storage boxes and would like to offer some of these studies and demos for purchase.  I am offering them by auction through Daily Paintworks. These 8x10 originals are valued at $145 but will have opening bids of $35!  Visit my Daily Paintworks gallery to have a closer look and to place your bids! Click here!

Thursday, April 25, 2013

X is for X Marks the Spot...Understanding Focal Points

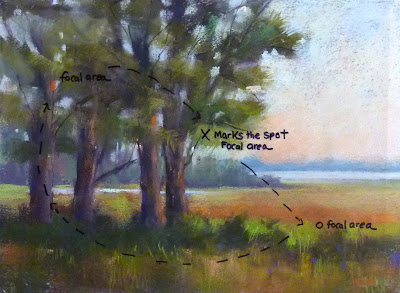
'The Four Mile View'           9x12           pastel        ©Karen Margulis

Focal Points. I'll always remember a workshop I took from Terry Ludwig.  He kept a pocket full of imaginary focal points and would come up to your painting and hand you one.  "Did you forget your Focal Point?" he would ask us.  And yes, we usually had forgotten to make sure our paintings had a focal point.

So what exactly is a focal point? You also hear the terms Focal Area and Area of Interest. I like the term Area of Passion (more on this later)  Some artists distinguish between a focal point and a focal area with the former being a specific small area or spot that draws the eye while the focal area can be a larger part of the painting.  It can be confusing! And what if your painting isn't about one area but rather about a mood or feeling? Isn't it just easier to ignore the whole idea of focal points???

Instead of getting confused about how to use the various terms, I like to make it simple. Try comparing your painting to a Treasure Map.
  • Your painting expresses something that is important to you even if it is just a mood. You need to know what is is that you want to express. The entire painting is a treasure map.
  • You decide what part or parts of the painting best expresses your idea. These areas become the focus of the painting.  These areas will have the most clarity of detail, sharpness, contrast or color. The most important area is the TREASURE. This is the X spot on the map. It doesn't have to be a 'spot' it can be an area.
  • You can have other areas that are important but not quite as clear or detailed as the X spot. These areas can be used to lead the viewer around the painting until they find the treasure.


In this painting I was drawn to this interesting stand of trees in the marsh. I decided the painting was about the trees. They would be my 'Treasure' and more specifically the lower right trees.  I also decided on a secondary focal area in the grasses on the right. I added touches of violet in the grasses. I also decided to add a spot of color up into the left trees to help pull the viewer's eye around the painting. 

Wednesday, April 24, 2013

W is for Watercolor Underpainting Tip

'Gently Through the Meadow'      8x10      pastel over watercolor       ©Karen Margulis
purchase through Daily Paintworks  $145
It's all about the tools!  Isn't that what is fun about creating art?  The chance to try different materials and see the results is one of the highlights for me.  It is through this experimentation that you discover what works and what doesn't.  I have learned some things about the paper I choose for watercolor under paintings (WU)

watercolor underpainting for above painting
What kind of paper does one use for a watercolor underpainting for a pastel?  

  • First and foremost it has to be a paper or surface that can get wet. 
  • Most sanded pastels papers except Sennelier LaCarte can take a wet wash.  Some do better for me such as Uart which tends to stay flay even when wet.  
  • Boards such as Ampersand Pastelbord are an excellent choice.  
  • You can even use watercolor paper or mat board.  Here is a little trick to give these more tooth...brush on a coat of clear gesso. (more on this later)
But paper type is only one thing to think about. You also want to consider the color of the paper. It does have an impact on the results of the watercolor. Have a look at the samples below. You can click on it to enlarge.


sample WU done on various color papers
I prefer doing a WU on a WHITE surface.  I like the way the light goes through the transparent watercolor to the white paper and just glows with light. White paper just makes the watercolors brighter, cleaner and more vibrant.

The second sample was done on a manilla color sanded paper. It was fairly light so the results are not too bad. This would be my second choice.

 Now have a look at the third sample done on Wallis Belgian Mist paper which is a medium gray. Look how dark and dull the color looks compared to the white sample.  I used the exact same colors and painted them at the same time.

To sum it all up.....have fun experimenting with papers to see your results but consider the ability of the surface to get wet and don't overlook the importance of paper color.  Now go have some fun!

Today's painting was the demo I did for my Tuesday class.  My goal was to leave much of the underpainting showing.

Tuesday, April 23, 2013

V is for Variation in a Painting

'Apple for the Teacher'            11x14           pastel         ©Karen Margulis
click here to purchase $145

Variation is an artist's best friend. It can mean the existence of differences in shape, form, amount, number etc.  or it can also mean something that is slightly different from similar things.  I try to use both types of variation in my paintings.  It keeps things interesting!  Today's class demo paintings illustrate both types of variation....a variation in the type of mark making and a variation on a theme (apples)

In class this week we are focusing on how we make marks with pastels. There are two basic ways to apply pastel. One is by using the tip of the pastel to create linear marks. The second is to apply the pastel with the side of the stick to create side strokes.  We all have our own way of making marks and this is our own personal calligraphy.  I tend to use the side of my pastels with the occasional linear mark such as in the painting below.

'Apple Delight'             8x10        pastel  purchase $95
No matter what our natural tendencies for mark making are it is fun and informative to try other types of marks. We might just discover a technique of applying pastels that we really love and that we can incorporate into our regular painting style.  The apple painting at the top of the page is a demo showing a painting using only linear strokes.  It was fun to do even though I had to concentrate to keep from making side strokes!


Here are a few types of linear marks that you might like to experiment with.  Choose a simple subject and do a series varying the type of marks you use in each painting. It is a fun way to become more confident in your mark making!


Monday, April 22, 2013

U is for Uniqueness in Art


'Standing Up Country'            11x14           pastel        ©Karen Margulis
click here to purchase $165
If a man does not keep pace with his companions, perhaps it is because he hears a different drummer. Let him step to the music which he hears, however measured or far away. Henry David Thoreau
Do you ever doubt yourself?  Do you ever wonder if you are going about your art the right way?  Do you ever look around you and compare yourselves to other artists?  Wonder how you measure up? Think that maybe you need to be more like them and you just aren't going about it the right way?

I imagine most of us go through this self doubt every once in awhile. Long hours alone in the studio can do that to you!  I have very simple goals for my art. I just want to paint what I enjoy while always looking to improve. I want to share what I learn with other artists through teaching and this blog. But sometimes I wonder if I should be pushing harder and being more focused.


'Canyon Country Grandeur'     6x8       pastel 
BUT....I like the freedom of being who I am and not what I think I should be.   I have to remind myself  my vision is unique and I don't need to paint like anyone else but me.  When these moments of self-doubt surface here are some things I do to get back on track.

  • Remind myself that it is the journey that is more important than the destination. If I am not enjoying the journey of creating art than the final destination will not be worth it.
  • Give myself permission to experiment and play with my paintings.  I don't have to always produce a successful painting. I will learn through these playful experiments!
  • Refocus on the things that I do best and find ways to do them even better.

 The painter, being concerned only with giving his impression, simply seeks to be himself and no one else. Claude Monet

Sunday, April 21, 2013

T is for Traveling Artists

'Summer in Taos'             5x7           pastel         ©Karen Margulis
purchase here $75

I admit it. I have serious wanderlust.  I am always planning a trip. Always.  When my kids were young we would take a family trip each summer and spend three weeks visiting National Parks.  I would spend a year (pre-internet) poring over books and travel brochures planning our big summer adventures.  We cherish the memories of seeing the wonders of our great country.  Now that I have been painting traveling takes on another dimension.

I now see things through the eyes of an artist and not a tourist.

I am fortunate to have two wonderful artist friends who share my passion for both art and travel. We are perfect travel companions. We are low maintenance and amazingly on the same time schedule.  And we LOVE the same adventures.  We once spent an entire day in Amish country riding down every road taking photos of barns. We could spend hours watching a bird build a nest or waiting for the perfect shot of a dragonfly.  We don't always paint but we are alway collecting photos and the sights, smells and sounds of a new place.

This summer we are taking a long awaited adventure in the Southwest.  We will drive form Georgia to Albuquerque for the International Association of Pastel Societies Convention. After the convention we will travel for three weeks around Arizona and Utah.  Highlights include Canyon de Chelly, Monument Vallley, Capitol Reef National Park, Bryce Canyon, Zion Canyon, Grand Canyon North Rim and Sedona.  I can't wait to immerse myself in the landscape that I truly love.

I will be bringing my pastels and I am working on putting together a lightweight and portable set up.  Today's painting was done with the small set I am testing.  My plan is to do a 5x7 painting everyday to document the trip. I will be blogging about the trip so you can follow along with us. More details to follow before we leave in June.

TIP for traveling artists:  I always try to bring some kind of art supplies with me on a trip.  Even the short trips.  Many times I never touch them but I have something even a few colored pencils and a sketchbook...in case the time and circumstances allow for art.  The times I don't pack any supplies are the times I get the urge to create and I have nothing with me!


Saturday, April 20, 2013

S is for Sunflowers..My Top 3 Painting Tips for Sunflowers

'Looking Up'          11x14          pastel         ©Karen Margulis
click here to purchase $165
I was on a Sunflower kick this week.  I decided to use sunflowers for my class demos on Edges last week so I bought some sunflowers to practice with.  I didn't realize that many of my students didn't enjoy painting flowers until I chose them for our subject.  I discovered that much of it has to do with the frustration from dealing with unfamiliar subject matter. (most of my students are landscape painters)

If you avoid flowers or would like to speed up the learning curve, here are three of my favorite tips for painting sunflowers or any yellow flower.


'Smiling Faces'          11x14             pastel    $165   click here
1.  Working with Yellow.  I find that yellow is a difficult color to work with in pastels.  It seems as though only the softest, most intensely pigmented sticks will make the thick juicy marks that I crave. I had good luck with my Diane Townsends on these paintings but often I struggle to get my yellows vibrant and not muddy.

TIP:  I always try to give yellow a boost....if I know my petals will be yellow I will underpaint or block in the flowers with some yellow. 

'Sunshine in a Vase'    9x12     pastel   $145 click here

2.  Building Up Petal Color.  Sunflower petals are not just bright yellow.  Observe them carefully and you will see oranges, reds, ochres and many variations of these warm colors.  I always like to decide what is the darkest color I see in the petals and lay in this color first. Often I start with a burnt orange and gradually add layers of color getting progressively to the brighter and more intense yellows.

TIP:  When you get to the final layers of yellow I like to mix a warm and a cool yellow. Also avoid using pale yellow (yellow with a lot of white) This will give you washed out flowers.

'Fresh as a Flower'               11x14        pastel   $145  click here
3. Petal Shapes.  If you have ever painted a flower and it looks like a child did it you are not alone!  This is probably the biggest challenge we have in painting flowers. Try as we might, our flowers seem to morph into the childhood symbols we have for a flower (you know, the daisy with a yellow center surrounded by perfect even white petals)  I'll address this in a future post!

TIP: To avoid this you need to turn off your auto pilot and look carefully at your flower reference.  The petals are rarely perfect.....vary the shapes and sizes and positioning and you will have a more interesting and natural flower.

'Sunflowers in Red Vase'  2.5 x 3.5  pastel   $15


'Sunny Delight'    2.5x3.5  pastel    $15

Friday, April 19, 2013

R is for Repurposing Boxes for Pastels


'Canyon Country'          5x7         pastel       ©Karen Margulis
click here to purchase $75

'Raven Watch II'      5x7     pastel   Click here to purchase $75

Both paintings done with the pastels in my Box #1

I have a thing for boxes.  I love a good box and I tend to collect them in my thrift store forays.  I'm not always sure how I will use them but I can't resist a well made box.  Recently I went through my collection to come up with possible candidates for a small plein air box for pastels.

Oh I have my trusty Heilman box. But I will be going on a three week adventure in the Southwest and my travel companions have agreed to travel very light. So no big box and easel for me. I came up with three possible solutions and I will be trying them out over the next few weeks. 

I had a great time repurposing these boxes and would like to share a few tips.

Box #1

 Box #1  Is a small black aluminum case that once held binoculars. I took out the dividers and found an empty Unison pastel box that fit snugly into the case.  I lined the unison box with foam (from a fabric store)  You can fit a surprising number of pastels in a small box if you use small pieces. For transport I will put the lid on the Unison box and secure it with rubber bands.

The great thing about this little box is that it has a hinge that allows the lid to stay open. I can prop a foamcore board and paint...a mini pochade! Everything is stored behind the lid flap.


Box #2

Box #2 is my well travelled 'cruise ship' pastel box.  This thin wood box was a Mancala game box.  I removed the innards and lined it with foam. It holds lots of pastels and they never break or shift in travel. The lid on this box opens completely flat which is great for painting in windy conditions. The box won't blow over!  I love this box!

Box #3


Box #3 is a lightweight aluminum box that once held barbque tools.  It doesn't open flat so I am able to use it to paint like a small pochade box.  I repurposed a small cardboard box from some Diane Townsend pastels lined with foam and filled with a selection of small pastels.  Not shown in this picture is the piece of foamcore I put into the lid to hold my extra supplies.

Thursday, April 18, 2013

Q is for Quiet in a Painting

'A Quiet Moment'           9x12           pastel        ©Karen Margulis
click here to purchase $145

I like to paint the quiet beauty that surrounds us.  

I wrote that for my artist statement several years ago and it is still very much the truth. Whether it is a patch of roadside wildflowers or a view across a marsh I am drawn to those often overlooked spots that are filled with beauty.  They give me with a sense of peace and quiet.  My mind can be racing with a to do list a mile long....but when I step up to the easel and paint my TRUTH I am at peace. Everything else can wait.

Block in for today's painting
I think I have finally figured out what my Truth is.... that is... what subjects call out to me to be painted....what makes my heart beat faster.  I used to think it was painting wildflowers.  And yes I am drawn to wildflowers but it is more than that.  I love painting nature up close and personal but I am equally drawn to wide open spaces...marshes, oceans,deserts and prairies.  They seem opposite but now I realize why I love them both.  It is the quiet that both subjects embody.

My goal is to capture this feeling of peace and quiet in my paintings. Yes sometimes I like to be bold and colorful for a change of pace but I always seem to return to my truth.

What is your truth? What subjects speak to you the loudest?  I'd love to hear from you. 

Wednesday, April 17, 2013

P is for Paper Choice for Pastels


'Raven Watch'     3.5x2.5     pastel         ©Karen Margulis
puchase here on Etsy  $15

We have so many options for pastel surfaces today.  We can choose from sanded papers, soft unsanded papers, hard boards with a sanded surface.....we can even make our own papers. How do we ever know what paper to choose?

I am a big fan of paper so I love to experiment with papers to see what results I can get with my pastels.   Through this experimentation and play I have discovered my favorite papers but more importantly I have discovered that there is no 'bad' paper....each paper fits a certain style or technique and I choose my paper based on the technique I plan to use.

 I have learned not to dislike any paper and give up on using it...but rather discover how to best use it.  Maybe it works best with harder pastels, or wet under paintings. Maybe a certain paper needs very soft pastels. The fun is in the discovery.

'Waiting'       2.5 x 3.5     pastel  sold

  • If you are new to pastels or just want to branch out and try new papers I recommend ordering a Pastel Paper Sampler from Dakota Pastels.  This will allow you to try many papers without investing in big sheets or pads.
  • Take it a step further and cut the papers into smaller pieces. I love to cut my own 2.5 x 3.5 papers to use for Artist Trading Cards. This way I can try papers out on a small scale and see how they work with various pastels and techniques.
IMPORTANT TIP:  This is from Doug Dawson....once you have found a paper that you like stick with it for awhile and don't jump around on different papers for each new painting. Give yourself the time it takes to get to know what the paper will do...become friends with it. Understand what happens with various pastels and techniques. Only when you thoroughly understand a paper should you move on and get to know another. Soon enough you will have your favorites that you can rely on!

Tuesday, April 16, 2013

O is for Overworking a Painting ...Tips to Avoid it


'Spring is in the Air'           5x7          pastel        ©Karen Margulis
When is a painting finished?  Usually before you think it is.  Overworking a painting is a common malady.  Here in the South we like to call it 'Finishing Off' a painting.  You know as in kill it....overworking a painting until the freshness is gone.

Why does this happen?  I have a theory. Sometimes we think we need to work for a certain amount of time for a painting to be worthwhile or good.  If we create a painting too quickly how could it be any good?  So we plug away adding more and more pastel sometimes with no plan.  This happens often in a class or workshop situation where an artist just noodles with a painting until the instructor comes around.

After the block-in and the first layers of pastel are added. Slow down and make sure every mark has a purpose. No NOODLING! 


'Cherry Grove'        5x7        pastel      
Here are a few tips to help you prevent overworking your paintings.

  • Stop after each layer of pastel to evaluate the painting. Put it in a frame or mat and step back.
  • A frame or mat will help you remove distractions and will show off the painting. Often I am surprised at how a frame makes a painting look more finished than I thought it was.
  • If you aren't sure what to do next then STOP. This is another good time to step back and evaluate the painting. Ask yourself if you have said everything you wanted to say in the painting.
  • If you still aren't sure if you are done then you probably are or else you are very close.  Allow yourself to make 3 or 4 marks. It is often these last well placed marks that finish the painting.
  • Don't allow yourself to watch the clock....if you are happy with a painting after 10 minutes stop and put it aside. Evaluate it later. This is better than overworking and ruining the freshness.
  • Don't feel like you need to have every square inch of the painting covered with heavy pastel...having some areas unfinished and mysterious can be very effective.

Monday, April 15, 2013

N is for Nupastels....when to use them


'Life in the Country'         8x10         pastel        ©Karen Margulis
SOLD

Nupastels.  For many of us pastelists these hard sticks are the first pastels we purchase. They are inexpensive and readily available. Along with a few Rembrandt pastels and some Canson Mi-Teintes paper we begin our journey with pastels.

But our journey often stops right there.  Why? Because the Nupastels and the Canson paper don't give us the results we want. We can't get those vibrant chunky marks that we admire in many pastel paintings.  So many artists give up on pastels.  This doesn't have to happen. We just need to learn when to use the Nupastels!

The 4 Nupastels I used to block in today's painting.

Nupastels are useful pastels. They need to be a part of your supplies but in order to really experience all that pastels offer you also need to have some good softer pastels in your box. I always encourage my students to buy the best supplies they can afford. This helps eliminate much of the frustration of working with very hard pastels on paper without much tooth.

I like to use Nupastels for my Block-in.

Nupastels are perfect for the important first layer which I like to call the BLOCK-IN.  They are considered one of the hardest of the soft pastels and so they don't put out a lot of soft pigment. So they don't fill up the tooth of the paper as quickly as a softer pastel.

Some of the Nupastel block-in showing along with further work with softer Terry Ludwig pastels
One of the ways I like to start a painting is to choose 4 values of Nupastels and to block in the large shapes of the painting using these 4 pastels and matching the values in my black and white thumbnail. After I put down a layer of Nupastel I will often blend it into the paper with a piece of pipe foam insulation. Sometimes I will use rubbing alcohol to create a wet alcohol wash.

After this first layer the paper will still have plenty of tooth for the subsequent layers of softer pastels. Today I used Terry Ludwig soft pastels.  I will not use the Nupastels anymore in the painting unless I want to add some finishing fine details.

By the way I would like to thank everyone for all of the wonderful comments to my posts while I was away last week. I appreciate you all taking the time to add to the discussion!  I would have loved to respond to everyone but the internet connection on the ship was painfully slow and expensive!