 |
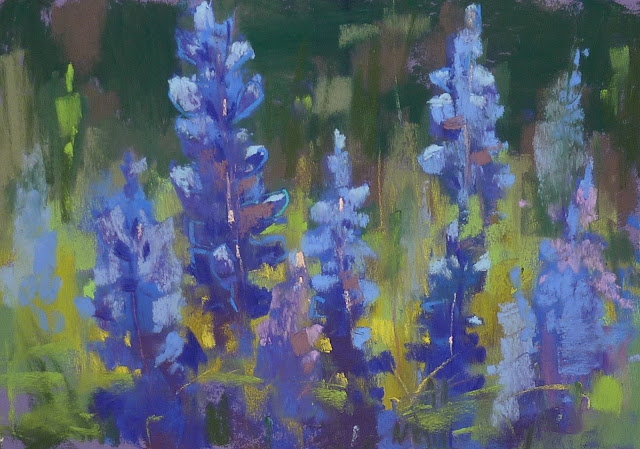
| 'Time for Bluebonnets' 5x7 pastel ©Karen Margulis available $75 |
It's all about expression. I want to capture the essence of a flower. I am not interested in a photographic likeness or a botanical illustration. I want to use color and value and marks to suggest the flower. There are some things I do to help me achieve a more painterly flower and I will share them with this pastel demonstration of some Bluebonnets.
Tip #1 It begins with study. It is important to get to know the flower. What colors are they? What are their growth habits? What kind of foliage do they have. Sketching them and observing them from life is a good start. Photos don't tell the whole story so real life observation is important. I paint from my photos but I make sure to spend time observing in real life too.
Tip #2 Start the flowers as simply as possible. Look at the overall shape. Draw an imaginary outline around the flower head to get an idea of the typical shape. In the case of Bluebonnets, they are upright shapes of various heights. They are comprised of individual petals that grow from the center stem. The petals resemble the bonnets pioneer women wore hence their name. I start a bluebonnet by lightly drawing the overall shape. I will refine the individual petals as the painting progresses.
Tip #3 Begin the flower with the darkest blue pastel you see. Bluebonnets range in color with a mix of blues to even pink and sometimes even white. When painting the typical 'Blue' Bluebonnet I always use blue or purple to block in the flowers. I rarely underpaint the flowers with a color other than blue or purple. I don't want to dilute the intenseness of the blue. I begin with the darkest blue-violet I have. I know I can get lighter so I want a nice rich dark base.
Tip #4 Create a small set of Bluebonnet colors. I like to choose the sticks of blue and purple that I will use for my flowers and line them up from darkest to lightest. I start by blocking in the darkest blues and purples and then gradually layer the lighter colors. I allow some areas of dark to peek through to give variety. I am still keeping the flowers heads simple upright shapes. I will begin to refine them after layering several colors.
Tip #4 Use Negative Painting to define the flowers. I paint the background and allow it to carve and define the petal shapes. I use the colors in the background like a knife....covering chunks of the blue to create petals. This is a great way to have suggested petals rather than stiffly painted petal shapes. I will paint some petal shapes using thick chunky strokes after I have refined the flower heads.
Tip #5 Use lines to define a few petals. I use lines sparingly but sometimes a well place linear mark can call attention to a petal and pull it forward. I don't want every petal to have the same level of detail....only on the flowers that are the most important.
With a few simple tips I am able to get a more painterly flower. Remember too that practice goes a long way in making bold and confident marks.
 |
| A few colors that I used for my Bluebonnets |


2 comments:
This is so beautiful! I wish I could be there with you and Marsha to paint bluebonnets!
Great blog, as always! I haven't been selecting my colors in advance...I need to start doing that! I'm sure that would help my painting.
Post a Comment