Visit my Patreon Page for more painting instruction and Paint Along Videos!

Tuesday, October 31, 2017

Do You Want an Explosion of Color?

'Nature's Peace'             9x12          pastel        ©Karen Margulis
sold
 I came home from New Mexico to a wonderful surprise. A friend had sent me two wonderful aprons and a set of Derwent Inktense sticks. What special treats!  I couldn't wait to put the sticks to use. I pulled out a piece of Uart paper and a photo from New Mexico and set to work.

I've used the Derwent Inktense blocks as they are called but I only had a few single sticks. I was like a kid in a candy store with the set of 24 colors. I have a set of 24 Intense pencils but the blocks are better suited for underpaintings.

Derwent Inktense Blocks are ink in stick form....wet and watch them explode with color
 If you aren't familiar with this product they are actually inks in solid form. They are called blocks but they are the same shape and size as a Nupastel stick.

  • You can work with them in a variety of ways but they are meant to be wet. Once they are wet they turn into liquid inks. You can wet them with water or rubbing alcohol or even turpenoid. Once they are wet they just EXPLODE with rich vibrant color. 
  • They can be mixed and layered. You can manipulate the wet ink with sprays of water or alcohol. I got some great drips with the rubbing alcohol.
  • They are fantastic for underpaintings for pastels. They are more vibrant than watercolor and very portable. 

My reference photo and underpainting on mounted Uart (the old uart mounted paper) 
I had a lot of fun with this underpainting. I used yellow Inktense sticks for the foliage to give my trees a head start. I find yellow very challenging to keep vibrant!  I loved the effects I got with the alcohol wash. Look at the interesting drips!  My goal was to allow some of this underpainting to peek through. If you haven't tried these yet put them on your list. They are too much fun!

The finished underpainting. Look at the cool drips!
Watch the underpainting come to life in this week's Patreon Video!
Come join the fun on my Patreon page. This week I posted the video of the underpainting and step by step demo of this painting. The cost is $4 a month for unlimited access to all of the content on the page. I also have a community page for you to share your work and ask for feedback. www.patreon.com/karenmargulis

Monday, October 30, 2017

How Weather Can Change a Painting

'Summer Will Come'            8x10         pastel plein air study              ©Karen Margulis
I am painting today from a plein air field study. The study was painted on a rainy day and it brought to mind the points I covered in this past blog article. I thought it was a good time to reshare. Enjoy this post from the archives!

Time is not always on our side. Especially when painting en plein air. When we paint outside we become a part of the very subject we are trying to capture on canvas (or paper). We are at the whim of Mother Nature. We have to deal with bugs, heat, cold, wind, rain to name just a few challenges faced by the intrepid plein air painter. Weather is a big challenge.

Weather is a challenge but it also influences the paintings we create. Challenging weather conditions can cause us to paint faster....and faster is sometimes better but it is always much different than slow.

I prefer painting quick small studies on location....field studies. I work fast trying to capture the essence of the scene. Like taking notes. So I embrace challenging weather.  It forces me to work quickly.  And I notice something in these fast weather driven paintings...they are fresh and loose and truly capture the feeling of the moment.

Take the paintings shown in today's post. They are all painted during my week in Finland all at the same spot. The only variable was the weather. They are all 8x10 pastels. Let's compare:


The painting above was painted as a demo in about 10 minutes. The goal was to show the class how I like to work to quickly to capture the feeling of the scene. I was drawn to the brightness in the sky that had suddenly appeared to break up the overcast sky. I had to work quickly to capture this shaft of light. Everything is just a suggestion. There is very little details in the trees. The main thing I wanted to remember was the shapes and colors. 10 minutes was enough to capture this. And it was a good thing because it quickly changed and the light was gone!

'Summer Study Finland'          8x10      

The painting above is the same location with a sightly different point of view. The weather was different this time. It was overcast with a gray sky filled with light clouds that were rolling and changing quickly. It was also windy. I wanted to capture the feel of the wind. I had more time to play with since there was no strong source of light. Conditions were constant....overcast and wind.
I spent more time on this painting. (maybe 30 minutes which is long for me)  I concentrated on the trees and grasses. Since conditions were constant I had more time to develop them in greater detail. I added the bright spots on the water since it was also agitated by the wind.

The weather conditions gave me more time and so I took more notes!

'Summer Study 2 Finland'      

In the last painting time was on my side. I was in the land of the midnight sun so the magic hour lasts for hours! The sun didn't set until around 2 am. Normally to capture a sunset we would need to paint quickly. For this painting the sunset conditions remained the same for hours! It was also very calm and still. I had more time to work at a slower pace (although I still chose to work quickly 30 minutes) But if I wanted I could have painted larger or painted a more developed painting.

Often we struggle with plein air because we try to do too much and we fight the weather conditions. Let the weather dictate how you respond to the scene and think about simply taking notes in paint when the weather isn't cooperating!

Sunday, October 29, 2017

Three Ways to Create Depth in Grasses


'Autumn Tangle'          7x5        pastel        ©Karen Margulis
available $95
Oh the things that excite me! There could be a fantastic vista in front of me and my eye will wander and find the patch of dead weeds!  This is my favorite time of year for this motif. The time of year when the flowers of summer are spent. If I am lucky I find their remains in tangles of dried grasses. I love painting them and have become better at portraying the tangle of grasses and spent blooms.
As I worked on today's painting I thought of the things I do to help me paint the dead weeds and create depth in the weed patch. Here are three of my favorite tips:

1.  Build from large simple areas of pastel and gradually use smaller and more defined marks. I apply the pastel with the side of the stick creating 'washes' of color before painting a single blade of grass. When I build the layers of grass I use more detail on top of the flat areas of pastel. The thicker grasses are applied with a firm hand. I like to have bits and pieces and chunks of color to suggest the variation found in grasses.

2. Start with the darkest colors you see in the mass of grasses. It is always a good idea to work from dark to light with pastel and when building up a complex angel of grassy stuff it is best to have the darker layers down before adding the lighter colors. Add the bits and pieces of color as your final marks.

3. Try using workable fixative or a spritz of rubbing alcohol to darken and 'fix' the first layers. Then when the lighter colors are applied they will skip over the fixed areas revealing some texture that helps suggests grasses. I like to use Blair Low odor workable fixative. 
*Note: apply the fixative with a light spray keeping the spray can moving. Don't allow the surface to get too wet or it will be slick and not receptive to pastel.

Beginning to build the layers


Saturday, October 28, 2017

Autumn Tree Demo on Uart Dark Paper

'Three Friends'           12x9          pastel on Uart Dark        ©Karen Margulis
available $145
When I saw the photo I knew just what I needed. I wanted to capture the crisp brilliance of the trees on a sunny Fall day. I wanted to colors of the foliage and the light on the tree trunks to come alive. I considered my options. I could do a bold underpainting blocking in the reds and greens and brilliant blue. I could do some kind of value underpainting establishing a roadmap of values. I could work on white paper and do a colorful and drippy watercolor underpainting. All of these options would be good but I had another idea.

These trees called out for black paper! I pulled out a piece of Uart Dark 800 grade. The dark charcoal tone of this paper would really help the colors come alive.

My Reference photo 
I started the painting with a plan. I did a small value thumbnail and selected the pastels I wanted for the painting. I drew my trees with a dark blue Nupastel which was visible on the Uart dark paper.

All set up and ready to paint!
My goal was to keep the foliage masses as simple as possible for as long as I could. It was such a busy scene and I really wanted to capture the kaleidoscope of colors.  I built the layers with wide strokes gradually changing to paint the individual leaves with smaller blocky strokes. It was fun to watch the painting progress and change with each layer added.


Building the color in the tree trunks...close up photo


As I painted I took photos of each change or layer. The entire step by step demo can be seen on my Patreon page. If you haven't has a chance to check out my page now is a good time! Unlimited access to my step by step demos and exclusive videos and exercises are available for a pledge of $4 a month. 
You can cancel at any time if you decide it isn't for you! www.patreon.com/karenmargulis

Friday, October 27, 2017

Seeing Pictures Emerge: Fun with Scrap Paper


'Autumn in Maine'            8x10          pastel         ©Karen Margulis
available $145
 I wasn't sure what I wanted to do with this piece of scrap Uart paper. It was actually a nice piece that I had mounted so I really needed to use it. But it was covered with some demo clouds. I had used the piece to show a student some tips for painting clouds. I usually brush out something like this but I had a different idea for this one.

A scrap piece of Uart used to show cloud painting tips
I took a piece of pipe insulation foam and rubbed in the pastel. I softened the blue sky and cloud marks. It morphed into an interesting and soft flow of color. I stared out it for awhile and slowly an image began to emerge. I saw the sky and some golden sand. I saw the shape of the water and even some tree shapes. It was exciting to imagine the painting that might come of these shapes!

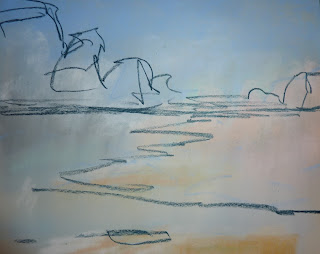
I could have simply painted from my imagination. But I was reminded of a scene I had seen on my recent trip to the Maine coast. I pulled out my photos and found the one I remembered. It was an eerie match! I eagerly used a Nupastel to draw in the big shapes. 


Drawing the new picture with a piece of Nupastel
 Since I was working on mounted Uart sanded paper I decided to pump up the values and colors with an alcohol wash underpainting. I used some of my new Derwent Inktense sticks (more on this later) with some rubbing alcohol and a stiff brush and waited for the underpainting to dry.

Adding some color with Inktense sticks and an alcohol wash
 I worked on the painting slowly building the layers beginning with the darks and then moving from the sky down to the rocky ground. It was fun to pull a painting from the mysterious leftovers on a piece of scrap paper!

Thursday, October 26, 2017

Workshop Review: New Mexico in the Fall

'Meadows of Gold'           9x12           pastel         ©Karen Margulis
available $145
 It seems to get better every year! This year my workshop at Our Lady of Guadeloupe Benedictine Monastery in Pecos New Mexico was an amazing experience. The weather cooperated and we were blessed with peak fall color and comfortable days. We had some wind the first two days but then it settled down and we basked in the warm sunny days.

The location is beautiful and the monastery welcomes us and treats us well but it is the artists in the group that make a workshop special. It is a wonderful thing when artists of all abilities and from all over (even as far as Toronto!) come together and form new and lasting bonds of friendship. Everyone in this group were supportive of one another no matter how experienced with pastel and plein air. It was a group of kind and joyful people which made it a pleasure for me to share and celebrate their successes.

I am still getting unpacked and caught up and cannot wait to get back to my easel. I thought it would be fun to share some photos of the monastery so you can see the beauty that surrounded us all week.

A collage of my demo paintings from New Mexico 

Down by the pond

New Mexico at it's finest

The trail down to the river. Look at that blue sky!

Morning light

The skies were amazing!

One evening at sunset.
And that is only a small sample of the wonderful subject matter that inspired us. I hope to go back again next fall!

Wednesday, October 25, 2017

7 Tips for Better Painting Demonstrations

'Joyful Skies'            9x12          pastel        ©Karen Margulis
available $145
I like to have a plan. When I have a plan and know where I want to go it is much easier for me to relax and let go. This mindset is important for my painting but it also works for doing painting demonstrations. I remember my very first painting demo and how nervous I was. I wish someone had given me some advice for overcoming the butterflies.

Perhaps you have been asked to paint for a group or to demonstrate some pastel techniques. No matter the size of the group butterflies are normal but preparation is the key to success. I have just returned from a workshop during which I painted over 10 demonstration paintings. I am now prepping for my next workshop which will also require 10 demos. I thought a list of demo tips would be helpful. No matter what your level of experience at some point we are all asked to share some painting and pastel tips! Enjoy the list.

Back in the studio prepping fro my next workshop!

TIPS FOR PAINTING DEMOS
  • Paint something you are familiar with. In fact I prefer to paint something I have already painted. Having familiarity with your subject will allow you to multi task and talk as you paint. If you are unfamiliar with the subject you might be too preoccupied with making the painting work to talk or answer questions.
  • Practice the painting on your own. Plan out your palette and plan out the points you want to make. Then practice the painting in front of a friend. Have the friend interrupt you and ask questions. 
  • Practice talking about the painting process and the steps you are taking without actually painting. Imagine you are painting as you talk. Do this over and over as often as it takes for it to sound natural. I like to practice my speaking in front of the dog and cats!
  • If you can talk about your process and paint at the same time your audience will appreciate it so practice, practice and practice some more. If you know your material then it will be easier for you to improvise and respond to questions.
  • Come to your presentation prepared. Have your pastels selected and your paper mounted. Don't forget business cards and a handout with information about your materials and process.
  • Come early and get set up before the audience arrives. This way you will have time to relax and talk to the audience before you start. This often helps to alleviate some of the butterflies!
  • And finally here is a tip I overheard from a conversation among pastel masters.......If the painting isn't working or going in the direction you wanted keep painting and don't apologize or even let on that it isn't working. Your audience will probably never know. If you get nervous and start apologizing it will make the audience uncomfortable. 

Come paint with me!! 
There are still a few spaces available in my upcoming two day workshop in Ann Arbor Michigan. I will be teaching at Artensity Workshops the first week of November. The three day workshop filled quickly so we added a two day workshop. The workshop theme is 'The Mystery and Magic of the Underpainting' and will be held on Thursday and Friday November 9th and 10th.  Click here for details and registration.  


My unfinished cloud demo from New Mexico before adding some final marks.

Monday, October 23, 2017

Painting An Orange and Red Tree

'Ready for Fall'              16x20              pastel            ©Karen Margulis


I am in New Mexico this week teaching a workshop so I am sharing this post from the archives:

I have gone from yellow to red to orange. I don't know why but everything has to be red and orange  this week.  So I wasn't too surprised when I pulled out a painting from last fall and decided I needed to change the colors of the tree from red to orange.

Do you ever take out an older painting and change it? I love to revisit older paintings and put on my 'what if' hat and see what could be done to change it. This painting had already been through the 'what if' process. It began life as a summer landscape. I blogged about the changes I made last year. Keep reading to see what I did last year and what else I did to the painting this year!

Last Year's revised painting

My post from last year:
When I finished this tree demo for my Wednesday night class I felt the pull to make it into an Autumn landscape.  I put on my 'What if?'  hat and asked myself ...."I wonder what would happen if I made this tree into a red tree?  How would I do that?"

The tree was fine as a green tree. But I am over green! So I went through my photo files and found a picture of a red tree and another of some fields in Fall colors. (this is a benefit of taking thousands of photos!) See the photo below for the original tree and photo along with the new reference photos.

The original demo featuring a Summer landscape with a green tree


Here is a summary of my process for changing the season of this painting:
  • The first thing I did was test the red pastels on my tree to see if I liked what was happening. I decided that it was a go. There would be no turning back....after all it is only paper. By the way I am using a sienna color piece of Canson.
  • Since I am using Canson I am limited to the number of layers I will be able to put down so I give the tree and the field a light spray of workable fixative. I liked the sky as it is so I didn't spray it. Now it will be easier to add more layers of pastel. I also like the texture the fixative gives.
  • I work on the big tree first. I want to be sure to keep  the light in the painting consistent. So I basically follow the light and shadows already in the tree. I used a cool dark brick red for the tree shadows. I use a warmer red in a middle value for the rest of the foliage. Where the light is hitting some of the leaves I use a warmer orange red. (go warm instead of light to get the illusion of sunlight)
  • I like the peeks of green from the original tree color. It makes the red more intense as well as making it look like the tree is actually changing color.
  • Next I need to work on the field. It is much too green for the red of the trees. So I use some ochres and yellows to tone it down and give the grasses more of an autumn feel. 
  • I decide to tone down the path and make it a bit more subtle.
  • Now that the path is merely a suggestion AND the tree so intense the painting feels unbalanced. There is nothing on the right side to balance the weight of the big red tree. So I added a smaller bush on the right. 
  • Now I had to break up the field in the mid to foreground. I didn't want it to be a big flat area. I made some directional strokes sloping down towards the path. I also took some of the pale yellow ochre in the distant field and put some behind the tree and bush to add another layer.
  • I went back to the big tree and added some branches and refined the skyholes.
  • Finishing touches: I decided to add some of the whitish-yellow wildflowers that I have been seeing everywhere this Fall. I tried not to overdo them and just merely suggest them.  
****Update. The tree was fine as a red tree but it lacked life and I didn't like the squared off shape of the tree top. To change the tree I sprayed some workable fixative and stumbled a few of my new orange Unison pastels to add some orange foliage. I also punched up the foreground flowers and added some purple asters for spice. I also made a few more subtle revisions. Can you spot them?

That was fun! I think I'll paint another Autumn tree!  It sure is fun to put on my 'what if' hat!

Sunday, October 22, 2017

Confessions of a Seasonal Painter


'Reflection'             9x12            pastel            ©Karen Margulis


I am a seasonal painter.  I love painting the landscape in every season. Every season has moments that inspire me.  I love the colors of fall. I LOVE painting snow. Spring brings flowers and summer brings long days and Queen Annes Lace.  But.... I only like to paint each season in that season. I can't wait to paint snow but I need to wait for winter. I am funny like that.

Maybe it is because being present in the season inspires me. When I am surrounded by the smells and colors of fall and the first crisp clear days I want to capture these feelings in a painting. Sure I can look at photos of snow in the heat of summer but unless I am on top of a snow capped peak somewhere in the arctic.....I don't feel inspired to paint it.

It's getting cooler in Georgia and the leaves are starting to turn. The smell of Cinnamon brooms and pinecones greets us in the grocery store. This is a sure sign of fall. It feels only right that I should paint autumn landscapes. 

watercolor underpainting
The wonderful thing about being a seasonal painter is the excitement of revisiting a favorite subject as each new season arrives. It is always interesting to look back on previous years to see how I painted the season. How have I grown as an artist? Are my autumn trees changing? How? The answers to these questions are important. They help me understand where I have been and where I am going.

As fall arrives I begin my annual reflection and begin a new series of fall paintings. After a few weeks I will have exhausted this subject and will look forward to the next season.

Painting notes:  9x12 white Wallis paper with a watercolor underpainting.

Friday, October 20, 2017

First Look at Jack Richeson Handmade Soft Pastels

'On a Gray Day'        5x7        pastel        ©Karen Margulis
 I love hidden treasure. That's what happens when you get busy and things get hidden under piles of stuff. Today I was looking for something when I found a stash of Jack Richeson pastels that I had purchased at the IAPS convention in June. They were giving away samples but the colors were so luscious that I bought about 20 more. I chose some greens that I thought I could use as well as some bright 'spice' colors.

This post isn't a complete review of these pastels since I didn't do a full test. I only pulled out this collection of greens because I knew they would be perfect for the little study I was working on.

Jack Richeson Handmade Soft Pastels
My intention was to use these pastels as spices....that is the final marks on a painting. After my brief use today I think they will be great in this role.

  • The size is perfect. They are round and about 1 1/2 inches long. This is the perfect 'brush' size. Not to big and not too small.
  • They are firm and not at all crumbly. I pressed hard and the pastel stayed intact and didn't break.
  • They go on soft. Even though they aren't crumbly they are soft enough to leave a nice amount of pigment. My first impression is that they are on the 'buttery' side which means they feel soft and a bit creamy. I will test them some more to see if this first impression is accurate.
  • The colors are wonderful. At the convention they were all on display like a wonderful candy store. Between this booth and Terry Ludwig's booth we were all in trouble! I couldn't resist choosing a bunch of them. I also loved the little plastic cases that the pastels came in. These will come in handy for traveling with a few extra spices!
These hand rolled pastels are available at Dakota Art Pastels and they are on sale this week. I plan to do a more thorough review but it is a good time to buy some to try for yourself!

Wednesday, October 18, 2017

The Benefit of Using Mini Reference Photos


'Change in the Air'          8x10         pastel       ©Karen Margulis
available $145
 I like mine small. Very small. In fact I like them so small that I can hardly see them especially with out my readers. I'm talking about reference photos. I am not anti-tablet or iPad but I do prefer a physical reference photo. But I want them small! This is my guiding principle when using photos.

The less you can see the more you are free to interpret what you do see.


Contact sheet of reference photos

That is why I like my reference photos small. I only want to see what is important. I can see the big shapes or maybe a color that excites me. I can see patterns of light and dark. Seeing the big shapes of light and dark form the bones of a strong painting.

I may not be able to see the tiny details but that actually allows me to concentrate on what is important. I won't get caught up in painting detail too soon. It won't allow me to put in more detail than is needed!
The reference photo used for this painting 3x2 inches!
Painting notes:  8x10 on Walllis warm mist discontinued paper. :(  with an assortment of Terry Ludwig pastels.

NEW ON PATREON TODAY! I have posted a new video demo of an intimate autumn landscape. This video is available to patrons who pledge the $4 a month for expanded content. Have a look: www.patreon.com/karenmargulis


How To Start a Painting With an Abstract Underpainting


'A Flash of Red'          8x10         pastel         ©Karen Margulis
available $145
I'm not about to waste a good piece of Uart paper. So when I saw this piece on the pile I had an idea. It was covered with red and purple squiggly marks....the result of my recent video on mark making. It served it's purpose but I hated to just throw it away.

So as usual I put on my 'What If' hat and thought about how I could reuse the paper. The easiest thing to do would be an alcohol wash. So I poured some 70% isopropyl alcohol into a cup and took out a stiff bristle brush.  I scrubbed the alcohol into the pastel marks and let the liquid do its magic. I couldn't get rid of the heavy lines so they became a part of the new underpainting.

I'm not about to waste a good piece of paper!

When the underpainting was dry I was pleasantly surprised. It was actually kind of an interesting abstract painting. But in it I could see a red tree trying to emerge! It would be a great way to start my  intimate autumn forest scene. 

I usually have some kind of plan for my underpaintings. In this case I simply wet some colors and marks and let them become their own abstract design. I then responded to this abstract. It was a fun way to start a painting and one that I will definitely try again!

A little rubbing alcohol and voila!


The finished painting. Watch the demo on YouTube
NEW ON PATREON TODAY! I have posted a new video demo of an intimate autumn landscape (the painting at the top of this post)  This video is available to patrons who pledge the $4 a month for expanded content. Have a look: www.patreon.com/karenmargulis

Tuesday, October 17, 2017

Try This Great Painting Exercise


'Fall Memories'            5x7         pastel         ©Karen Margulis
available $95
I got back on the ship with both my camera's memory card and my own memory full of beautiful images. I would have loved to paint plein air on our stop on Mount Desert Island Maine but our time was very limited. A friend generously offered to give us a quick driving tour and it was awesome. I did my usual 'drive by' shooting taking as many photos as I could while Alice drove.

Of all the images I took it was interesting that I recalled one particular scene more clearly. It was a stand of yellow trees against a moody, misty, cold and blustery day. The following morning I took out my small pastel kit and decided to paint this scene from my memory. I glanced at the photo of the scene on my camera and then put the camera away.


My smallest travel kit is the Heilman Single Sketch Box filled with Girault pastels

I thoroughly enjoyed the freedom of painting without trying to be true to a photo. I was able to put in the details that I recalled. These are the things that really mattered to me.  I was able to create the scene using my imagination. I could arrange the elements and play with values and colors to create an interesting painting. It was liberating!

Try This: Pick a reference photo that YOU TOOK. Glance at it for a minute and then put it away. Now paint the scene pulling things from your memory and imagination. Have fun!

Girault pastels are wonderful. They look hard but go on soft!