Visit my Patreon Page for more painting instruction and Paint Along Videos!

Monday, August 31, 2020

Tips for Painting Grasses with Pastels


'Looking In'                   12x17              pastel               ©Karen Margulis         available $225               


My grass painting has evolved. I have gone through the stages from painting every blade of grass with stiff fence-like marks to big swaths of green with no detail. As my style evolves the grass goes along for the ride! Lately I am interested in getting more depth in my grassy areas of a painting. Even in closeup viewpoints I want the viewer to feel like they could put their hand in the grass and not just on the top layer.  To do this I have to build up many layers of complexity.
You can see this painting in a video demo on my Patreon Page. 

Here are a few tips to help your treatment of grass in a painting.

  •  Avoid painting individual blades of grass. Think instead of the big underlying shapes or blocks of grass. Pull out and paint a few blades. Allow the viewer to participate and fill in the rest. A few well placed blades will read as grass.
  • Using the long edge of a soft square pastel use the press and lift method to leave a print of a piece of grass. Do a few but be careful not too have them spaced too evenly or all marching in the same direction.
  • Use the top edge of a harder round pastel and roll it leaving a broken line of grass.
  • Lay down a block of color and then draw some lines of grass with a thin hard pastel. Draw a SENSITIVE line. Have a light responsive touch so the line isn't to thick or regular. Practice sensitive lines.
  • Paint on a heavily textured surface. Glide the pastel over the texture and it will look like grasses without putting in a blade!
  • Underpainting! I like to use an alcohol, turpenoid or oil stain and allow the drips to create the grasses.


       I used a small quick response study along with a reference photo to inspire my painting.


Check out my Patreon group at www.patreon.com/karenmargulis 
 

Thursday, August 27, 2020

Have You Tried an Oil Stain Underpainting?

              'Stop for the Magic'                     9x12             pastel          ©Karen Margulis       $175
 
Ahhhh the smell of oil paint and Gamsol filled my studio today. It made it feel like a real art studio somehow. Pastel is an odorless medium and I forget how much I love the smell of paint.  I took the oils out this month to share the technique with my Patreon group. 

I love to experiment and change things up!  Different papers, different pastels and different underpainting techniques are all things I look to try. This month I decided to do an oil stain underpainting. It has been awhile since I have used this technique but I do love it. Read on for some tips on making the best of this technique.


Tools of the trade

SUPPLIES NEEDED

  •  Paint: a few tubes of oil paint. I only use alizarin crimson, ultramarine blue and cadmium yellow medium and mix the colors I need. I don't use white since I want my colors to be rich and transparent. I don't use black either but mix red and blue for a nice rich dark.
  • Brush: I use a cheap bristle brush because I like to scrub the paint and the sanded papers are hard on a brush!
  • OMS: which stands for odorless mineral spirits. You can use your preferred brand. I use Gamsol or Turpenoid. Do not use the Turpenoid in the green can. In my experience it doesn't dry as well especially if you use it to do a wash with pastels. You will also need a can or jar for the OMS.
  • Paper: You need a pastel paper or board that can get wet. I prefer Uart paper. Ampersand Pastelbords are an excellent choice as well. For today's painting I used Pastelmat which wasn't my favorite choice. I didn't get the drips I usually get with Uart paper.

closeup of the oils stain

I love the vibrancy of the oil paint. It makes a rich and colorful underpainting. The trick is getting the paint the right consistency. I call it an Oil Stain because you want to get the paint the consistency of wood stain. I use the OMS liberally when mixing my paint and make a puddle of color the consistency of stain or tea.  If it is too thick the painting will fill the tooth of the paper and you won't be able to layer much pastel. If it is too wet it will just run and it won't stain the paper.

TIP: If you can see brush marks in the paint then it is too thick....thin it with more OMS. Practice, practice and more practice will allow you to know just how much OMS is enough.

As the paint dries the magic begins. The best underpaintings will result in interesting drips that look like root systems.  The Pastelmat absorbed the paint so quickly that it didn't drip. It was a bit disappointing but I still loved the vibrancy of the oil paint and it gave me something colorful to respond to.

The painting in today's post is the Paint Along demo this month for my Patreon group. Paint along with me! www.patreon.com/karenmargulis

Friday, August 21, 2020

Video Demo: How to Paint More Vibrant Reds!

      'Power in Memories'                 5x7                   pastel          ©Karen Margulis        available $100


 Returning to favorite subjects is always a good idea when doing quick response studies. It helps you get to know your subject. One of my favorite motifs is poppies. Whether they are close up and intimate or in a meadow filled with flowers, I always learn something new when I paint them.

Last year I made a video of a close up poppy demo. I discuss how to get more vibrant reds. If you missed this video you can watch it on my YouTube channel. The link is below:

                                                    https://youtu.be/NT6mX-aGhrQ 


YouTube is a great resource! If you have not checked out the wealth of art videos on YouTube be sure to give it a try. I have a YouTube channel and I try to post something new every week. This is in addition to my regular Patreon videos and lessons. I'd love for you to subscribe to my YouTube channel and check the notification bell so you know when I upload a new video!  


                                                                       The demo painting!

Wednesday, August 19, 2020

15 Minute is all you Need!

        'Sunny Days II'                  5x7                   pastel                  ©Karen Margulis.     available $100


It has been awhile since I did this fun little exercise. It is just what the doctor ordered! Take a reference photo and paint 4 quick studies based on the photo. Set the time to 15 minutes for each study. It is a great little exercise if you want to do the following:

  • paint more
  • paint faster
  • paint looser
  • paint with more passion and expression
  • paint what you love without guilt
  • add more miles of paper or practice without spending a lot of time
  • overcome fear
  • build confidence
  • break out of a block 
  • break free of a rut
  • explore without fear of wasting good paper
  • explore color
  • explore mark making
  • discover new approaches
  • discover new compositions for familiar subjects
And I could go on but you get the idea. This is an exercise that I need to do more often. Many artists already do it and many instructors do some variation of the exercise in their classes. I call my version 15 Minute Explorations. They can be done as a warm up before painting or a wind down after painting. Or they can be done on their own during your studio time


        'Sunny Days'                            5x7              pastel            ©Karen Margulis.          $100 

JOIN ME ON PATREON TO JUMP START YOUR PAINTING PRACTICE!  www.patreon.com/karenmargulis

Monday, August 17, 2020

New YouTube Video. How to Paint without a Plan!

          'Forest Light'                   pastel                   ©Karen Margulis       available $155


Planning a painting leads to a better chance of a successful result. But sometimes I just want to paint! I have one quick question I ask myself that helps me get started with a painting without a lot of planning time. I also often answer this question and then do a quick response study. In this video I show you a demo based on one of these quick response studies. 

                               Click on the link below to see the video on my YouTube channel. 


Join us over on my Patreon group if you would like to explore the idea of doing quick response studies!


Thursday, August 13, 2020

Trying a New Set of Pastels!

                'Nothing But Dreams'                 9x12            pastel            ©Karen Margulis    available $165


I finally did it! I got into my new set of Unison pastels. They had been on my desk for a couple of months now! I had a gift certificate to use for Dakota Pastels so I treated myself to a new set by Unison ....the Light and Shade set. It looked intriguing. I like to have a variety of colorful lights and colorful darks and that was the focus of this set! I will be doing a video review next week in my Patreon group but I always like to use or try to use a new set exclusively so I can get to know it better. 


I loved my first look at this set and I can see me using these colors a lot but more likely as part of my main collection rather than a stand alone set. If this set had another row of middle dark values it would be perfection!


                                              Yes I take the labels off and break them in half!


We are also doing oil stain underpaintings this month so I decided to use one of the underpaintings for this forest scene. I love the interesting drips that the oil stain gives. 


Here is the painting at the almost finished stage. I needed to supplement the set with a few middle value greens and yellows. 


I will be sharing more about this set in the coming days as I explore it even more! Have you tried this set? How do you like them? 

Tuesday, August 11, 2020

Do This Every Five Years!

       'Sanibel Island'                    8x10               pastel                 ©Karen Margulis      available $165


I have been painting for 15 years now. Sometimes I feel like I have just begun. The time has gone by so quickly. It has been a wonderful journey so far and I know I have much more to learn. Every once in awhile I like to take time to look back to see how far I have come. I have an ongoing 5ish year project. I paint an updated version of one of my earliest painting. I use the same size 8x10 and use the same reference photo. I don't look back at the older versions. The results have been interesting!

Have a look at the older versions. I can see how my approach and understanding of the basics of painting has changed over the years. I will look forward to the next 5 years!

How long have you been painting with pastels? Is it time to paint an  updated version of one of your early paintings? Is it time to start your own five year project?

This is the 2013 version


This is the original painting done in 2005


Paint and learn online with a great group! Join me on Patreon for lessons demos, videos, challenges and more! This month we are working on painting small studies. It is the perfect time to jump in and join us!

                                                   www.patreon.com/karenmargulis

Saturday, August 08, 2020

Building Up Texture for Pastel is Easy!


        'Secret Garden'             16x20         pastel                ©Karen Margulis             available $325


I am still on the texture kick! I am intrigued by the build up of physical texture on my paper. One of the things I like about oil and acrylic is the ability to lay on thick paint and push it around with a palette knife. Sure we can use soft pastel and make heavy thick marks but we always risk that the chunky pastel mark could flake off. 

I have been experimenting with using clear gesso over older failed paintings. The gesso mixes with the pastel forming a thick paste. I brush this paste over my paper and then use a palette knife and other tools to drag through the paste. This results in raised areas once the gesso dries. Here is a photo of some of my tools. I had my painting subject in mind as I created the textured surface. 

You will want to use a paper or surface that can take abuse and can get wet. I used a piece of unmounted Uart 500 paper. It stayed perfectly flat as it dried! If you missed my post last month about this technique you can see it here:http://kemstudios.blogspot.com/2020/07/how-can-you-use-palette-knife-with.html

Today's painting started out as a failed older painting and went through several iterations. It was at times frustrating but I kept plugging away. I will be sharing the entire progression later in the month on my Patreon Page. Please consider joining us! www.patreon.com/karenmargulis

Thursday, August 06, 2020

Remembering Elizabeth Mowry


'Island Summer Breeze'               9x12                 pastel              ©Karen Margulis
available $250

In Memoriam
Elizabeth Mowry PSA-MP, HFH
March 8, 1940 – July 18, 2020


This week I learned of the passing of Elizabeth Mowry. Like many other pastel artists I was inspired by Elizabeth and her wonderful books. They were the first pastel books I bought and my first efforts with pastel were my attempts at copying the wonderful paintings in her books. I wasn't very successful but I was determined to master this wonderful medium thanks to the beauty Elizabeth created. 

In 2013 I had the opportunity to take a workshop with Elizabeth when she came to Atlanta to judge the exhibition for the Southeastern Pastel Society. It was a very special experience and one of the highlights of my pastel journey. I learned a lot those three days. One of them was that I wanted to be as gentle a person and as well dressed as Elizabeth! (I still do)

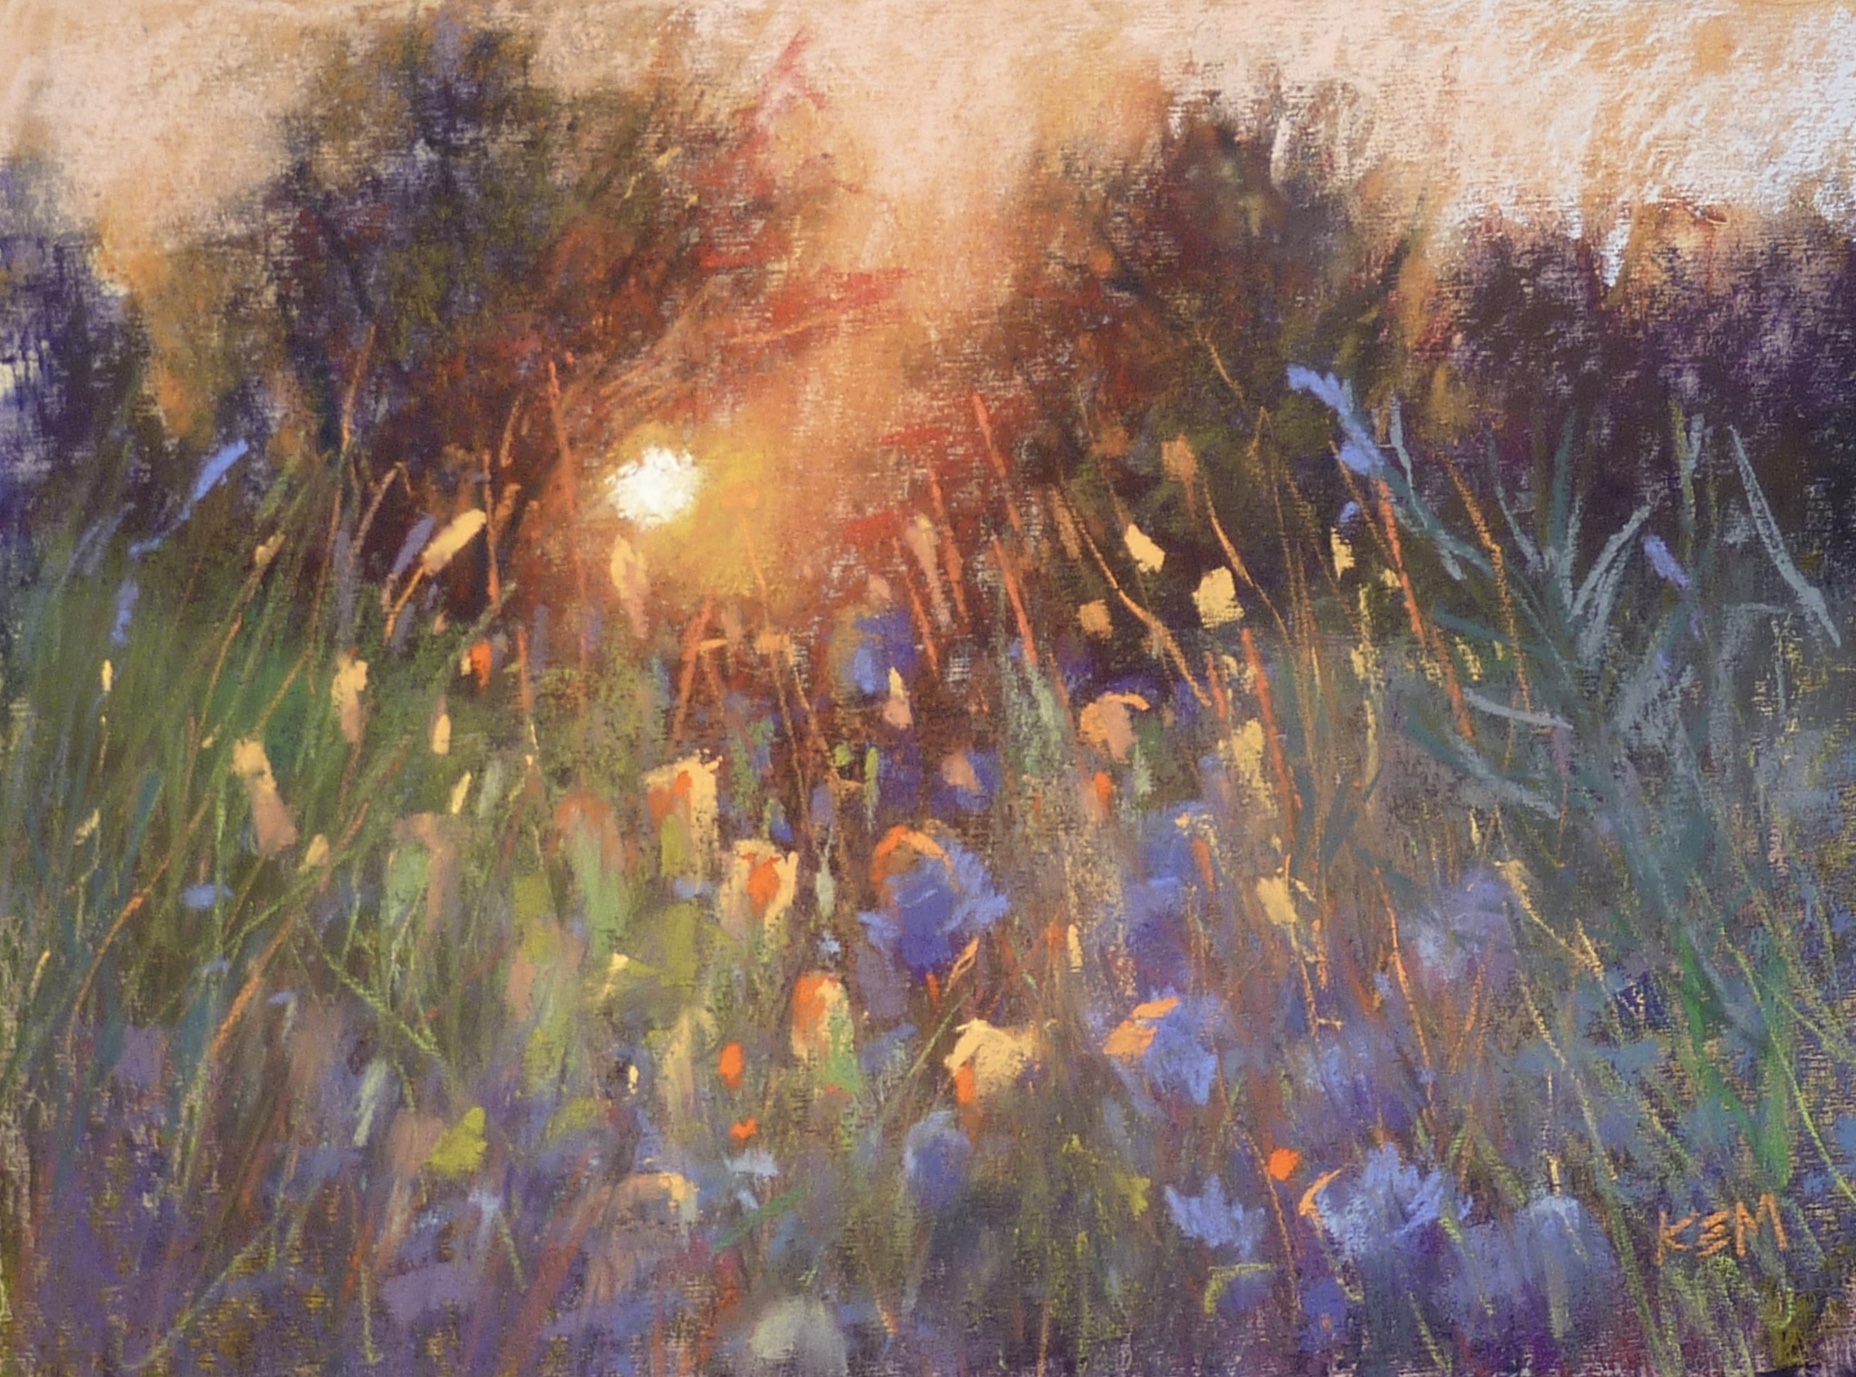
I am grateful for the opportunity to meet her and sad to hear of her passing. I painted today with Elizabeth in mind. I decided to paint a new version of one of the workshop paintings I did in her workshop. I am also sharing the original blog posts I wrote in 2013 when I attended the workshop. Here is the original:


A painting I did at the Elizabeth Mowry workshop in 2013


Day One Workshop Review May 2013:
I am so glad I decided to take this workshop with Elizabeth Mowry. What a wonderful artist and gentle spirit she is. As she spoke so eloquently about her love of nature I felt a special kinship. When I talked to the group about the painting I did during the sharing time, I spoke about how I like to look inland at fields and meadows for inspiration. Elizabeth understood this! I know I will come away from this workshop inspired and enriched.
The workshop began with Elizabeth doing a 2 hour demo. She feels it is important to show how she resolves a demo painting and not just how she starts. I found her demo very interesting and very different from how I usually work. She uses wallis paper and Girault pastels. She goes right in with local colors and works from the sky down. When she saw how I was starting my painting she said "oh you are one of those color people" I smiled. Yes I guess I do love color!
After lunch we painted for 2 hours then had a chance for sharing and feedback. The day ended with Elizabeth's slide presentation of her journey as an artist. I enjoyed hearing about her life and work! I can't wait to go back tomorrow.
I learned an interesting use for pastel pencils and I will share this with you when I can do a more complete post.


Day Two Workshop Review: 
It was another wonderful day at the workshop. Elizabeth opened up the day with a quote about nature. She then did a wonderful demo of some Autumn trees. She called it a tree study because the painting was all about the tree. Elizabeth's demo was sprinkled with her pearls of wisdom about painting trees such as:

  • It is important to really study trees and get to know them.
  • Slow down and really observe the tree...how does it grow,what colors,what is it's character.
  • When you are painting the edges of trees really slow down and pay attention to the edges. The edges can tell a lot about the tree.
  • In looking at my notes I guess the most important thing is slowing down! That is good advice I intend to take


Elizabeth Mowry's palette for her tree demo


After the demo we spent some time looking at some of Elizabeth's work as she shared her method of critiquing our own work. I will share this another time and will definitely be using it. After lunch we painted and finished the day with another group sharing/feedback session. I enjoyed the whole day but especially enjoyed our lunch with Elizabeth where she shared stories of her time on her New York farm. I can't get the picture of her goat stuck up on the roof out of my head!
One more day so stay tuned! Oh and I painted the beach today. I think I'll do a tree tomorrow!


My day 3 painting


Day Three Workshop Review:
Today was the last day of the workshop and we sure did fit a lot of painting and information into three days.  Credit goes to Elizabeth Mowry for her organized plan for the workshop and to our wonderful Volunteers from the Southeastern Pastel Society. Their hard work made it easy for the artists to concentrate on painting. Breakfast and lunch was provided and so no time was wasted.  It made for such a pleasant and relaxing workshop experience.

Today was a day spent on painting. We were able to finish what we had started or start something new. Elizabeth was able to give everyone plenty of individual help.  She also took shared with us one of her teaching exercises called Learning Circles. I am going to give it a try so I will have to leave you with that little tease until I can get to it!  The workshop ended with another longer feedback session. Elizabeth encouraged everyone to share their thoughts so we all left with lots of ideas.

It is usually my goal to come home from a workshop and work on the ideas and techniques I've learned. I don't know how much time I will have to do that since I am gearing up to go to IAPS and our big Southwest Adventure in a about 10 days!  I have a lot of organizing to do before I go but one of the big things I got out of the workshop is to learn to slow down and observe. That I will be practicing on this trip so the timing of this workshop was perfect for me!


Monday, August 03, 2020

Art Hack: Put a Push Pin in your Pastel Box

'A Bright Spot in my Day'                 9x12               pastel                 ©Karen Margulis
available $165

I am always on the lookout for art tools. It doesn't matter where I am shopping. I have even found great mini alligator clips at the grocery store! I call these finds my Art Hacks. I have found some great ones and have been introduced to many by my fellow artists.  I am introducing a new weekly blog topic devoted to these hacks. Enjoy this week's Art Hack!

Close up of the tangle of grasses and wildflowers

A few years ago I took a great workshop with Stan Sperlak and he introduced me to this week's tool.... a stainless steel push pin. Not your ordinary thumbtack or cheap-o plastic pin. These were long and substantial push pins. Humorously Stan gave us each one and called them sterling silver. We earned them at the end of the workshop!  I continue to use these pins in my work. Read on for the ways a push pin can be used for pastel painting.


Using a push pin for precision pastel removal

  • Push pins can be used to remove pastel with surgical precision. Simply scrape away the offending pastel mark. I painted my flower too fat. Instead of brushing it out all I had to do is scrape off some of the flower giving it a trim!
  • Push pins are great for straightening a horizon. It is challenging to get a nice straight horizon. The more pastel you add to make it straight the worse it can get. Use the pin to scrape away a thin line of pastel.....you can gradually get the horizon straight this way.
  • Push pins are helpful for adding texture. I used the tip of the pin to remove bits of pastel in my flower revealing the dark pastel layer underneath. This creates a feeling of texture in the bloom. In the daisy painting I used the pin to give the suggestion of veins in the petals. 
  • Push pins make great grasses and stems. Scrape linear marks into a grassy area to create the illusion of grass. You can also make a fine stem with a pin. See the photos above. It's like scratch art! Tip: You need a thick enough layer of pastel for this to work.
  • You can use a pin to attach your paper to your drawing board 
Order some push pins and keep one in your pastel box. How can you use a push pin in your work? Share in the comments!

Saturday, August 01, 2020

Do You Want to Paint More and Think Less?


'Summer Love'               8x6             pastel             ©Karen Margulis
available $75

Today I want to share the introduction post for my August Patreon content. I know many of you are already patrons and I am grateful for your support. If you were thinking of going us for just $4 a month, this month will be a fun time to join We are going to PLAY!

Buckle up friends! This month we will be painting fast and furiously!  If you are a 'fly by the seat of your pants' painter you are going to love it. If you are a more slow and methodical painter this month will have you going outside of your comfort zone. It is going to be a fun month of painting and learning and growth!
 It seems strange that I will be recommending that we paint this month without planning in advance but  I hope to convince you that playful quick studies are just as important to our growth as learning how to plan and use the basic concepts of good painting. And it is just plain fun!  Thinking is important. But sometimes we study and think too much and we end up overworking paintings and feeling frustrated. There is a time and place for everything and I will lay it out this month through lessons and demos.
Above is my finished demo painting done in the video.(available to patrons)  I quickly responded to this familiar scene and painted with my heart. It is 8x6 on MingArt paper.


WHAT CAN YOU EXPECT THIS MONTH
  • As usual there will be a Monday demo which will either be a video or step by step photo demo.
  • There will be a new Paint Along series for Silver members
  • Silver tier copyright free reference photos and Saturday expanded lessons for silver members.
  • Pastel review: I will review the new Unison Light and Shadow set.
  • A new conversation starter
  • Art business 101 tip
  • Review of Dakota mounted boards
  • Friday challenges
  • Whatever else I find to support our content this month!
HOW TO PREPARE
My personal plan is to paint a small 5x7 study every day this month. This is not a 30 day painting challenge that you see occasionally. I don't want to put pressure on anyone however if you are up to the task go for it!!  I do hope you will commit to painting at least 2-3 small studies each week. You can make it easier by preparing in advance. Spend a day getting supplies organized so it will be easy to pop into your painting place and paint a quick study.
  • Cut at least 20 pieces of paper down to 5x7 or 6x8. No smaller or larger. Any pastel paper will work. This is a great time to use the papers you don't like and have in a pile somewhere!
  • Gather some reference photos. I like to print them on inkjet paper and elect several photos and size them to fit 4-8 on a page. If you have photos ready to go you will be more efficient!
  • Put together a small box of pastels or select a limited palette to simplify your pastel choice. I will be using my set of Floral Landscape Terry Ludwig pastels. 


I'd love for you to join us on Patreon!! It is easy to join and easy to cancel if you find it isn't for you!  www.patreon.com/karenmargulis