Visit my Patreon Page for more painting instruction and Paint Along Videos!

Thursday, December 31, 2015

My 2015 Best Nine Instagrams....a Revelation!

My Instagram #2015bestnine ...Instagram posts with the most likes

A surprise to end the year!  You may have seen these circulating on Instagram and Facebook. People have been posting their top nine instagram photos of 2015. I was curious about it so I did some research and found the website that calculates the instagram posts that have received the most likes. I have tried to be more active on Instagram this year so I had quite a few photos posted.

What a surprise when my top nine appeared in a photo collage. My top nine photos were my paintings. It was a revelation. I immediately noticed a theme.  I had posted 196 photos...many were photos of my paintings. The paintings that received the most interest were all TREES!


I have been gravitating towards landscapes with trees. I had avoided them for many years. It is gratifying to know that the tree paintings are speaking to viewers. It is said that if you paint what you love it will show. I believe this to be true. In all of the nine paintings in the instagram collage I was moved and excited to paint the scene. I painted them with my heart. This seemingly silly little collage has reinforced the importance of painting our own personal truth.

As the New Year begins I wish you all a very Happy and healthy New Year filled with beauty and love. I wish for you to all discover and continue to paint what speaks loudest to you!

Wednesday, December 30, 2015

How to Establish a Daily Painting Habit


'A Good Day'            5x7                   pastel             ©Karen Margulis
sold
I wish I could be so disciplined in other areas of my life. Daily Painting is a habit that came easily for me. I have stuck with it since 2005. I rarely miss a day of painting. Some days I'll paint two or more paintings. Some days I don't get into the studio so these extras make up for my lost time.

Daily painting has been the key to my growth as an artist. As you all know there is no substitute for time spent at the easel. No amount of reading or studying or watching art videos will make us better artists if we don't put this book learning to practice.

It's a new year and a great time to establish good art habits. I have been writing about art habits this week. By now you probably have some idea of the goals, resolutions or habits you want to start in 2016. Starting is good. But the trick is keeping the habit going! How is this possible?

a piece of scrap paper works great for a daily painting
For an action to become a habit it needs to be done on a consistent and regular schedule. It also needs to be done consistently for a period of time. Three weeks of consistent work on the habit is generally accepted as a good start. You also need a couple of other ingredients for the habit to stick. I'll break them down into three simple steps:

a quick underpainting on Uart paper

  •  Step One: Know the Habit you want to establish. Understand exactly what you want to do. Ask yourself why you want to do it. What results do you expect. Commit to the habit. You have to truly WANT to do it. It can't be something you do because someone tells you it would be a good thing. You have to be invested in successfully adopting the habit.
  • Step Two: Make it Simple to do the habit. So often Daily painting habits fail because we get in our own way. We make it too difficult. So it is too easy to make excuses. Make it easy to paint. Set up your supplies in a place where you can leave them out. If you have to set up and clean up every single day....it gets tiresome. Excuses will be made! Prepare paper in advance. Have a stack of reference photos ready (choosing subject matter can be such a time killer!) Get set up for success! Note: it isn't always easy to find time to paint every day. Find a schedule that works for you but realize that a painting session of just 15-20 minutes is better than nothing. If you don't have time consider doing quick studies rather than big masterpieces.
  • Step Three: Reward Yourself! Habits are formed because the action we do rewards us. If done on a regular basis our brains will begin to anticipate the reward....we will start to crave the reward so we do the activity. We will do the activity no matter what is in the way. Think about runners who still need to run in the rain. Think about smokers who smoke despite knowing it is bad. They crave the reward so they do the activity.  This is important! We need to be rewarded for doing the daily painting....what's in it for me? why should I paint everyday? Figure out what  makes the daily painting satisfying. How can you reward yourself? I discovered that for me, my reward was the satisfaction of doing a blog post and recording my progress. It was my reward. The feedback was a bonus. It kept me going and still serves as my reward. Find your reward and get ready to make daily painting a habit!


If you'd like to read more about habits I recommend this book: "The Power of Habit "by Charles Duhigg

Tuesday, December 29, 2015

Behind the Scenes ...Heron and Egret Painting


'The Wild Side'        9x12      pastel      ©Karen Margulis      available $160
(enjoy this post from the archives. I am working on a brand new pdf demo to be released soon!)

I'm nosy. I like to be an observer of everything. Sometimes I get so involved with my people watching and observations that I forget that I am not really invisible. I am just very curious. It's not just people watching that intrigues me...I love watching art come to life. I enjoy seeing artists post their progress shots and even better when they give a commentary. I love learning how other artists approach a painting. 

So today I will take you behind the scenes of my egret and heron painting. I took some progress shots and I have added my thoughts below each photo. I hope you enjoy a peek behind the scenes.


I am using a 9x12 piece of Uart 500 sanded paper. I begin with a drawing done with compressed charcoal. I just dive right in with the charcoal and make any corrections without erasing. This is a totally different technique from my landscapes. It just illustrates that there is no right or wrong way to start a pastel painting!


I decide to start with the heron. I began by blocking in the darkest darks and then the middle values and finally the lightest areas. I usually work on the entire painting at one time including the background but for some reason the heron went quickly and I decided to finish him. Sometimes you just go with the flow!


Next I painted the egret. There is not strong dark so I began by using a middle value blue and purple before add ing the lighter value whites. I have left the dark charcoal lines on both birds. I love lines and I liked how they gave the birds a looser more expressive feeling. They are my interpretation of these wonderful birds....not a photorealistic representation.

I also added some of the dried marsh grasses with a few different yellow and orange pastels. Now the hard part, the background ....I never wait until the end to put in a background!


I wanted the birds to have a backdrop of water so I used several different blue pastels to sneak the water behind them. I was careful to pull the blue all the way into the birds. I didn't want to leave a halo of paper color around the birds.  I used blue to negatively paint in between the grasses. That was fun!  I love painting animals this way! Directly, fast with no underpainting!

4x4 study
Here is another favorite painting os a snowy egret. I enjoy the square format for these birds!

'My Snowy Friend'        12x12     pastel      available $175


Monday, December 28, 2015

An Incremental Approach to Good Art Habits

'River's Edge'          9x12       pastel      ©Karen Margulis
available $150
 It is time to brainstorm. Yesterday I wrote about my non-plan for the New Year. I am calling it the Year of Art and it is all about cultivating good habits so that I can create and share without pressure or stress. What makes it different from the usual way I try to start a new year is that this year I will add my habits one month at a time. Richard McKinley tells us to approach a painting incrementally so why not gradually introduce new habits rather than getting burnt out by trying to do too much at one time.

So today I took out a notebook and started brainstorming. What did I want to accomplish in 2016? What art habits did I want to have? Do I have any bad habits that I would like to change? I wrote down all of my thoughts and ideas and wishes. I ended up with a lot of things I wanted to do but the list quickly became overwhelming.....defeating the purpose!

I decided to whittle the list down to just 6 habits to work on in 2016....one each month with hopes that they become a part of my daily routine. Here is my list of 6 habits:


  1. Work on becoming fluent with oils. I will be expanding on this but I am devoting the month of January to doing a daily oil painting as part of Leslie Saeta's 30 in 30 challenge. I have been wanting to play more with oils. It is important not only to challenge myself but to make me a better pastellist. I am excited to get started.
  2. Make sketching a habit. I don't know how many times I've started keeping a sketchbook only to  stop within days! I know that being able to draw is important to becoming the best artist possible so I want to make sketching a habit!
  3. Make time to MOVE, be more active and eat better. All of these things are important and I could do a better job with all of them.
  4. Be more organized with paperwork. I hate paperwork. Every year I plan to do a better job with my record keeping and organizing of paperwork. Will I succeed this year? 
  5. Make time for more plein air painting. This is something I love to do but only seem to make time for it when I travel. I would love to have a better plein air habit at home.
  6. Become more familiar with watercolor so that I can do more interesting underpaintings.


step 3 of today's painting
Your turn!  Take out paper and pen and start brainstorming. What good art habits do you wish to cultivate in 2016? Feel free to share in the comment section!
4x4  study

Sunday, December 27, 2015

Three Steps to a More Fulfilling Year of Art


'Early to Rise'           12 x18       pastel      ©Karen Margulis
available $165 
It is that time of year. Time for setting goals and making New Years resolutions. I do it in some form or another every year. I start with good intentions and plans to stay organized and be productive. But life has a way of throwing curve balls. It isn't easy to stick to a plan and I have decided that maybe that isn't a bad thing after all. It is too easy to get stressed and frustrated when the plan goes astray. It sometimes takes the joy out of creating....too much pressure to stick to the plan can interfere with creating meaningful, heartfelt art.

This year I will try a different approach. Instead of setting goals and resolutions I will work at developing good habits. Good habits that will allow me time to create and share without stress or pressure. I am taking three steps to get my 'Year of Art' off to a good start.

4x4 study
Step One:  Get completely Organized. I already did this and it feels wonderful. I spent the entire month of December going over every square inch of my studio spaces. Supplies are organized and labeled. Everything has a place and I am proud to say there are no 'junk boxes'. For too long I had merely tidied up my space leading to lots of unnecessary clutter. The clutter was bogging me down. I have a bright uncluttered space that is begging me to come create.

Spend some quality time uncluttering and organizing your art space. It will be so liberating. If you don't have a dedicated art space.....see what you can do to make room for a little place for you to create.

Step Two:  Decide on Good Habits to cultivate. Make a list of all of the good habits you have and wish to have. They can be both art and non-art related. Now pick ONE habit to work on for the month of January. All too often we set too many goals and resolutions at one time and it is overwhelming. Working on one habit at a time allows the habit to become a part of our daily life. It is said that it takes 21 days to form a habit so a month is plenty of time to turn an action into a habit. Next month add another habit to work on.....slow and steady wins the race!

Step Three:  Decide on a reward for working on your good habits. I will discuss this idea in more depth in upcoming posts but having something to look forward to will help you  keep plugging away at your habit. What will motivate you to get into the studio to paint more often....or to work on your blog or to get more involved in an art community (or whatever habit you wish to cultivate) ? Choose a reward to motivate you!

Tomorrow I will share some of the art habits I plan to cultivate in 2016. My non-plan is to have good habits that will naturally lead to growth as both an artist and teacher. No pressure....just fun!

Saturday, December 26, 2015

Painting Snow with Almost White Pastels

'Almost Winter'     11x14      pastel        ©Karen Margulis
available $150
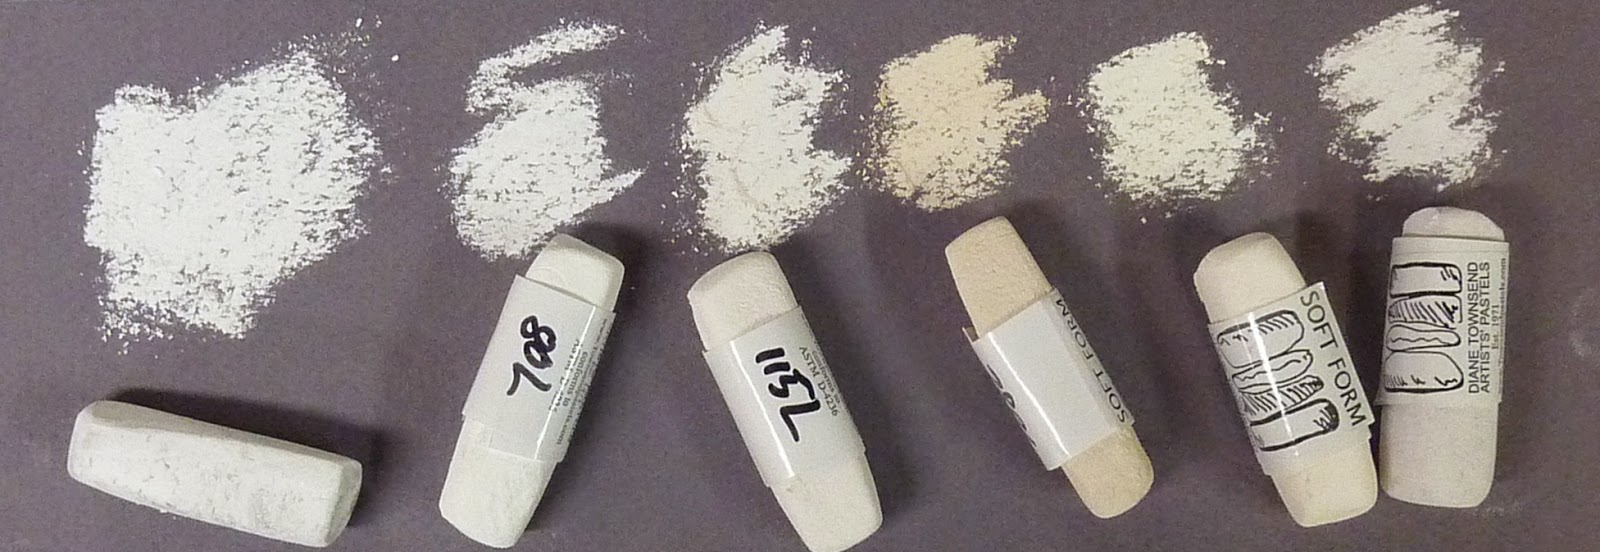
I never use white pastels. Well.....maybe sometimes but very rarely do I ever use a pure white stick of pastel in a painting.  I recently bought a chalkboard and chalk (for fun) and it reminded me of how chalky a pure white pastel can look. I prefer colorful lights.  When something is supposed to be white like clouds or snow I first look for the colors that are present in the surroundings. White things reflect the colors that surround them so they rarely appear pure chalky white.

When I am faced with painting something white I reach for my favorite light pastels...Diane Townsend Soft pastels. These lights are almost white but lean towards a pale color.  I call them 'Almost Whites'.  I love love Terry Ludwig, Sennelier and Schminke Almost Whites but I seem to reach most often for the Diane Townsends. I like the ever so slight gritty texture and how it they sound scratchy when using them.

A collection of 'Amost Whites'. The pastel on the far left is pure white for comparison

I don't use a specific color name but when I am low I just order open stock. I like to keep a pale (almost white) version of each primary and secondary color on the color wheel....red, blue, yellow,orange,violet and green.  Basically I want a warm and cool light.

The next time you are painting something white and reach for the pure white....stop and look for the color. Choose a pale light instead of the white. Reserve that pure white for the highlight if it is even necessary.

If you are thinking about painting snow this winter I invite you to look at my Winter/Snow pastel demo download. You can read more about it in my Etsy shop here

Thursday, December 24, 2015

Merry Christmas!

'Jingle All the Way'        6x6        pastel
available $65
Painting is a stress reliever. So as I made preparations for hosting Christmas dinner with one eye on the weather, I snuck in some painting time to relax. The weather was calling for record setting high temperatures and days and days of rain and thunderstorms. My studio (aka the dining room for holidays) is prone to flooding after days of torrential rain. My worst case scenario came true last night with water seeping into the studio. I was ready with the wet vac and will be able to keep on top of things but dinner has been moved to the family room. It all works out!

I'll be back soon with my regular posts. I hope everyone enjoys a safe and relaxing and dry holiday!

Wednesday, December 23, 2015

Happy Holidays From My Yearly Snowman

'Paint Your Holidays Colorful'       6x8       pastel
available $65
Every year I like to get silly and paint a snowman. It is a fun way to wind up the year. It has been a year filled with exciting travel and sharing with friends near and far. I have a newly organized studio and will be sharing it with you along with tips for organizing your own studio space in the new year. I am excited to start another year of painting and blogging.

Thank you for taking the time out of your day every day to visit with me here on the blog and read what I have been up to. I appreciate all of the participation and feedback. It keeps me motivated! I wish everyone a happy and peaceful holiday....whatever it is you celebrate....make it colorful!

Tuesday, December 22, 2015

A Quick Tip for Painting Reflections

'Peace on Earth'           8x10        pastel        ©Karen Margulis
available $150
I couldn't resist. I had to paint one more before my studio is transformed into the family dining room for Christmas dinner.  I am working on studies for a hotel project. I will share all of the details soon but I am having fun creating these studies of some of my favorite subjects.

This scene was fun to paint and gives me the opportunity to share one of my favorite tips for painting reflections and making water look wet.  I don't overthink my reflections. I know there are certain 'rules' about reflections. Dark objects will be slightly lighter in the reflection and light objects will appear slightly darker. I don't really consider this as I paint. Sometimes too many rules bog me down.

But I have discovered a technique that tends to make the reflections believable and they end up being  'correct' without too much angst. Read on for the details:

My plan and underpainting

  •  When I put a color in a shape that is above the water I put the same stick of color down into the water. Example.....I put green in a tree then I use the same color in the reflection before I put the stick back.
  • IMPORTANT: I pull the pastel stick DOWN and make a vertical stroke in the water for the reflection. If I were to use the same quality of mark in both the tree and the reflection it would be difficult to know which was the tree and which was the reflection.
  • Pulling strokes down for reflections helps give the illusion of wetness in the water.
  • Next step is to BLEND the vertical strokes so they are soft and 'watery'. I use my finger or a white magic eraser to pull and soften the strokes. *This is the key to success.* The blended marks give the viewer a clue that they are looking at reflections in water and not an upside down tree!
  • I Paint all water in HORIZONTAL strokes. I pull some of the water strokes across the reflection....just in some areas. I don't want to obscure the entire reflection. 

Small color study for the hotel project

Monday, December 21, 2015

A Quick Lesson on Painting the Sky

'A Place for Contemplation'       8x10      pastel       ©Karen Margulis
available $150
I squeezed in this painting today. I am busy finishing my holiday preparations and a secret project for my granddaughter. I'll share it after Christmas!  But I have a deadline for submitting images for a project so I wanted to paint at least one study today.  Here is the result.

In looking at both the 8x10 and the smaller 4x4 study I am struck by an observation about the sky. It makes for a good quick lesson.

If the sky relates to the earth there will be greater harmony.

Once I began to pay attention to this simple truth my paintings seemed more authentic and believable. I think they became better paintings.


4x4 color study

Have you ever looked at a landscape painting and felt that something was 'off'? It wasn't anything you could quickly put your finger on but something seemed a bit jarring.....like hearing  some beautiful music and the musician hits the wrong note.  That is what happens when the sky doesn't have any connection to the ground. It could be shapes but often it is a color relationship, I can make a huge difference in the feeling of the painting.

In my painting I began by blocking in the big shapes with 4 values of orange. I used a pale yellow- orange in the sky and water, darker orange for the trees and creek banks and middle value oranges for the grasses.

Automatically there was a connection between the sky and ground. I continued this relationship as the painting developed by adding a pale orange-yellow in the sky at the horizon. I could have used another color.....pale pink or pale lavender or even kept the entire sky blue. But having that touch of orange in the sky echoed all of the orange in the grasses.....connecting the two areas with a common thread. Any other color or just plain blue would have been jarring....or boring.

Lesson: Always pay attention to the colors you choose for the sky. Whenever possible introduce a touch of the same or similar color to both sky and earth for a more harmonious and pleasing landscape.

Sunday, December 20, 2015

Cheap and Easy Way to Make a Sanded Pastel Surface

'Storm Along the Turquoise Trail'    3.5 x 3.5    pastel     ©Karen Margulis
available in my Etsy shop  $35
I don't like to waste materials. That is why I had such a collection of stuff to go through in my studio renovation. I came acre a box of mat board drop outs and I can't wait to put them to use. I have a cheap and easy way to use them for pastel surfaces. I blogged about it a few years ago but it is worth revisiting the post. Read on!


'Yucca'      3.5 x 3.5  sold

  I enjoy painting on my own home made surfaces but I don't like to prepare them. I don't like the mess of mixing the pumice and gesso. I don't like waiting for them to dry. So I don't bother making my own supports. Until now!

I was introduced to this method by a student who worked at a frame shop. She had a pastel artist customer who told her about using clear gesso on paper or boards. The clear gesso alone makes a wonderful surface. It has a small amount of grittiness which is just right for pastels. I tried it on these two small paintings.

'The View Towards Abiquiu'    3.5 x 3.5      pastel
sold
 I am using scrap pieces of mat board courtesy of my student. (it's great to have a framer as a student!)  I used Liquitex Clear Gesso. I simply brushed it on the mat board with a 1 inch brush. I made some smooth like linen weave (top painting) and some with more random brush marks. (bottom painting) They dried quickly though I didn't paint on them right away.  I also applied some of the clear gesso on some Somerset white paper. I have some BFK Rives that I also want to try.

I am very happy with the amount of tooth that the clear gesso provides. I don't think I'd want it any rougher but I could add some pumice if I wanted to. I could also tint the gesso with liquid acrylics if I wanted toned supports.  But that would defeat the purpose of quick and easy!

Making my own pastel surface 
If you are interested in other methods of creating your own pastel surfaces you might like to read my post on home made surfaces.

Mystery Painting Giveaway continues this week! Purchase a painting from my Etsy shop and receive a mystery painting free! 5x7 painting get a 5x7 painting of my choice. 8x10 or larger get an 8x10 of my choice. See al available paintings here :http://www.etsy.com/shop/karenmargulisfineart


Saturday, December 19, 2015

A Tip for Finishing a Painting

'View From the Water'           8x10         pastel         ©Karen Margulis
available $150
The painting is almost finished. It is almost there. But something is missing. It lacks the finishing touch. There is no eye candy. I like to call it spice. The little pop of color or an interesting mark that pleases the eye. It is very much like cooking. If you make a dish and play it safe....it may not be as satisfying. You want to take a bite and keep on eating. Spices used in moderation will do the trick.

Adding spice to a painting may make the difference in your viewer coming back for more or moving on to the next painting. So how do you decide what to do for a spice? What color? Where should it go? There is no single answer but I do have a tip that works well.

MAKE USE OF THE COLORS UNDERNEATH


4x4 color study
What does that mean? Whenever you are looking for a color to add spice or a pop of eye candy revisit the colors you put down in your underpainting or first layer of the painting. In today's painting I decided to use pink for the underpainting. I used a dark hot pink for the foliage and a paler pink for the sky and water. I chose pink because I knew it would make the greens more interesting since it is a warm color and the green is cool (and almost complements). I also have used this combination before and liked the effect. Scroll down to see some progress shots:


Drawing the tree shapes


Blocking in the painting with pinks and dark blue in the tree trunks

Rubbed in the first layer to get an out of focus watery feel

Begin building the painting using dark red violet in the trees

 I continued incorporating pinks in each layer. This helps with color harmony. But when I was finished I wanted more spice. That is when I picked up the original hot pink pastel I used in the underpainting and made a couple of small marks along the edge of the tree trunk. Click on the photo below and look for these spice marks.  They are just small marks but they added the needed spice.


The next time you are trying to decide how to finish a painting....consider your spices and bringing the underpainting colors to the finishing layers!

Friday, December 18, 2015

Art Inspiration From Star Wars

'Down in the Bayou'            8x10      pastel         ©Karen Margulis
sold
In the spirit of the current Star Wars hype I'd like to share a message that has profoundly influenced my approach to art. Yes it is related to Star Wars although I am not really invested in the movies. I saw the original way back when but that is about it.

But I do have a Star Wars related quote posted above my desk. It is a quote from Yoda. It guides me every day as an artist.

"Do or Do Not...There is no Try"    Yoda


A few years ago when I decided to become a full time working artist I was concerned. Could I really do it? Would I find collectors? Would artists want to take my classes? It was a scary time and it took a leap of faith. Yoda's quote reminded me that I had to just do it! There was no trying. I needed to believe in myself and work hard to achieve my goals as an artist.


An alcohol wash on toned uart paper

The quote worked for me. Whenever I would doubt myself....or whenever I was feeling tired or lazy....It reminded me to keep going. It reminded me that I need to DO. Not think about doing it or thinking about maybe trying it but to actually DO IT!  This thought still guides me. When I want to try something new I am reminded to find it in myself to work at it until I succeed. This mindset will come in handy in 2016 when I am setting new art goals!

I paint everyday because I am committed to Doing it. I make time to get in the studio at some point everyday so that I can become a better artist. Yoda's quote has helped me develop this habit so I am grateful to Star Wars!

the pastel palette used for today's painting.
Painting Notes: Today's painting is a study for a big project I will be working on over the next few weeks. I have been commissioned to paint 8 acrylic Louisiana landscapes for a new hotel. I am working on ideas and painting small pastel studies in preparation for the bigger paintings.

Thursday, December 17, 2015

Painting A Snow Scene in Six Easy Steps

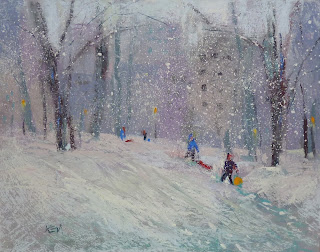
'City Kids'           8x10        pastel        ©Karen Margulis
sold
Greta is a city kid. Even though she isn't quite two years old she goes to her neighborhood park everyday. She has a group of friends already and I can just imagine the day when they will be old enough to go on the sledding hill. This painting is dedicated to my granddaughter and all of the city kids out there! 

I took some step by step photos as I painted this one. Here are my steps and my thoughts as the painting developed.


I chose a homemade support which is mat board coated with gesso and pumice mix. It is white. I did a quick drawing with a pink Nupastel. My reference photo inspired me but I made changes to create a better composition.


I blocked in the painting with big simple shapes of neutral pastels. I selected muted colors from my 'neutral drawer'. These are all grayed down muted colors such as blue-grays and muted purples. You can see the texture of the pumice in this photo.


Here is a shot of my Neutral Drawer. I keep these colors together so I remember to use them. Next to other more saturated colors these pastel get overlooked. Some may even think of them as ugly or dirty. I love their soft subtleness.


I decide to rub in this first layer of pastel to fill in the rough texture of the support and to create an out of focus underpainitng.


For this painting I choose to work on my center of interest first. The children going up the sled hill are my center of interest. Anytime you add a figure to a painting the eye looks at the figure first. I want to make sure they are well placed and developed before I spend too much time on the less important parts of the painting.


Next I develop the trees and suggest window in the distant buildings. I am still using my neutrals. I did use some saturated colors on my figures. I also add some blue and lavender shadows in my snow.


 I work on the snow some more. I use a dull rose for the distant snow and some brighter whites in the foreground snow. I also make some footprints in the snow. I also add a few lamp posts and light the lights....since I was going to make it snow.


I add the snow using pastel dust. I decide to add some smaller figures in the distance since my two stars seemed a bit lonely!  I also changed the color of the turquoise sled to yellow to echo the lights in the distance. Now I am finished!