Visit my Patreon Page for more painting instruction and Paint Along Videos!

Thursday, November 29, 2012

Breaking Free From your Photos...Painting Winter


'Winter Glow'      5x7      pastel    ©Karen Margulis   $65 click here to purchase
I admit it. I paint mostly from photos. I know I should be painting from life more but I just don't get out as often as I'd like.  But I don't want my paintings to look like photos or to look like they were painted from photos.  I prefer to let my photos give me ideas for paintings...they are for inspiration and not for copying every detail.

I like to give myself challenges that will help me to Not be dependent on the photo. If you tend to rely too heavily on your reference photos here are some ideas to help you break free:
  • Paint from a black & white photo. This helps you make more interesting color choices.
  • Paint from a fuzzy or blurry photo. If you can't see the details you won't be tempted to put them all in.
  • Block in your painting with the photo and put it away for the later stages.
  • Do  photo memory exercise. Look at photo then turn it over to paint (more on this later)
  • Paint from several photos and put together your own composition.
  • Use a photo but change a major element that will push you out of your comfort zone....change key, color scheme, move elements around or something drastic like change the season which is what I did for today's painting.


watercolor underpainting on white Wallis paper

For today's painting, I took the reference photo that I used for the Colorado landscape painting in yesterday's blog post.  It was a summer scene with green meadows filled with wildflowers.  I looked at it and wondered what it would look like in the winter, covered in snow.  I chose white paper and did a watercolor underpainting that was very washed out but with enough information for me to go on. 

I had to rely on my imagination and what I know about painting snow and winter to finish the painting. It was very liberating! I just imagined the same trees and meadow covered in a blanket of snow. There was really no right or wrong because it was totally from me and not some photograph!  It was a fun exercise that I will be sharing with my students!

The same painting representing summer   8x10  pastel 


Wednesday, November 28, 2012

Pastel Demo....Colorado Landscape with Wildflowers

'Into Yankee Boy Basin'        8x10      pastel       ©Karen Margulis
painting available for $95 at Daily Paintworks
After three weeks of traveling I have enjoyed getting back to the easel today.  I decided to do a pastel painting of Colorado's Yankee Boy Basin. I visited this beautiful spot at the height of wildflower season and was in heaven!  I took photos of my process and would like to share them as a demo.


 I am working on Uart paper size 8x10. I chose Uart because I wanted to do an alcohol wash and this paper handles a wash beautifully.  I did a rough sketch of my main shapes with a nupastel. I don't like a fussy drawing because then I am tempted to stay in the lines and be less painterly.


I covered the paper with broad strokes of hard pastels. I used some Nupastels for this step. I used a combination of local colors and complements for the underpainting. I started with the dark shapes first. I chose the pinks and oranges because I knew I would be using a lot of green in the painting. This will make the green masses more interesting.


I used rubbing alcohol and a cheap bristle brush to paint over the pastel, liquifying it. I try to be careful to not let it be too sloppy and drippy or else all of the colors will run together to make mud. it dries in about 20 minutes or less.


Now I am using my softer pastels and I begin by blocking in all of the dark shapes. I try to connect the darks where I can so I won't have a painting that is too spotty.  Next I block in the sky with several blue pastels.


I finish the sky and add some lights to the clouds. I also add some pastel to the mountain. I liked the colors of the mountain in the underpainting so I use a very light touch and use colors close to the ones in the underpainting.


At this point I got into my zone and forgot to take pictures!  What I did was build up the greens in the trees and the grasses. I used a lighter cooler green in the distant grasses and warmer greens in the foreground. There was a lot of bushes and stuff in my reference photo so I tried to simplify it into some green shapes.  I also worked on the path by adding some dark peach and blue shadows and the light peach of the dirt.


I am almost done here. I added hints of the wildflowers with a focus on the red Indian Paintbrush. These are just marks and not detailed flowers.  I decided that I needed to carry the eye down the path and into the distance better. So I added some bright green accents in the bushes and carried the red flowers into the distance but I used a cooler red and I made them smaller. See the top photo for the finish!

Thanks for following along and I hope my thoughts as I painted are helpful!  I have an idea for this same scene so plan to come back later this week to see what I am up to!

Tuesday, November 27, 2012

Tips for Using A Limited Pastel Palette


'Autumn Splendour'     2.5x 3.5     pastel  
available for $18 with shipping click here

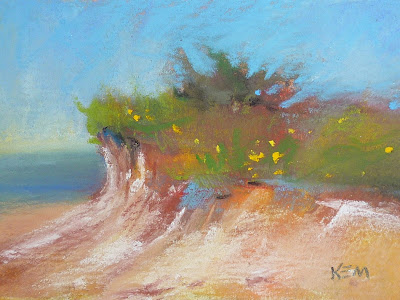
'Nantucket Dunes'     2.5x3.5      pastel

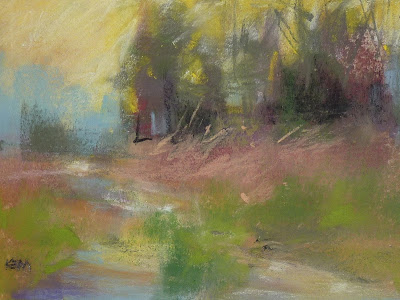
'Crossing the Meadow'      2.5 x 3.5      pastel

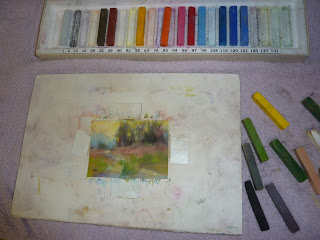
You really can paint just about anything with a limited palette!  In my post yesterday I shared a recommendation for a pastel set that is great for travel or painting on the go. I talked about the benefits of this little set of pastels. You can read my post HERE

Now I'd like to share some tips for using this limited collection of pastels. I always love a challenge so I decided to paint a few small pastels to see how well these pastels worked for me. I worked small on Uart paper 2.5 x 3.5 inches.  I was looking at three of my recent oil paintings for inspiration. Overall I am pleased with the flexibility of this set. Here are some tips:

Using the Holbein Stephanie Birdsall set of Pastels
  • You are not limited to the colors of the actual sticks of pastels. You can layer and blend them to make new colors.  It works best if you put down the darkest colors first. You need to use a light touch. 
  • Think of the sticks of color like tubes of paint. If you have experience mixing paint just think of what colors you need to mix to get the color you want.  For example if you want a blue-green for distant foliage, you won't find it in this set but all you need to do is put down a blue and layer some green. The two will optically blend to produce the Blue-green.
  • Be careful not to over-blend. This leads to muddy color. A quick light layer is best. Allowing the color underneath to show will produce a cleaner color that will be optically blended. The viewer's eye will see the new color.
  • Be careful when blending complements. They will neutralize one another and produce a gray. This is great for making grayed colors if you need one.
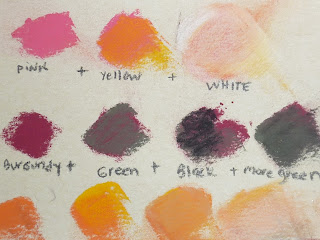
  • Make use of the white  and black pastels to change the value or how light or dark your colors are.  For example. I wanted a pale pink sky but the only pink in the set was a saturated bright pink. I put down this pink and altered it by adding yellow. It was still too dark so I layered some white to make the pale pink I wanted.  I did the same thing with black to make my green a darker value.


Sample Color Mixtures

Monday, November 26, 2012

A Recommended Pastel Set for Painting on the Go

Collage of Mini Pastel Originals
All Minis are available for $15 each or 2 for $25 email if interested
 In a couple of weeks by daughter and I are taking a cruise. Of course I am looking forward to some lounge chair pastel painting.  My favorite activity for the days at sea is to sit on a lounger with a small box of pastels and paper and paint some minis (2.5x3.5)  I usually take a small box of pieces of a variety of pastels but I have another recommendation for an even more portable and neater alternative....Holbein Pastels Stephanie Birdsall set of 24.

'Landscape Impression'     2.5 x 3.5     pastel

Holbein Pastels Stephanie Birdsall set of 24
I came across this set at the last IAPS convention.  I was shopping at the trade show i.e. Candy Store and I discovered the goodies at the Holbein booth.  I was buying a set of Gouache paints for underpainting.  If I spent another $5 I would get a bonus so I was trying to decide what else I needed.  Stephanie Birdsall was in the booth doing a demo with her set of Holbeins. She was a great salesperson and convinced me I needed her set. Her gorgeous painting made it an easy decision!  Here are the selling points and why you may wish to give these pastels a try.

  • They are a medium soft pastel shaped into neat sticks. You can use the side or the sharper edges for detail. They look hard like a Nupastel but they go down softer. The hard stick form makes them clean to use, a bonus when painting on the go where you don't want to make a dusty mess.
  • The colors! Stephanie explained to me that she selected the colors in her set to allow you to pain any subject. There are warm and cool versions of colors plus a few greyed colors, black and white. By layering these colors you have a very good selection. You can use the white and black to adjust the value of your colors if needed. Working with a limited palette is a great exercise. You will discover that you really can paint with just a few pastels!
  • The box!  I am not one who usually like to leave my pastels in the original box but this set is packaged so well and so compact that it is a great box to take on the go. The box has a lid plus another cardboard sleeve to slide over the box for extra security.
  • Clean, good variety and portability make these pastels an excellent choice for throwing into a bag with some paper for painting anywhere you go.  I am planning to do a demo with just this set to give you an idea what you can do.
The Holbein Stephanie Birdsall set is available at Dakota pastelshttp://www.dakotapastels.com/pages/softpastels-holbein.aspx

Mini original pastels make great Holiday gifts. They are available for $15 each or 2 for $25 by check or Paypal. Email me kemstudios@yahoo.com if interested.

Winter Landscape... Sale Painting of the Day

'Winter Delight'      6x6      pastel     ©Karen Margulis
It's Cyber Monday and I already see a few deals I am interesting in. I do need some art supplies!  If you are cyber shopping today, consider choosing a piece of original art. Art makes a great gift (even for yourself!)  This painting is a 6x6 pastel on Uart paper in the popular 6x6 square format.

'Winter Delight' is available by auction at DailyPaintworks.com. The opening bid is $50.

Saturday, November 24, 2012

How to Keep Blogging While on Vacation

'Morning on the Lake'        5x7       pastel     ©Karen Margulis
I have been living our of my suitcase for the last three weeks. Painting trips, workshops and family visits have kept me away from my studio and computer.  But I have managed to keep up with my daily blog posts and my Daily Painting galleries.  I have come up with a system of sorts to keep posting while on the road.

I have been asked how I manage to post everyday and I tell them it is just like any habit...it is a discipline like an exercise program or going to the gym.  I am used to it and I make time for it in my routine and I feel like something is missing if I miss a day.  So when I am out of town I want to 'stay in shape' so I make time for posting and staying connected. Here's how:

  • I am using the Blogger platform so what I do works for Blogger. If I know I will be out of town and have time to prepare I will write my posts ahead of time. Blogger allows you to write a post and save it as a draft. You can even schedule it to be posted when you want. (I actually don't schedule my posts but do it manually when I want on my iPhone.)  
  • If I don't want to bring my laptop I write the posts in advance. I only need my smart phone or iPad to publish the posts. I usually make a list of the days I will be away and spend a few hours preparing and saving the posts to draft. When I am ready to post them on the road I open Blogger,go to my list of posts, find the ones marked 'draft', click on edit which opens the post and then click 'publish' Done! 
  • If I am bringing my laptop and I don't have time or don't want to write my posts in advance, I just make time if I can to write a post on my laptop. For the trip I am on this week, I started my posts by adding pictures and saving them in draft then in the morning while having my coffee I finished writing.  When I was on Pawleys Island a few weeks ago I posted my daily paintings during our afternoon 'wine time' 
So far I haven't been successful writing posts from my iPad because Blogger doesn't let you attach pictures. There are some apps for blogging but I haven't tried them yet. I need to do that before my next trip. If any bloggers out there have recommendations I'd love to hear them. For now my system works to keep me posting and sharing my experiences!

SALE PAINTING OF THE DAY
'Dragonfly Magic'   5x7  pastel
It is time for Holiday shopping and there is nothing better than the gift of original art. I am offering a savings of 20% on all paintings in my Etsy shop. I will feature a painting everyday during the Holiday Sale.  Today's painting is a pastel. I created the lacy effect on the wings by starting on a black surface. I added iridescent pastel and drew the lines of the lace with the tip of a push pin! You can purchase this painting in my Etsy store here:https://www.etsy.com/listing/113147064/blue-dragonfly-5x7-original-pastel

Friday, November 23, 2012

Pastel & Mixed Media Class at the Art School of Sandy Springs

'Winter Magic'      8x10   Pastel on homemade surface   $95 purchase here
I am in Florida this week visiting family and I spent the ride down working on lesson plans for my winter classes.  I am exited to announce that I will be teaching this winter at the Art School of Sandy Springs. I will be teaching a class on Pastel and Mixed Media. This will be a 6 week course starts January 15 9:00-12:30.  Here is a description of the class:

 Winter landscapes, clouds and skies, marsh scapes, bird's nests and florals will be the subjects of this pastel class. Will learn to work with prepared backgrounds. Explore the wonderful flexibility of the pastel medium. Pastel can be combined with most other painting and drawing mediums which makes it ideal for experimenting with mixed media techniques. In this class we will explore the
possibilities of mixing pastel with acrylics, oils, ink and more to create texture and special effects that cannot be achieved with pastel alone. Underpainting, oil stained underpainting, pastel dusting, texture with pastel/acrylic mixture, painting on a black surface... Al level welcome.

The painting in today's post shows one of the techniques we will be using.  We will create our own pastel surface which is an excellent way to add texture to a pastel painting.  If you would like to learn more about the class or to register visit the school's website here http://theartschoolinsandysprings.com/Home_Page.html

For my regular Wednesday students, our classes will resume January 16th. Look for an email soon!


Thursday, November 22, 2012

Holiday Art Sale in my Etsy Shop

'Across the Creek'    5x5    pastel

'Across the Creek II'     5x5     pastel

'Across the Creek III'      5x5     pastel
I love Etsy!  If you are looking for a great site to shop for unique items or just a place to browse for inspiration, Etsy.com is the place.  Just visiting the home page with it's ever-changing display of beautiful art and fine crafts is a treat.  I recently opened an Etsy shop to share my paintings and I have loved being a part of Etsy.  Many new collectors have discovered my work and it is so easy to set up a store and list work.  I plan to do a more in depth post in a blog series on marketing I am working on.

Since it is the time of year that many of us are looking for Holiday gifts I have decided to offer a special savings code for the paintings in my Etsy shop.  The gift of original artwork is a wonderful thing so if you are looking for something special or just want to treat yourself, have a look at my Etsy shop. The savings will be available through December 5th to allow for shipping to for the holidays.

Here is the link to my Etsy shop    http://www.etsy.com/shop/KarenMargulisFineArt
Use code HOLIDAY at check out for a 20% savings.

Wednesday, November 21, 2012

10 Things for an Artist to be Thankful For

'Wildflowers in the Mist'        6x8       oil on panel     ©Karen Margulis
available with Paypal  $125
I have much to be thankful for. Family, good friends, good health and much more.  Today I wanted to do a twist on my list of gratitudes.  Being a full time artist has provided me with a whole new set of things to be thankful for. I'd like to share 10 of them with you.

  1. The gift of sensitivity.  I am grateful for the ability to look at the world in a different way. As I have developed as an artist so has my eye and sensitivity to subtle beauty.  I not only notice the obvious beauty like a fiery sunset, but I notice the simple things like a shaft of warm light across a meadow.
  2. My artist friends.  I love all of my friends but there is a special bond I share with my fellow artists. We just see things in a different way. Many of my artists friends were the 'different' ones in their family so when we get together and share so many things in common it is a great feeling. I love my artist friends!
  3. Art Supplies!  We love them and we need them to create. We probably don't need as many supplies as we crave (cavemen made art with burnt sticks)  But part of the fun of creating art is to try new supplies.  And who can resist a new box of gorgeous pastels!
  4. Travel.  I have always had wanderlust but being an artist gives me opportunities to travel. Trips to conventions, workshops and art events take me to new places to discover.  I am grateful for my good friends who love to travel and for the trips we take together.
  5. Collectors.  I approach my art by painting the subjects that I love but when a painting connects with someone and they are moved to have it hang in their home....there is no greater feeling of satisfaction. I am grateful for the people who enjoy my work.
  6. The internet.  Even though artists struggle with balancing time online with painting time, I am grateful for the ability to connect with so many artists and art lovers online.  Being an artist can often be a lonely endeavor and having an online community to share work and ideas has been invaluable to me.
  7. Enjoying my Day Job.  I am grateful for being able to work as an artist full time. I wake up every morning with a spark of excitement for the day. I can't wait to go down into the studio and go to work every day!
  8. Magic.  I am grateful for the chance to create something from nothing. It may not always be a success but just having the opportunity to turn a blank canvas into something.
  9. Books.  I love books, especially art books.  Being an artist gives me a good excuse to collect books. I need them. I need them for instruction and for inspiration. I think I'll buy a new book today!
  10. Sharing. I love to learn so I am grateful for the opportunities to learn from other artists but I learn just as much from sharing what i've learned with others. I love teaching and sharing on my blog and I appreciate all of you who visit every day to see what I have to share!
I wish you all a very Happy Thanksgiving!

Tuesday, November 20, 2012

Reflections on a Workshop...Most Important Thing I Learned

'Across the Meadow'        6x8      oil on panel      ©Karen Margulis
available in my Etsy Shop $125 click here
Sometimes it takes awhile to digest a workshop experience.  Sometimes you are just not ready for all of the information that you are given.  Years later the light may turn on and you finally have an 'Aha' moment.  I believe that every workshop presents us with something of value.  It is up to us to take the time to reflect on the experience, compare it to your goals for the workshop and see what seems to stand out.

I decided to take Marc Hanson's workshop because I have been a big fan of his work. In fact I purchased one of his April Challenge paintings a few years ago and it continues to inspire me.  I have recently been working in oils and thought that it would be good to take an oil workshop with an artist I admired. I have been winging it with oils with no formal instruction so this would be a chance to see if I was on the right track.

In three days I learned quite a bit about oils. I added several new colors to my limited palette. I got new brushes. I started to use a medium.  I became more comfortable with a palette knife.  After watching Marc do a couple of demos I realized that I was taking a similar approach to blocking in the painting. And I realized something that I already knew but wash;t really doing. And it is going to be big for me I think.

Restraint.  That is the word I will try to keep in mind as I paint.

  • I want to restrain my speed for one thing. I usually paint fast.  But I want to take more time in the resolution stage of a painting. I want to take my time and gradually refine the details rather than rushing the finish.
  • Restrain my color.  I love color but I realize that a painting needs subtle and neutral colors to allow the more intense colors to work. I am sometimes successful with this but it is an idea that I will try harder to accomplish.
  • Hold back on the exciting stuff....plan in advance and know where they will go but don't rush to put it in right away.....gradually build up to the finishing touches. This refers to things like the highlights, intense colors, finer details. Again, this is something I try to do but I want to work harder at it.


Monday, November 19, 2012

Three Things to do After an Art Workshop

'Nantucket Dreaming'      6x8    oil on panel    ©Karen Margulis
sold
It never fails.  I return home from a painting workshop full of inspiration and ideas only to be faced with a list of non art related chores.  I am thrown back into the regular routine and before I know it that spark of excitement and inspiration is pushed down by the weight of my other obligations.  If only we could have a couple of extra days after a workshop just to paint and talk to our artist friends about the things we have learned.

Most of us don't have the opportunity or time to spend a few extra days just to paint.  But this time I am going to do my best to not let the ideas from the workshop take a back seat to everything else.  I decided that there are three important things that I need to do after every workshop and I will encourage my students to do the same after a workshop they take with me as well. So what are the 3 things?


  • PAINT!  I can't stress how important it is to get right to the easel after a workshop. The longer you wait the more you will tend to forget. Paint while the instructor's demos and words are still fresh in your mind.  You know when you can still he the voice of the instructor in your head as you paint?  This voice will fade the longer you wait.  I find I do better trying the ideas and techniques I learned once I am back in the studio. I can take my time and practice. 

  • LOOK BACK AT YOUR NOTES!  How many times have you taken a notebook full of notes and then never looked at them again?  I know I am guilty of this. Yes there is the benefit of writing down notes in the first place but you will get more out of them if you look at them again. It is a good idea to re read your notes right after the workshop while it is all fresh in your mind.  It is even better if you can take some time to rewrite your notes.  This extra step will really help to cement the ideas in your mind.  I know that mu notes are often a jumble of thoughts I write down as the instructor speaks and paints....so it helps me to rewrite the notes an make better sense of them.

  • CONNECT WITH THE OTHER ARTISTS!  One of the best things about a workshop experience is meeting other like minded people. Other artists who share the same passions and who want to be the best they can be.  The friendships and camaraderie that develops can be one of the best things to come from a workshop.  If you can reach out to theses new friends so that you can stay connected it is worth the effort.  At this workshop, the coordinator sent out an email list of students after the workshop. This was such a nice touch! I also plan to look up my new friends on Facebook.  Often we have already met on facebook and only meet in person at a workshop so it works both ways!
I am happy that I have had a chance to paint after the workshop. I have done 3 small oil paintings so far and plan to try my hand at some gouache studies this week while I am out of town.
What things do you do after a workshop? I'd love to hear!

Sunday, November 18, 2012

Marc Hanson Workshop Report Day 3

'Morning Quiet'         6x8     oil on panel   ©Karen Margulis sold

 Let me begin my report by commenting that today's painting was done yesterday when I got home from the workshop. I believe it is important that you take time after a workshop to paint as much as you can. More on this later!

The third and last day of the workshop began with a bit warmer temperatures and the promise of sun. We gathered at a small lake to paint and Marc began with a quick demo. There was a wonderful mist and mystery on the lake but by the time everyone assembled it was gone.  Marc had wanted to demonstrate how he paints backlit situations and mist but it was a good lesson to see how to approach a plein air painting in very rapidly changing conditions.

We spent the rest of the morning painting on our own. I chose a distant bush across the lake and wasn't too pleased with my results. I had decided to add to my limited palette so it was a learning experience to see what the added colors did. You know what they say.....you don't do your best work at a workshop because you are in learning mode.

After lunch Marc had an exercise for us.  I really enjoyed having guided exercises at a workshop. I learn more from solving structured problems then just muddling around on my own.  The afternoon exercise was a Memory Painting.

Painting #1   1 hour Memory Painting
 For this exercise we did 2 paintings of the same subject.  We had an hour for each one. This is how it worked. We chose our scene and set up our easels facing away from the subject.  Marc started the timer. We had 5 minutes to look at the scene and then 20 minutes to paint.  Then another 5 minutes to look and another 20 to paint. We did this for an hour.  The painting above is my memory painting.

Painting #2  1 hour painting while looking at subject
For painting #2 we turned our easels back to face the scene and we had one hour to paint as usual looking at the scene.   At the end of this exercise everyone line up their paintings so we all could see the results. It was interesting. For most of us, our memory paintings were looser and less fussy.  We tended to put in what we thought were the most important elements.  In comparison, the second paintings had more detail and tended to be fussier.  The memory paintings were more an impression of the scene rather than a copy.  It was an interesting exercise that I will be sure to repeat on my own.

The workshop ended to soon! I really enjoyed meeting new artists and the camaraderie that was developing.  Three days is just a teaser!   I did learn a lot that I still need to process.  I roomed with two of my artist friends Marsha Savage and Candy Day and our evening art discussion really gave me a lot of food for thought.

Read Marc Hanson Workshop report Day 1 HERE
Read Marc Hanson Workshop report day 2  HERE

Saturday, November 17, 2012

Great News! 2012 IAPS Web Show Acceptance

'The Moment of Truth'     9x12    pastel     SOLD
I interrupt my workshop reports to share my good news. I just found out that this painting has been accepted into the 2012 IAPS Web Show.  IAPS stands for the International Association of Pastel Societies.  I am very honored to have my painting accepted. This is the first time in the web show for me and I am looking forward to seeing all of the paintings.  I am also happy to have another point towards the IAPS Master Circle. I have one point to go!

I'd like to share the inspiration behind this painting because it something that has had a big impact on the direction my paintings have taken.  I have shared this story before but it is a message that is worth repeating.  I call this painting 'The Moment of Truth' because it was another plein air version of these same 'weeds' that I did a workshop several years ago that gave me an epiphany of sorts.

I was at a Stan Sperlak workshop on his Crow Creek Farm. The painting I did was a last minute plein air study that I did while cleaning up for the day. I couldn't resist the lighting on the tiny patch of weeds. I shared the painting at the end of workshop critique and it sparked a conversation about finding the subject that speaks to you. Stan talked about the importance of finding our own Truth....what it was that truly spoke to us and compelled us to paint.  These are the things that will allow us to do our best work.  I realized that my Truth was nature and landscapes but the more close-up intimate view. I realized how excited I got by seeing a field of wildflowers or weeds by the roadside.  I am most in my zone when painting these subjects. I realized that it was OK to paint the weeds as my husband called my wildflower paintings.

That discussion about finding the truth has had a huge impact on me and my work. I may experiment with other things and try new subjects but I always happily return to my own Truth and find ways to paint what speaks to me the loudest.

Friday, November 16, 2012

Marc Hanson Workshop Report Day 2


'Autumn Surprise'         6x8       oil on panel    ©Karen Margulis   $125 paypal
It wasn't as cold today and I actually shed 3 of my 6 layers!  The workshop started with Marc doing a demo.  It was about a 2 hour demo and I took a lot of photos.  I loved having my Canon superzoom camera. I didn't need to get up or more around to get a close shot of the painting in progress.

After the demo it was so close to lunchtime we decided to eat and get it over with so we could have the rest of the day to paint. It was a good choice and I managed to do 3 paintings.  The painting above was my last one but it was actually my second.  I didn't like how it was going so I wiped it out and put it aside.  Before I cleaned up for the day I decided to take it out and try again with better success.

Below are photos of Marc's demo along with some random thoughts about what I learned.


Marc Hanson's demo painting

  • I loved Marc's initial block-in. The wet and drippy paint reminded me of the way I like to do my oil underpaintings for pastel. He wiped it in with a rag/paper towel to great a toned surface. 
  • I have been working with a limited palette so I enjoyed see how he used other colors to mix his subtle grayed greens dried grass color. I tried these new colors in my painting. 
  • It was great to see how he built up the painting and especially how he painted the branches. He loaded his brush and drew the branches. 
  • He used a palette knife and a hardware store brush to create texture in the end stages. I can't wait to play around with those tools more!
I have taken a lot of notes so I am sure I will have more to share in future posts.  One more day so stay tuned to part three!

If you missed my review of day one you can read it HERE

Thursday, November 15, 2012

Marc Hanson Workshop Report...Day One

Concept Exercise on an 11x14 panel
Let me begin by saying that I am in workshop learning mode.  I am trying things outside of my comfort zone so I am not expecting great paintings.  I am pushing myself to learn new things so I can grow as an artist.  I'd like to share my experience with you and I'll show you the good, bad and the ugly!

I am attending a 3 day oil workshop with Marc Hanson. If you aren't familiar with his work have a look at his website HERE   I first discovered Marc's pastels a few years ago and I became a fan of his work. And now that I am interested in oils I knew that he would be a great instructor for me. I jumped at the chance to join this workshop near home.

The workshop is in Atlanta but it was anything but Hot-Lanta today. It was in the 40's, cloudy and windy all day. But we all braved the cold and enjoyed the moodiness of the day.  Marc's plan for us today was to do some exercises to get us out of our comfort zones and to help us with both the mechanical and the emotional sides of painting.

Marc showing us his Value Comparison Tool
 First we did some value studies.  We divided an 11x14 panel into 4 sections. Using only black and white paint we did a Light Value painting, a Dark Value painting, a Middle Value painting and the last one was an equally weighted all over value pattern. Below is a photo of Marc's paintings. I forgot to take a picture of mine. It was really too cold to get the camera out!

Marc's Black and White Studies
 Below is a photo of some of the artists watching the demo. It was cold! I had quite a few layers so I was actually comfortable enough. Thank goodness for long underwear and wool socks!

It's a Cold Day in Hot-lanta!
 After lunch it was back to the easel this time for an exercise that would help us tap into the more emotional part of painting.  We would also be painting in color!  The idea of this exercise was to choose one word the describes your concept for the subject you are painting. If you know why you want to paint something,,,what you want to say about it...it will guide the decision you make as you paint.
My concept word studies still on the easel
We taped off 4 sections of an 11x14 canvas.  Here are my studies. Here are my concept words from top left...Quiet, Mystery,Promise of a better day, Color Surprise.  It was a fun exercise and one that I will definitely do again!

We're up early for another day so stay tuned!

Wednesday, November 14, 2012

What to do With Leftover Oil Paint

'Remembering Summer'         8x10      pastel  ©Karen Margulis
available on Daily Paintworks  $75
 What can you do with the leftover paint on your palette after a painting session?  You can save it of course.  But if it is time to give your palette a good cleaning then you might want to do something with the leftover paint.  I hate to throw anything usable away!  One of the things I did was to paint miniatures with the leftover paint. But I still had some left. It was too little to save but too much to throw out!  So I did some under paintings!

Oil Stain Underpaintings
I took out some pieces of 8x10 sanded paper. I had some cut Uart and Wallis on hand. I clipped the papers to my board and went to work.  I thinned the oil paint with Gamsol until it was runny like tea. I started by scrubbing in some darks before adding any other colors.  I did each one separately and only used what colors were left on my palette. I let them dry upright so the paint would drip as it dried.

I ended up with 5 interesting underpaintings that I will use for pastels. This morning I chose the middle underpainting and painted a wildflower meadow. If you enlarge the photo you can see some of the drips from the oil paint.  I am going to let each underpainting suggest a subject. It will be fun to see what develops!

Tuesday, November 13, 2012

No Paint Wasted! Painting Minis en Plein Air

'Creek View I'      2.5 x 3.5     oil on canvas  
$40 paypal

'Creek View II'     2.5 x 3.5  oil on canvas

'Creek View III'     2.5 x 3.5    oil on canvas
I don't like to waste paint.  With pastels there is no waste. When you are finished painting for the day you put your pastels away or like me leave them out for the next painting.  There is no worry about the pastels drying up. Sure you use them up as you paint but there is no leftover pastel to worry about.

I am trying to get used to the idea of clean up and what to do with leftover paint with oils.  I know you can save the paint and there are different ways to do this.  I have been covering my palette with press and seal saran wrap.  That works fine for a couple of days but what happens when you want to clean your palette and start fresh?  Or what if you have only a little paint left...not enough to save but too much to scrape off?  I know some artists like to mix it all into a nice grey but I decided to use up my paint by painting some quick miniatures.

I used the small 2.5 x 3.5 stretched canvases. I lay them on a paper towel on a table and used the piles of leftover paint from my morning session.  The paintings are loosely based on the marsh I was looking at. It was fun to interpret it on a smaller scale.  I didn't want to waste a speck of paint so I even took out a small palette knife to lay the paint on thick!

The end result....I had three little studies and a clean palette!  Yesterday I had to clean my paleete to get ready for the Marc Hanson workshop (tomorrow)  So I used the paint in another way. Come back tomorrow to see what I did!

Monday, November 12, 2012

2 Easy Ways to Transport Plein Air Pastel Paintings

Collage of my Pawleys Island Plein Air Paintings

It is always fun to come home from a painting trip and unpack the finished paintings. I like to lay them all out on a table and look at them as a group. Sometimes the paintings I really liked aren't as good as I remember and others look better than I thought.  It is a great way to relive the trip!  Painting a lot on a trip is great but how do you keep them safe when you are finished and while you travel?

I have tried a few methods of transporting finished paintings but have settled on two favorites.  I used to use a folder that I made from card stock with leaves of glassine stapled together. It was too flimsy.  Then I tried using two pieces of foam core with glassine sheets held together with binder clips. It was too bulky and it was difficult to look through the paintings without taking them all out.


'Marsh Impressions'        5x7     pastel  plein air  sold

Now I have settled on two methods for keeping my paintings safe.  I rarely paint larger than 8x10 so these methods work well. If I decided to paint larger I would probably bring a foamcore sandwich.


  •  For the 8x10 or 5x7's I like to use an inexpensive pad of tracing paper. I just slip the painting in between the pages. They stay safe and clean and if I want to look back through them I can do it easily.  I take the aded precaution of using a small binder clip to close the pad so paintings don't slip out. I also like to slip the pad into a clear poly envelope....the kind that have a string tie.

  • For anything smaller than 5x7 I find a small magazine or even better a local travel guide magazine. These are small and portable and readily available at stores and visitor centers. The glossy magazine pages don't harm the painting though I don't store them in the magazine. I remove the paintings as soon as I can when I return home.


Traveling with Finished  Paintings

Sunday, November 11, 2012

Painting a Great White Egret

'Pawleys Egret'        6x8       pastel      ©Karen Margulis SOLD

I just returned from a wonderful week on Pawleys Island.  I did 29 paintings and took over 1000 photos. I am filled with inspiration and I can't wait to sort through my photos and reflect on all of the beautiful things I experienced this week.   But that reflection may just have to wait another week.  I have one day to do my laundry and repack my painting gear for a 3 day workshop with Marc Hanson.

The workshop is in the Atlanta area but I have decided to stay an a hotel closer to the painting locations  along with two of my artist friends Marsha Savage and Candy Day. I know how tiring a workshop can be and I just don't want to have to fight the Atlanta traffic. It is more fun to be immersed in the workshop experience and not have to come home every night and change gears.

My plan is to post reports each evening about the workshop so please visit my blog this week for my report.  I will also work on putting together an album and a full report of my week on Pawleys Island.

This is one of the paintings I did while at the beach house. It was cold and rainy one day so I painted two egret paintings from photos I took the day before. This is a 6x8 pastel on Canson paper.