Visit my Patreon Page for more painting instruction and Paint Along Videos!

Sunday, December 31, 2017

My Favorite Paintings of 2017 #1


I hung this painting in my bedroom. It is my most favorite painting of the year. It's my favorite for a few reasons. I consider it a breakthrough painting because I accomplished something I have been working on. I feel I was successful in this painting.

  • I have been working on finding the right balance of detail vs. suggestion in grassy/weedy areas.  I want to suggest the grasses without painting too many. I also have been working on creating more depth and dimension in these areas. I want to create a deeper tangle of grass.
  • This painting also reminds me of the importance of plein air outings. Know that painting outside from life is important. It really allows you to experience the landscape with all senses. Colors and values are different in real life than in photos. Having plein air experience allows me to work from photos and make my painting seem natural and believable. This painting was done from a photo taken in Ireland but I had painted at this spot for an entire day making many studies. It helped me interpret my photo in a more meaningful way.
  • Finally this painting just brings back some great memories of a fantastic week in Ireland.

Saturday, December 30, 2017

My Favorite Paintings of 2017 #2

'Beneath the Setting Sun'          18x24         pastel        ©Karen Margulis
 This was one of my favorite paintings of 2o17. Not only did I thoroughly enjoy painting it. I was honored for it to be awarded Best in Show at the 2017 Southeastern Pastel Society Exhibition! Enjoy the following post from the archives:

We need the darks. A light shines brighter when it is surrounded by dark. When I want to create the illusion of light...the intense glow of sunset...I know I need to surround the light with strong darks. Pastel paintings are traditionally done by layering the darker values first. I embrace these darks and love starting a painting with a rich dark pastel. But I don't want to use any dark color and I never use a black pastel for my darks (I do have an exception to this which I will share later this week)

I love to use COLORFUL DARKS in my paintings.

I consider a colorful dark to be a very dark value that may be close to black but just a darker value of a color. In my pastel collection I always like to have a a dark version of each color on the color wheel. I love to use Terry Ludwig dark pastels. You can get a great collection in his dark sets.
I also like using Diane Townsend soft form pastels. I usually purchase these open stock. I consider a dark blue, green, purple and red must have pastels! See photos of my dark pastels below.


The underpainting with texture applied
Today's painting is a good example of the power of rich and colorful darks. This scene demanded rich darks to allow light of the setting sun to look bright enough. I used a variety of darks to build up the dark and shadowed area of the painting. I began the painting with a dark underpainting using Art Graf blocks and water. I applied some gesso and pumice mix to build up the texture of the grasses in the meadow.


In the photo below you can see the layers of dark. I like to build up the dark areas with several sticks of color that are all the same value. If you look closely you can see that there is one dark eggplant color that is a bit darker. This is the famous Terry Ludwig Eggplant pastel. It is a must-have pastel but I reserve it for accents only.

Layering those colorful darks
With pastel we start with the darks and build up layers and gradually get lighter. This allows for a strong base on which to build the lights and the details. It is much easier to tone down a dark area than to try to introduce it in an area that is too light. That is a sure recipe for mud. Start dark and rich with colorful darks! 

close up detail
Painting Note:  This is an 18x24 version of one of my favorite paintings from last year. I wanted to challenge myself to size up form the original 9x12 painting. It was great fun to let the texture of the ground suggest the texture of the grass! I used Uart paper.


Friday, December 29, 2017

My Top Three Paintings of 2017 #3

9x12     pastel       ©Karen Margulis     sold
 It's the time of year for looking back on the top lists of 2017. What were the top movies? Songs? Books? So in the spirit of reflection I decided to choose my top three paintings of 2017. I will share them here over the next few days along with my comments on why they made my short list this year.


close up of the painting in progress
Why did this painting make my list?

As I scrolled through photos in my 2017 painting file a few jumped out for various reasons. This intimate woodland scene was one of them. It didn't win any awards or wasn't in any exhibitions.  I selected it for my list simply because I liked it and I enjoyed painting it. It also brings back good memories of a highlight of the year for me....the IAPS convention.

Painting during the convention in Old Town Albuquerque
I always enjoy going to the IAPS convention. It is called the biggest pastel party on earth! This year was special because I was once again selected to be an instructor/presenter. There is nothing more exciting than to be on the stage sharing with a group of passionate pastelists!

set up for my wildflower demo
The painting reminds me of the convention because I painted it shortly after I returned home on a piece of new paper that I had purchased at the trade show. The paper was Yi Cai sanded pastel paper from China. There was something about the paper that was interesting. I thoroughly enjoyed working on it and this painting seemed to flow from my fingers. Maybe it was the paper or maybe just the glow of a fun week at the convention but when I look at this painting I just smile. It is worthy of my list!

Why not look over the paintings you did in 2017 and choose your favorites!

Wednesday, December 27, 2017

You Need This if You Use Pastels!

'Winter Tango'         8x10        pastel       ©Karen Margulis
available $125
It is the bane of a pastelist.....dirty fingernails. You know you are a pastelist when you have to apologize to the cashier for your dirty fingernails. "I paint. I really didn't just go dig in the dirt!"
For years I did the best I could to clean my fingernails with a nail brush. But they seemed perpetually stained. Not any more!

I discovered the MUST HAVE soap for pastel artists. Good old Lava Bar.


Lava soap has been around since the 1800s and has been the trusted soap for coal miners, oil rig workers and mechanics. If it works for them then surely it will work wonders for pastel stained fingernails! The secret is the pumice in the soap. Not only does it remove the pastel with the help of a nail brush it leaves your hands exfoliated and soft!


To protect my hands I take a three step approach.

  • Protect my hands before painting with barrier cream like Art Guard or Gloves in a Bottle. (or gloves)
  • Keep hands clean while painting with baby wipes.
  • Wash hands after painting with Lava soap and a nail brush.
  • Moisturize hands with a good cream. I like Weleda Skin Food.

Tuesday, December 26, 2017

Painting the Winter Landscape is Easy!


'Winter Silence'              8x10             pastel             ©Karen Margulis         SOLD
Enjoy today's timely post from the archives!

I like to paint winter landscapes in the winter. Some prefer to paint them in the heat of the summer. A bit of respite from the heat. I can understand that. I like to paint a warm summer beach to take the chill off a cold winter day.  But I still prefer to paint winter when it is cold.  I feel like I can relate to the cold iciness of the snow when I actually feel cold. And it helps to be able to observe the snow and the bare winter trees live and in person!

It was cold outside when I painted this demo. It has been cold everywhere including Georgia!  I enjoyed painting it and I am excited to share the detailed demo notes in my latest download available in my Etsy shop.  I love sharing my mini demos here on the blog but these monthly demo downloads allow me to go in depth and share step by step my thoughts and techniques.  

This demo focuses on how to paint the colors in snow and snow shadows and how I create the illusion of detail without really putting in a lot of detail....suggestions of detail is what I try to do.  Bare winter trees are the perfect subject for minimizing detail.

This demo is 22 pages with 40 color photos. It is available as a PDF download for $6. You can view or on your computer or print it out. Here is the link to the Winter Demo

If you haven't tried my monthly pastel demos I have the last 5 available in a bundle for $24 here.


The front of my Demo PDF


suggesting bare winter trees


shapes and colors = suggested detail
This PDF demo is available today on Patreon for all Patrons! www.patreon.com/karenmargulis

Sunday, December 24, 2017

Holiday Greetings from the Caribbean

'My Kind of Snowman'          5x7       pastel      ©Karen Margulis
available $95
Happy Holidays from the Caribbean! I hope my sandy snowman finds you warm and filled with peace and joy. I had fun painting this guy. Every year I paint a 5x7 snowman and since I knew I would be away on a cruise I decided a sandy snowman was in order!

Saturday, December 23, 2017

My Instagram Best Nine #2017bestnine

My #2017bestnine  The photos with the most likes on Instagram
Have you tried Instagram yet?  If not I urge you to join the fun. It is a wonderful social media platform that is perfect for artists. On Instagram you follow who you want and only see those posts. It is easy to curate your feed to include only art. Imagine scrolling through beautiful images from your favorite artists. That's it. No politics or drama or unwanted intrusions. I LOVE it! Give it a try.

Every year you can go to this website www.2017bestnine.com to have them select your Instagram Best Nine then post it to your Instagram and use the hashtag #2017bestnine. Your best nine is a collage of your photos that have received the most likes and response for the year.  Since I post mostly my art it is always interesting to see which paintings get the most response. It is quite telling. Last year it was all tree paintings. This year seems to be the year of wildflowers!  I wonder what 2018 will bring!

Friday, December 22, 2017

Behind the Scenes of A Pine Tree Painting


'After the Snow'       10x8       pastel       ©Karen Margulis
available $145
We weren't expecting it. In fact all week long the weather report was calling for a 'nuisance dusting'. But they were wrong. In my town we got about 11 inches of snow!  We lost power for 20 hours but it was worth it! I took a bunch of photos for future paintings. We do't get snow often so I had to take advantage!

For today's post I am taking you behind the scenes of this pine tree painting. During the snowy day I pants these trees as they were getting covered on snow. The morning after the storm the sun came out and it was glorious! All of the trees were covered with snow making a true winter wonderland. I wanted to paint the trees before the snow melted off the branches.


I took out a piece of Wallis warm mist from my stash. I thought the warm brown tone would be perfect for my sunlit trees. I did a quick sketch with a piece of vine charcoal. I wanted just a loose drawing of my main shapes and lines.


The next step was to block in the darkest areas of the painting which was the tree trunks and foliage (needles) I used several layers of dark value pastels......purples and cool greens and turquoise. I put in more foliage than I needed so it was time to carve into the dark shapes with my sky.


I used a couple of blues and a pale yellow to paint the sky. I used the darkest blue to carve the sky into the pine foliage.  I also paint the distant tree line with light gray blue greens. Next came the snow I used duller warmer pinkish snow in the distance and the brightest sunlit snow in the foreground.


In the next stage  of the painting it was time to start adding detail. I add branches in the trees and scrubby bushes at the base of the trees. I also add detail to the tree trunks. I layered several colors in the trunks from violet to orange to get the sunlit glow.


Finally I added snow to the branches and foliage with a soft whit Schmincke pastel. I decide to add the suggestion of a small building/shed to the background for balance.

Thursday, December 21, 2017

A Tip for Painting Bare Winter Trees

'Welcome Winter'        6x14       pastel       ©Karen Margulis
Trees are hard to paint.  I hear this from my students all the time.  I think sometimes we make it more difficult than it has to be.  Take trees in the winter landscape. I am referring to those bare branched deciduous trees.  You would think that they would be easier to paint than a tree full of leaves. After all it is just a few branches which can be easily drawn in with a hard pastel, right?

But it is the bare branched, lacy looking tree that can be the most challenging. Why? Because we try too hard to put in every branch and twig and we end up something looking like a stick poking out of the snow.

Another challenge is to get the bare trees to look like they are part of the landscape and not 'stuck' on the background. Again, we sometimes try to hard and spend all of our efforts painting the tree and branches and forget about the background. Then try to put it in around the tree. Challenging!

How can we avoid some of these winter tree challenges? Here is a tip for dealing with those bare winter trees.


  • For those lacy looking bare branched trees in the distance:  It is easier to suggest the laciness. It is all an illusion. I like to scumble a nice muted distance color such as a muted purple or grayed green up into the sky. Then I pull some of the sky color on top of the trees muting them even more. The next step is to take the sky color and put in a few well placed sky holes to break up the  mass of the tree. Finally I take a sharp edge of a pastel or a Nupastel and draw in a trunk and a few very light branches. I use very little pressure because I want these branches to be light and airy.

Check out the quick video of this technique over on my Patreon Page www.patreon.com/karenmargulis

Wednesday, December 20, 2017

Painting the Light on Snow


'Winter Magic'        11x14      pastel       ©Karen Margulis
available $165

"Take that pure white pastel out of the box!" 
That was advice I got a few years ago. So I did and I rarely use white in my paintings. Oh,  I will use an occasional spot of pure white for a highlight but most of the time I can't even find my pure white in my box.

Instead I use very light values of many colors in my lightest or white objects.  I try to create the illusion of white with my light values and by surrounding them with darker colors.


To paint the white in snow it helps to remember that white snow is reflective. It reflects the color of the light so if the light is warm, the snow will have a warmth to the white such as a pale pink, peach or yellow.  If the light is cool the snow will reflect this coolness. Doug Dawson explains it so well in his book 'Capturing Light & Color in Pastel'.

  • At sunrise or sunset the light reflected by the snow is pink or orange.
  • Shortly after sunrise it turns yellow-orange.
  • Later in the morning is becomes yellow.
  • It starts to cool off around noon and becomes yellow-green.
  • From noon to sunset the process reverses itself.
It is important to remember that these colors also become cooler into the distance due to the effects of aerial or atmospheric perspective.  And sometimes it is hard to see these shifts but we do need to address them and often exaggerate them. This is what helps me:
  • The snow in light is brightest and warmest in the foreground.
  • As it recedes into the distance it becomes cooler and duller....yellow then orange then red is filtered out.
  • The snow in the distance tends to be duller often a dull greyed pink.
There are always exceptions to this idea but it is a good starting point. You need to pay attention to the light and the color of the light and snow.  I saw an excellent post on Facebook by Liz Haywood-Sullivan.  She suggested that artists observe the snow at different times of day and under different lighting conditions and keep a Snow Diary with color swatches and notes.  I think this is an excellent idea for those of you who live in areas that get snow!

Tuesday, December 19, 2017

Painting The Shadows on Snow in a Winter Landscape

'Winter Shadows'           10x10         pastel       ©Karen Margulis
available $155

 I love painting winter landscapes but I am snow challenged here in the south. We haven't had a good snow in Marietta in a long time.   So I have to rely on photos for my winter scenes. Working from photos always presents challenges but especially with snow photos.

Our ordinary point and shoot photos of snow just don't do a good job of capturing the colors we see with our eyes.  The light snow often looks pure white and the shadows look black.


When we paint what we see in the photos we end up with boring and flat looking snow.  We have to introduce and exaggerate the colors to make our winter/snow paintings more authentic and interesting.

So how do we know what colors to put in our snow and shadows?  Living in the south I can't even observe snow so I have to rely on other artists and instructors.  One of my favorite resources for information on painting snow is Doug Dawson's excellent book 'Capturing Light & Color with Pastel'.  Doug has a chapter on painting snow and I'd like to share a few of my favorite bits of advice from his book.


Let's begin with Shadows on snow. (since I usually paint the shadows first) Both the light areas of the snow and the shadows have color. Snow reflects the color of the light in the 'white' areas and the color of the sky in the shadows

  • Shadows in snow reflect the color of the sky. They are usually cool ...blue-green, blue-violet or blue.
  • The color in the shadows get cooler as they go into the distance. (They follow the principles of aerial perspective) 
  • Shadow colors shift from blue-green to blue-violet to blue as space recedes. This is because yellow is first filtered out of the light, then oranges and then reds.  See the photo above for some of the pastel colors I use for snow shadows starting with blue-greens on the right to blue-violets to blues.
WHAT YOU NEED TO KNOW:  Snow is not white and shadows are not black. Snow is the color of the light and shadows are the color of the sky. Shadows are cool colors and shift and get even cooler as they recede.

Monday, December 18, 2017

Which is More Important in Making Art: Quality or Quantity?


This is an interesting question for a daily painter. By default I have to go with quantity. The more I paint the more I learn and the more I improve.  Over on Patreon we have been reading the book 'Art & Fear' by David Bayles and Ted Orland.

One of the passages we have been discussing is the idea of quality vs quantity. In the book the authors share a story about a pottery teacher who divided his class into two groups. One group had the entire class series to work on making one perfect pot. The other group was instructed to create as many pots as possible during the same time period. The result was that the quantity group produced better pots because they had more practice. The quality group spent more time studying and trying to figure out how to make the perfect pot and so they didn't have enough time to practice and lean from their mistakes.

What an eye opening idea!  I believe it is true that the more you practice the more you learn and improve. Quantity will ultimately lead to quality!

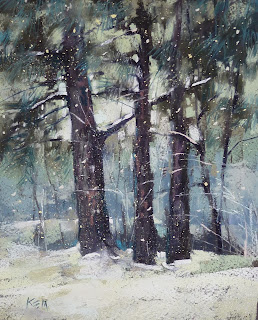
This has been the case for me. I began painting everyday shortly after I took up pastels in 2005. Practicing has made a huge difference for me. Have look at one of my very first pine tree paintings. This one was done plein air about 6 months after I started painting. I can look at it now and give it a good critique but at the time I thought it wasn't too bad!  I have learned much over the last 12 years. Now scroll up to the top of the page to see two pine tree paintings that I did this month. Quantity leads to quality. I  am looking forward to seeing what I will do after another few years of practice!

click here to see my very first blog posts:  http://kemstudios.blogspot.com/2005/07/


Sunday, December 17, 2017

A Quick Tip for Painting Falling Snow

'Let it Snow'        9x12       pastel       ©Karen Margulis
available $125
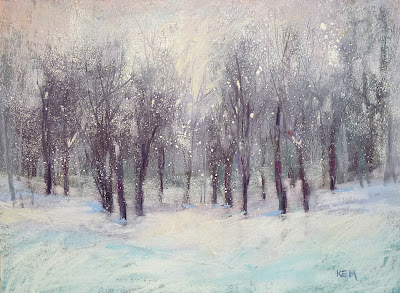
Want to paint snow with pastels?  Forget about trying to paint every snowflake. I have a quick and easy way to create a snowy landscape.  All you need is a very light value pastel and something with a sharp edge. I like to use a palette knife.  A piece of glassine or tracing paper is helpful but you could do without it in a pinch. Read on for details. 
before adding snow

Here is another painting demo with details on adding the falling snow.


I am using a light gray piece of Canson Touch paper that I also coated with some clear gesso for a bit more texture. I used only my softer pastels, Terry Ludwigs and Diane Townsend lights. I blocked in the darkest shapes with some blues and purples.


I block in the sky with pale pink and pale yellow bringing it down into the trees.


I finished the snow covered foreground and mid ground using blues for the shadows on the snow and pale yellows and pinks for the snow color. I don't use pure white at all.


I refine the trees by using the sky color to create some airy and lacy branches. I also lightly draw in some branches with the sharp edge of my pastel. I refine the trunks and aadd some bits of color to the trees. Now I am ready for the falling snow.


I lay the painting flat. Using my flat palette knife and a pale pale pastel (not white) I shave the pastel over the painting where I want some snow to fall. I dig into the pastel stick to create some larger snowflakes. Once I am satisfied with the amount and placement of the snow I put down the piece of glassine paper and press down with my palm all over the paper to push the pastel dust into the paper. I also use the palette knife to push the bits of pastel into the paper. I also use the palette knife to draw in some branches like scratch art.
Voila...now you have falling snow!  Easy and a lot of fun!


On Patreon today: I posted a video sharing two ways to add falling snow to a pastel winter landscape. www.patreon.com/karenmargulis


Saturday, December 16, 2017

Last Minute Minis with a Surprise Pastel


'Magic in the Forest'      2.5 x 3.5      pastel       ©Karen Margulis
 I had a surprise this week!  I decided to paint a few mini pastels to use for holiday gifts. I started out doing a series of magical winter forest scenes. I started with dark blue and built up layers of green in the fir trees. Then I spotted a small sparkly green peeking out at me from the box.  I felt the excitement build as I took it out of the box.

And then I made a mark with it. It felt wonderful as I added some of this iridescent green to my trees. It was soft and smooth and let a sparkly trail that added just the right color and punch to my trees. It was magic!
A fun little pastel.....Diane Townsend iridescent pastel 503D
I have other iridescent pastels but for some reason I love the green ones the best. They tend to add just the right touch to trees. I have another one in my plein air box and everyone in awhile I use it and I always enjoy the effect. 

Tip: The trick to using a sparkly pastel and making it work is to make sure you are using the right value and color. This way the sparkle is subtle and blends right into the surroundings.


Wrapped and ready for last minute gifts


Friday, December 15, 2017

Do You Have an Icing Pastel?

'Winter Wishes'         11x14        pastel          ©Karen Margulis
available $165
Do you say Icing or frosting?  Is it a regional thing? I guess I use both terms interchangeably but not being much of a cook or baker I am not sure what is the proper word. But in the pastel painting world I will call it Icing the Cake!  What am I talking about?

ICING: That moment when you get to put some thick pastel in your painting as a final highlight or accent mark. Like when you add some thick snow to a tree in a winter landscape.

You can use any light value pastel for your icing but there are some pastels that do a better job than others. The softer the better. You can create icing with a hard pastel but it is very hard to get the thick texture that a super soft pastel will give you. My favorite Terry Ludwig and Diane Townsend pastels will work but this is the time for me to take out my ICING PASTELS.


I find the Sennelier and Schmincke pastels are too soft for the way I paint. But I do love them for making those final icing marks. It takes little effort to get a nice thick juicy mark! That is a mark that leaves a measurable amount of pastel on the paper.

Do you have Icing pastels? Check out this chart on Dakota Pastel's website. It lists pastels in order of softness.


Thursday, December 14, 2017

Ten Great Gift Ideas for Pastel Artists

'Holiday Cheer'          8x10        pastel        ©Karen Margulis
available $145
It's that time of year! Have you made an artist's wish list? Perhaps you are starting to think about setting goals for 2018. I always begin the new year with a good studio cleaning and nothing spurs me on better than having to find ha home for some new supplies! Here are a few suggestions to get you started on your wish list.

1.  Any size Heilman Box. The ultimate gift besides a full set of your favorite pastels is a great pastel box. I use and recommend the Heilman Box. Click here to see my recent review.

2. Any set of Terry Ludwig pastels. The ultimate pastel! This is my favorite pastel brand and any set would be a treat. If you are on a tight budget consider the smallest sets. The 14 Most Requested Violets is fantastic. All sets on sale through December 31. www.terryludwig.com

3. Cretacolor Pencil Lead holder. This fun drawing tool is a great addition to any artist's supply box. Read my recent blog post about this fun tool here. Find it here:https://www.amazon.com/Cretacolor-BC31036-Ergonomic-Lead-Holder/dp/B0049V37C4

4. Analaogous Color Wheel. Everyone who sees me use this color wheel wants one. It is a great tool for helping resolve color problems or choosing a palette for a painting. Read my blog post about the wheel here. http://kemstudios.blogspot.com/2015/11/my-favorite-color-tool-comes-to-rescue.html

5. White Artist Tape and Dispenser.  I can't do without my tape dispenser for my roll of white artists tape. it makes life so mush easier since I use this tape every day! Read all about it here: http://kemstudios.blogspot.com/2012/01/my-most-indispensable-studio-gadget.html
Buy one on Amazon click here.

7. Diane Townsend Pastels. I love all pastels but next to Terry Ludwigs I would have to add some Diane Townsend soft form pastels to my list of favorites. Add a few to your collection! http://www.townsendpastels.com

8. Art Graf Artist Tailor's Chalk. These are not at all like they sound! They are a must have for underpaintings. I love the earth tones and the primary color sets. Read about them on my blog here.
http://globalartmaterials.com/artgraf.php

9. Hand Care Basket. Artist hands take a beating! From handing pastels to the frequent hand washing they need a lot of TLC.  I like to first protect my hands with Gloves in a Bottle barrier cream.  I wash my hands with Lava soap and a nail brush. And finally I apply a good quality had cream. My favorite is Weleda Skin Food.

10. Sketchbook by Hand book Journal Co.  Just in time for starting a sketchbook habit. I love these little sketchbooks. They come interesting sizes that fit easily in your bag. Perfect for sketching on the go! http://www.globalartmaterials.com/travelogue.html

Do you have anything you would like to add to this list? Add them in the comments!